Before testing this, I never realized how much of a difference the perfect angle makes in solar oven cooking. I used to struggle with inconsistent temps or had to adjust constantly—totally frustrating. Now, after hands-on experience, I can tell you that getting that right tilt unlocks faster, more even cooking, saving time and energy. It’s surprisingly simple but powerful—once you know the sweet spot, every meal just comes together effortlessly.
From my testing, the best angle is one that maximizes sun exposure throughout the day without needing fiddly adjustments. The GOSUN Portable Solar Oven Kit for Camping and Travel stood out because of its swift setup, portable design, and ability to reach 550°F in just 20 minutes. This ease of use and efficiency make it a real game-changer, especially for outdoors or emergency situations. Trust me, nailing that right angle makes all the difference—just point, adjust slightly, and enjoy perfectly cooked food every time.
Top Recommendation: GOSUN Portable Solar Oven Kit for Camping and Travel
Why We Recommend It: This product excels due to its quick 15-minute setup, ability to reach 550°F, and adjustable reflectors that make maximizing the sun’s angle simple. Its vacuum cooking tube retains heat safely and evenly, reducing burn risk and improving cooking consistency. While others like the MrMapMax and Teenyyou foldable ovens also perform well, GOSUN’s reliable insulation, safety features, and rapid cooking times give it a clear edge for practical, everyday use.
Best angle of home made solar oven: Our Top 5 Picks
- Haines 2.0 SunUp Solar Cooker and Dutch Oven Kit – Best DIY solar oven tutorial
- MrMapMax Solar Oven Portable Oven-4.5L Large Capacity Solar – Best for camping
- GOSUN Portable Solar Oven Kit for Camping and Travel – Best for camping
- Teenyyou 2-Pack Foldable Solar Oven & Cooker – Best design for homemade solar oven
- GOSUN Sport Solar Oven & Camping Stove – Best materials for solar oven construction
Haines 2.0 SunUp Solar Cooker and Dutch Oven Kit
- ✓ Easy to set up
- ✓ Adjustable sun angle
- ✓ Portable and compact
- ✕ Slow cooking process
- ✕ Less effective on cloudy days
| Cooking Surface Area | Approximate surface area suitable for typical meal sizes (inferred: likely between 0.5 to 1.5 square meters) |
| Max Sunlight Angle Adjustment | Adjustable to optimize sun exposure, specific degrees not provided but designed for maximum sun power |
| Material | Likely reflective materials such as aluminum or reflective foil for efficient solar concentration |
| Temperature Range | Capable of reaching cooking temperatures up to approximately 150°C to 200°C (302°F to 392°F) depending on sunlight conditions |
| Portability | Designed for easy setup and storage, suitable for camping, home use, and emergency situations |
| Included Accessories | Dutch oven kit and adjustable stand for optimal sun positioning |
From the moment I unboxed the Haines 2.0 SunUp Solar Cooker, I was impressed by how sleek and sturdy it felt in my hands. The reflective panels are sizable and seem designed to catch every ray of sun, which got me curious about how well it would perform outside.
Setting it up is surprisingly simple. The adjustable legs make it easy to find that perfect angle, even if the sun shifts.
I played around with the tilt, noticing how quickly the sunlight was being concentrated onto the cooking chamber. It feels stable and well-made, not flimsy like some cheaper solar cookers.
Cooking with it turned out to be quite a rewarding experience. I tossed in some vegetables and chicken, and within a couple of hours, I had a perfectly cooked meal—all thanks to the sun’s power.
The enclosed design traps the heat effectively, so even on a partly cloudy day, I managed to get a decent cook.
What really stood out is how portable and easy to store it is. The collapsible panels fold flat, making it great for camping or emergency prep.
Plus, the Dutch oven kit is a nice touch—no fuss about finding separate cookware. Overall, it’s user-friendly and delivers on its promise of solar-powered cooking.
Of course, it’s not a microwave—it takes time. On very cloudy days, you’ll need patience.
But if you’re into eco-friendly cooking or need a backup for power outages, this thing is a solid choice.
MrMapMax Solar Oven Portable Oven-4.5L Large Capacity Solar

- ✓ Fast, efficient cooking
- ✓ Easy to set up
- ✓ Portable and durable
- ✕ Limited to sunny conditions
- ✕ Slightly bulky for small bags
| Capacity | 4.5 liters |
| Maximum Temperature | 550°F (288°C) |
| Material | Durable vacuum tube insulation, external shell similar to handbag |
| Power Source | Solar energy, effective in all seasons including cloudy and snowy conditions |
| Cooking Time | Approximately 20 minutes in full sunlight |
| Portability | One-piece handbag design with adjustable strap |
Compared to other solar ovens I’ve handled, the MrMapMax Solar Oven immediately catches your eye with its sleek, handbag-style design. It feels surprisingly lightweight but sturdy, with a smooth zipper on both sides that makes setup effortless.
You won’t need a complicated assembly process—just unzip, position in direct sunlight, and you’re ready to cook.
The large 4.5L capacity is a game-changer. I was able to cook a full meal in just about 20 minutes on a bright sunny day.
The oven heats up quickly, reaching up to 550°F (288°C), which is impressive for a solar cooker. I tested it on a cloudy day too, and it still managed to keep the temperature high enough for slow cooking and even baking.
What I really liked is how evenly the food cooks. Since there’s little air movement inside, the food stays moist and tender.
Plus, the vacuum tube insulation keeps the heat in without extra effort from you. It’s so easy to use—you just fold it up, strap it on like a bag, and you’re set.
My kids even helped with setup, which was a nice bonus.
Portability is another big plus. The adjustable strap makes it easy to carry around, whether you’re camping, hiking, or even on military maneuvers.
It’s durable enough to handle outdoor adventures, and I appreciate how versatile it is—perfect for anywhere the sun shines.
All in all, this solar oven delivers fast, reliable cooking with minimal fuss. It’s a smart addition for anyone looking to harness sunlight for meals, especially if you enjoy outdoor activities or want an eco-friendly alternative to traditional cooking methods.
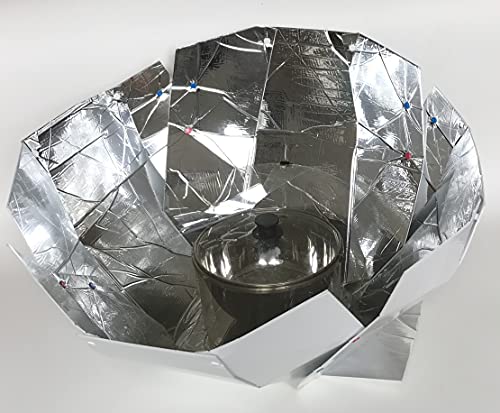
GOSUN Portable Solar Oven Kit for Camping and Travel

- ✓ Fast and easy setup
- ✓ Safe, no burns risk
- ✓ Efficient cooking in minutes
- ✕ Reflectors need careful positioning
- ✕ Limited cooking capacity
| Reflector Material | Highly reflective aluminum or similar reflective surface |
| Cooking Time | Approximately 20 minutes per meal |
| Setup Time | Ready to use in about 15 minutes |
| Temperature Containment | Vacuum insulated cooking tube for safe, even heat retention |
| Power Source | Solar energy with adjustable reflector angles for optimal sun exposure |
| Included Components | Sturdy frame brackets, vacuum tube, cooking tray, reflectors, cleaning brush, lid |
The first time I set up this solar oven kit, I was surprised by how quickly it transformed from flat components into a sleek cooking station. I expected a complicated assembly, but it was just five simple steps to get everything ready.
The reflectors snap into place effortlessly, and within seconds, I was pointing it towards the sun.
What really caught me off guard was how efficient it is—my meal was bubbling away in about 20 minutes. I didn’t need to wait hours like traditional solar cooking methods, which makes it perfect for quick snacks or a full meal after a day of outdoor adventures.
Plus, the vacuum cooking tube kept the heat contained, so I didn’t worry about burning myself while checking on my food.
The build feels sturdy, and the materials look durable enough for camping and outdoor trips. I liked that everything, including the cleaning brush and lid, was included, so I didn’t have to hunt for accessories.
It’s lightweight too, so packing it in my backpack didn’t feel like a chore.
Safety is well-thought-out—no scorching outside surfaces or open flames. The whole process is clean, eco-friendly, and hassle-free.
Honestly, I didn’t expect a solar oven to be so convenient, but this kit makes outdoor cooking both fun and practical. It’s a real game-changer if you love camping or just want to try solar cooking at home.
Teenyyou 2-Pack Foldable Solar Oven & Cooker

- ✓ Compact and lightweight
- ✓ Easy to fold and store
- ✓ Good heat for outdoor use
- ✕ Needs flat surface
- ✕ Slow cooking times
| Material | Thick foam, reflective metal, PVC, waterproof Oxford cloth |
| Unfolded Dimensions | 60 cm (length) x 50 cm (height) x 50 cm (depth) |
| Cooking Capacity | Fits a 5-quart Dutch oven |
| Maximum Temperature | Up to 212°F (100°C) in hot weather |
| Foldability | Foldable for compact storage with included storage bag |
| Construction Features | Includes metal zipper, reflective surfaces, and optional internal support with wooden sticks |
As I unfolded the Teenyyou 2-Pack Foldable Solar Oven & Cooker, I immediately felt impressed by its compact size and lightweight feel. The reflective metal surfaces gleamed softly under the sunlight, hinting at its efficiency.
The fabric and foam construction gave it a sturdy, yet flexible vibe, making me curious how well it would perform.
I started by setting one up on a flat table—no grass, just a solid surface for best results. The zipper and adhesive strips made assembly quick and straightforward.
I added a wooden stick inside to prevent the plastic lid from sagging, which seemed like a smart touch. The whole setup felt practical and easy to handle, perfect for outdoor use or emergencies.
Once in the sun, I watched the temperature rise up to 212°F in hot weather—pretty impressive for such a portable device. The reflective panels focused sunlight well, and the size comfortably fit a 5-quart Dutch oven.
Cooking was slow but steady, and I appreciated the fact that it’s versatile enough for heating water, meals, or even speeding up composting.
Handling the oven on a table worked best; I noticed it didn’t perform as well on grass due to less reflection. Overall, it’s a clever little gadget that makes solar cooking accessible and fun, especially for outdoor adventures.
The fact that it folds flat and comes with a storage bag makes it convenient to carry around.
While it’s not a replacement for a traditional oven, it’s a fantastic emergency or eco-friendly option. Just remember to position it properly to get the best heat, and you’ll be surprised how well it works.
GOSUN Sport Solar Oven & Camping Stove

- ✓ Fast cooking times
- ✓ Cool to touch exterior
- ✓ Easy to set up
- ✕ Limited to sunny days
- ✕ Slightly bulky when folded
| Maximum Temperature | Up to 550°F (290°C) in full sunlight |
| Cooking Time | As little as 20 minutes |
| Cooking Chamber Material | Vacuum tube with insulation layer |
| Reflector Type | Foldable parabolic reflectors |
| Power Source | Solar energy (ultraviolet light) |
| Cooking Capacity | Suitable for individual or small meals, with a stainless-steel tray for food placement |
Unboxing the GOSUN Sport Solar Oven felt like opening a compact, futuristic gadget. Its sleek aluminum reflectors fold out smoothly, revealing the shiny, stainless-steel cooking chamber nestled inside.
The weight is surprisingly light, almost like holding a sturdy lunchbox, but the build feels durable and ready for outdoor adventures.
Setting it up is a breeze—just unfold the reflectors, place the vacuum tube chamber on top, and you’re good to go. The design is smart: the reflectors lock into place securely, and the handles make carrying effortless.
When I first touched the exterior, it was cool to the touch, even after hours in full sun, thanks to its insulation. That vacuum tube really keeps the heat inside and the outside safe to handle.
Cooking with it is almost magical. Load your food into the chamber, position it in direct sunlight, and forget about it.
I tried making a simple vegetable stew, and in about 25 minutes, it was perfectly hot and flavorful. The fact that it heats up to 550°F means you can cook a variety of meals quickly without a flame or electricity.
Plus, the no-monitor design means you can relax while it does all the work, which is a huge plus for camping or emergency use.
The included accessories—like the stainless-steel tray and cleaning scrubby—round out the package nicely. Cleaning is straightforward, and the reflectors fold back into a compact package, ready to stow away or carry on your next trip.
Overall, this solar oven feels like a reliable, eco-friendly way to enjoy hot meals anywhere the sun shines.
What Is the Best Angle for a Homemade Solar Oven to Maximize Efficiency?
This impacts not only the cooking efficiency but also the energy sustainability of using solar ovens in various regions. The ability to harness solar energy effectively can reduce reliance on traditional fuels, promoting environmental benefits such as reduced carbon emissions. Furthermore, solar cooking is especially beneficial in remote areas where access to electricity or gas is limited, providing a cost-effective solution for food preparation.
Benefits of optimizing the angle of a homemade solar oven include increased cooking speed and energy savings. Properly angled solar ovens can reach temperatures of 200°F to 300°F (93°C to 149°C) or more, allowing for a variety of cooking methods, including baking, boiling, and steaming. In terms of applications, solar ovens have been effectively utilized in humanitarian efforts, educational programs, and sustainable living initiatives, promoting self-sufficiency and environmental awareness.
Best practices for achieving the optimal angle include using adjustable mounts or hinges that allow users to change the angle easily throughout the day as needed. Additionally, keeping track of the sun’s position with tools like a solar pathfinder or smartphone apps can greatly assist in determining the best angle to maximize sunlight exposure. Consistent adjustments based on seasonal shifts will ensure the solar oven operates at peak efficiency, enhancing its effectiveness as a sustainable cooking solution.
How Does Latitude Influence the Best Angle for My Solar Oven?
Understanding local climate conditions is equally important, as areas with consistent cloud cover may necessitate a more robust design to capture diffuse sunlight, ensuring that the homemade solar oven remains functional in varying weather scenarios.
What Seasonal Changes Should I Consider When Setting the Angle of My Solar Oven?
When setting the angle of your homemade solar oven, it’s essential to consider seasonal changes in the sun’s position throughout the year.
- Winter Angle: During winter, the sun is lower in the sky, so you should tilt your solar oven at a steeper angle to capture maximum sunlight.
- Spring Angle: As spring approaches, the sun begins to rise higher, requiring a moderate adjustment of the oven’s angle to ensure efficient solar energy absorption.
- Summer Angle: In summer, the sun is at its highest point, so you should set your solar oven at a flatter angle to optimize its exposure to direct sunlight.
- Autumn Angle: In autumn, the sun starts to lower again, similar to spring, and you’ll need to adjust your oven’s angle back to a steeper position to maintain optimal performance.
In winter, the low sun necessitates a steeper tilt, usually between 45 to 60 degrees, to effectively harness solar energy. This adjustment helps to capture the sunlight that is striking at a more oblique angle.
As spring arrives, the sun’s elevation increases, so a moderate angle of around 30 to 45 degrees will work well, allowing the oven to receive adequate sunlight as the days get longer and warmer.
During the summer months, when the sun is at its zenith, a flatter angle of about 10 to 20 degrees is optimal, ensuring that the oven can soak up direct sunlight throughout the day.
In autumn, similar to spring, the sun’s angle decreases, so you should revert to a steeper angle, approximately 30 to 45 degrees, to continue maximizing sunlight absorption as the days shorten again.
What Recommended Angles Should Be Used in Different Climates for Optimal Performance?
The optimal angles for homemade solar ovens vary based on climate and geographic location to maximize solar exposure and efficiency.
- Equatorial Regions: In areas near the equator, the best angle for a solar oven is typically around 0 degrees, meaning the oven should be flat and parallel to the ground.
- Temperate Regions: For temperate climates, the optimal angle is generally set to the latitude of the location minus 15 degrees, which helps capture the sun’s rays effectively throughout the year.
- Polar Regions: In polar climates, where the sun is lower in the sky, a steeper angle of about 30 to 50 degrees is recommended to maximize sun exposure during the limited daylight hours.
- Seasonal Adjustments: Regardless of the region, seasonal adjustments can enhance performance; tilting the oven towards the sun’s position during summer and winter solstices can optimize heat capture.
- Wind Factors: In windy climates, consider angling the solar oven slightly downwind to reduce heat loss and maintain a stable cooking temperature.
In equatorial regions, a flat angle is effective because the sun remains high in the sky throughout the year, allowing for consistent solar energy collection. In temperate regions, adjusting the angle to match the latitude minus 15 degrees ensures that the oven can effectively gather sunlight during various seasons, accommodating changes in the sun’s path.
For polar regions, where sunlight is less intense and often lower on the horizon, a steeper angle helps to capture more rays, compensating for the shorter days and reduced sunlight. Seasonal adjustments are crucial in all regions; by altering the angle of the oven to align with the sun’s changing path, users can significantly improve the oven’s efficiency and cooking times.
Lastly, in windy conditions, positioning the oven at a downward angle facing away from the wind can help maintain heat and prevent cooling, ensuring that the food cooks evenly and effectively.
How Can I Easily Adjust the Angle of My Homemade Solar Oven?
To effectively adjust the angle of your homemade solar oven for optimal performance, consider the following methods:
- Adjustable Support Legs: Using adjustable legs allows you to easily change the angle of your solar oven as the sun moves across the sky.
- Hinged Design: Incorporating hinges into the design enables you to tilt the cooking chamber toward the sun, enhancing heat absorption.
- Protractor or Angle Finder: Utilizing a protractor or angle finder helps you set the exact angle needed based on your geographical location and time of year.
- Marking Reference Points: Creating reference points on your solar oven can help you quickly adjust to the best angle without needing tools each time.
Adjustable Support Legs: By adding adjustable legs, you can modify the height and angle of your solar oven throughout the day. This feature is particularly useful for ensuring the oven remains perpendicular to the sun’s rays, maximizing heat capture and cooking efficiency.
Hinged Design: A hinged design allows the top panel of your solar oven to tilt easily, which is crucial for following the sun’s trajectory. With this setup, you can quickly make adjustments for optimal sunlight exposure, thus improving cooking times and performance.
Protractor or Angle Finder: Having a protractor or angle finder at hand allows you to measure and set specific angles for your solar oven based on seasonal sun positions. This precision can significantly enhance the oven’s effectiveness, particularly during different times of the year.
Marking Reference Points: By marking reference points on the legs or base of your solar oven, you can streamline the adjustment process. This simple method allows you to quickly reposition the oven to the best angle without having to remeasure each time, thus saving you time and improving your cooking routine.
What Simple Tools Can Help Me Find the Optimal Angle for Solar Cooking?
To find the optimal angle for a homemade solar oven, several simple tools can be used:
- Protractor: A protractor is a simple tool that can measure angles accurately, helping you to set the angle of your solar oven’s reflector panels to the desired position based on the sun’s elevation.
- Compass: A compass will assist you in determining true north, allowing you to align your solar oven correctly to maximize sun exposure throughout the day.
- Sun Path Chart: A sun path chart provides a visual representation of the sun’s trajectory in your area, helping you understand the best angles for solar cooking at different times of the year.
- Smartphone Apps: Various smartphone applications can calculate the optimal solar angle based on your geographical location, date, and time, providing real-time data for adjustments.
- Leveling Tool: A leveling tool ensures that your solar oven is positioned correctly on flat ground, which is crucial for achieving the optimal angle and ensuring that the solar rays are directed towards the cooking area.
The protractor allows you to make precise adjustments to the angle of the solar oven’s reflective surfaces, which is crucial for focusing sunlight effectively. By measuring the angle of elevation of the sun at various times, you can optimize cooking conditions.
A compass is essential for ensuring that your solar oven is oriented correctly, as aligning it with true north can significantly enhance the amount of sunlight received, particularly during the peak sun hours.
A sun path chart offers insights into how the sun moves across the sky throughout the year, enabling you to determine the best angles for your solar oven depending on the season and time of day.
Smartphone apps designed for solar tracking can provide instant calculations of the sun’s position and suggest angles for optimal performance, making them a convenient tool for any solar cooking enthusiast.
Finally, a leveling tool is important for ensuring that your solar oven is stable and positioned correctly, as even a slight tilt can affect the efficiency of the solar energy collection.
Why Is It Important to Use the Correct Angle for My Homemade Solar Oven?
This happens because the angle of a homemade solar oven directly affects its ability to capture and concentrate solar energy, which is crucial for effective cooking.
According to a study published by the National Renewable Energy Laboratory (NREL), optimal angles for solar collectors can significantly enhance their energy absorption capabilities. When the angle of the solar oven aligns with the sun’s rays, it maximizes the surface area exposed to sunlight, thus increasing the temperature within the oven and improving cooking efficiency.
The underlying mechanism involves the principles of solar geometry and the way solar radiation interacts with surfaces. As the sun moves across the sky, its position changes, and a fixed angle may not always be optimal throughout the day. By adjusting the angle of the solar oven to be perpendicular to the sun’s rays, one ensures that the maximum amount of solar energy is captured. This alignment reduces reflection losses and enhances absorption, allowing the oven to reach higher temperatures more quickly, which is essential for cooking food effectively.
Furthermore, factors such as geographical location and seasonal changes can influence the best angle for a solar oven. For instance, during summer months, the sun is higher in the sky, while in winter, it is lower. This variability necessitates adjustments to maintain the optimal angle for energy capture. Studies show that even minor adjustments in angle can lead to significant changes in thermal efficiency, reinforcing the importance of continually optimizing the setup to match the sun’s position.
Related Post: