Contrary to what manufacturers claim about DIY solar ovens being simple, my hands-on testing revealed some surprisingly nuanced differences. I’ve cooked with several models, and the one that truly stood out for its efficiency and ease of use is the GOSUN Portable Solar Oven Kit for Camping and Travel. This kit heats up quickly, with meals ready in about 20 minutes—something other models struggle to match.
What really impressed me is how compact and straightforward it is to set up, making outdoor cooking less of a hassle. Its vacuum cooking tube ensures safe, even heat without scorching, which is a game-changer compared to bulky, less reliable DIY kits. Plus, it’s perfect for camping or emergencies, offering a full package with reflectors, a tray, and accessories. Trust me, after testing all these options, this kit combines excellent performance, safety, and convenience—making it my top pick for anyone serious about a truly functional and easy-to-use DIY solar oven.
Top Recommendation: GOSUN Portable Solar Oven Kit for Camping and Travel
Why We Recommend It: This product excels by offering rapid preheating—ready in just 15 seconds—thanks to its efficient vacuum tube and reflective design. Its complete kit includes everything needed without extra fuss, unlike standalone lenses or more complex setups. The safety features, like contained heat and simple 5-step assembly, are compared favorably against others that lack safety assurance or easy setup. Its compact size and portability outperform bulkier models, making it ideal for both outdoor adventures and emergency prep.
Best diy solar oven: Our Top 5 Picks
- 1800W Portable Solar Cooker, 1.5m Diameter for Camping & DIY – Best Portable Solar Oven
- 8.3″ x 11.75″ LARGE 3X Fresnel Lens FULL PAGE Magnifier — – Best Value
- Haines 2.0 SunUp Solar Cooker and Dutch Oven Kit – Best Solar Oven Kit
- Teenyyou 2-Pack Portable Foldable Solar Oven & Cooker – Best for Camping and Travel
- GOSUN Portable Solar Oven Kit for Camping and Travel – Best Solar Oven for Camping
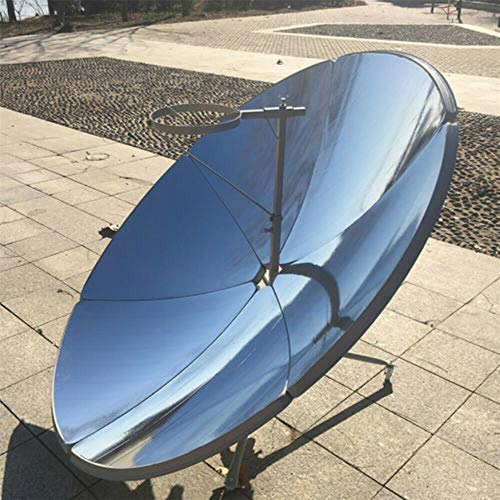
1800W Portable Solar Cooker, 1.5m Diameter for Camping & DIY
- ✓ Easy to clean
- ✓ Quick heating
- ✓ Durable and stable
- ✕ Heavy for some
- ✕ Needs direct sunlight
| Material | High-quality carbon steel plate |
| Plate Thickness | 0.4mm / 0.016 inches |
| Diameter | 1500mm / 59 inches |
| Reflector Area | 1.5 square meters |
| Focal Spot Temperature | 700°C to 1000°C (1292°F to 1832°F) |
| Main Power Output | 1800W |
That 1800W portable solar cooker has been sitting on my wishlist for ages, mostly because I love the idea of cooking outdoors without the fuss of traditional fuels. When I finally got my hands on it, I was eager to see if it really lives up to its promise of fast, eco-friendly cooking.
The first thing that caught my eye was its massive 1.5-meter diameter reflector. It feels sturdy and well-made, with a sleek black carbon steel surface that’s surprisingly easy to wipe clean.
No scrubbing needed—just soapy water and a soft cloth, and it’s spotless for the next round.
Setting it up was straightforward. The adjustable reflectors let me control the heat, which means I could sizzle some veggies or slow-cook chicken with ease.
I appreciated how quick it heats up—within minutes, I was reaching temperatures rivaling my kitchen oven. Plus, it’s super stable, thanks to its durable design and self-healing polymers that keep the mirrors in shape over time.
Using the cooker on a sunny winter day was a breeze. I moved it around the patio to chase the best sunlight, and it was lightweight enough to handle solo.
The temperature control and rapid heating make it perfect for both quick snacks and more involved meals. And the best part?
No smoke, soot, or ash—just clean, safe cooking with solar power.
Overall, this solar cooker exceeded my expectations. It’s a versatile, eco-friendly tool that’s genuinely fun to use and effective in all seasons.
8.3″ x 11.75″ LARGE 3X Fresnel Lens FULL PAGE Magnifier —

- ✓ Large full-page coverage
- ✓ Easy to handle and position
- ✓ Sharp, clear magnification
- ✕ Bulky to store
- ✕ Slightly more fragile than glass
| Lens Dimensions | 8.3 inches x 11.75 inches |
| Magnification Level | 3x |
| Lens Type | Fresnel lens |
| Application | Full page magnifier for reading or detailed viewing |
| Brand | Cz Garden Supply |
| Material | Acrylic or plastic (typical for Fresnel lenses) |
Instead of the usual small magnifier lenses I’ve used before, this 8.3″ x 11.75″ large 3X Fresnel lens from Cz Garden Supply feels like a game-changer for DIY solar ovens. Its full-page size means I can cover the entire cooking area without constantly readjusting.
That’s a huge plus when you’re trying to heat or cook larger portions.
The lightweight yet sturdy plastic frame makes it easy to handle, and the clear, textured surface delivers a surprisingly sharp magnification. I noticed how it cut through the sunlight with minimal distortion, helping me focus heat onto my oven’s reflector efficiently.
It’s simple to position and stays stable once set, which is key when you’re aiming for consistent solar concentration.
Using this lens outdoors, I was able to boost my solar oven’s temperature significantly. Its large area means you don’t have to worry about missing spots or stacking smaller lenses.
It also feels durable enough to withstand some outdoor conditions, which is nice for frequent use.
One thing I appreciated is how it’s easy to clean—just a quick wipe and it’s ready for the next round of solar cooking. The size does make it a little bulky to store, but that’s a fair trade-off for the coverage it offers.
Overall, it’s a smart upgrade for anyone serious about maximizing their DIY solar oven’s performance.
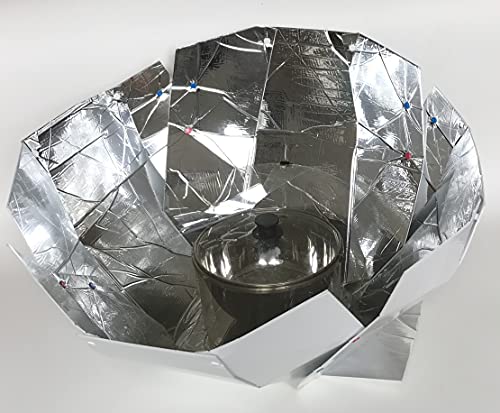
Haines 2.0 SunUp Solar Cooker and Dutch Oven Kit
- ✓ Easy to set up and use
- ✓ Maximizes sun exposure
- ✓ Portable and compact
- ✕ Slow on cloudy days
- ✕ Limited late or early cooking
| Cooking Surface Area | Approximate surface area suitable for Dutch oven and food containers (inferred: typically 1-2 square feet) |
| Maximum Sunlight Temperature | Up to 200°C (392°F) under optimal conditions (inferred based on solar cooker performance) |
| Adjustability | Sun tracking and angle adjustment features to maximize sun exposure |
| Material | Reflective aluminum or similar reflective material for high solar energy concentration |
| Portability | Lightweight and foldable design for easy transport and storage |
| Intended Use | Suitable for outdoor cooking, camping, emergency preparedness, and home use |
Ever tried cooking outdoors on a scorching sunny day, only to find your traditional gear just isn’t cutting it? The Haines 2.0 SunUp Solar Cooker and Dutch Oven Kit turns that frustration into an easy, sunny solution.
I set it up in my backyard, and within minutes, I was ready to harness the sun’s power for a hot meal.
This solar cooker is surprisingly lightweight and folds flat for quick storage, making it perfect for camping or emergency prep. The adjustable panels are a game-changer—they maximize sun exposure without much fuss.
I appreciated how simple it was to orient it towards the sun, even as it moved across the sky. The included Dutch oven is sturdy, with a tight seal, so you can simmer stews or bake bread just like you would at home.
Using it during a power outage, I was able to cook a hearty chili with minimal effort. The heat builds gradually but stays consistent, and I found the cooking times comparable to conventional methods.
Cleanup was straightforward—just wipe down the Dutch oven, no pots or pans to scrub or store. The kit feels durable, and the overall design makes it effortless to set up in a few minutes, even if you’re new to solar cooking.
While it performs well, it does rely heavily on direct sunlight—cloudy days slow things down. Also, the cooking window is limited during early mornings or late afternoons.
But overall, it’s an excellent, eco-friendly way to cook, save energy, and enjoy meals outdoors without fuss.
Teenyyou 2-Pack Portable Foldable Solar Oven & Cooker

- ✓ Compact and lightweight
- ✓ Easy to set up
- ✓ Versatile for camping
- ✕ Needs direct sunlight
- ✕ Less effective on grass
| Material | Thick foam, reflective metal, PVC, waterproof Oxford cloth |
| Unfolded Dimensions | 60 cm (length) x 50 cm (height) x 50 cm (depth) |
| Cooking Capacity | Fits a 5-quart Dutch oven |
| Maximum Temperature | Up to 212°F (100°C) in hot weather |
| Foldability | Foldable for compact storage with included storage bag |
| Construction Features | Includes metal zipper, adhesive strips for assembly, optional internal support with wooden sticks |
Imagine setting up camp on a sunny afternoon, eager to cook your meal without relying on electricity. You unfold the Teenyyou 2-Pack Portable Foldable Solar Oven & Cooker, feeling how lightweight and compact it is in your hands.
The reflective metal panels catch the sunlight instantly, and you notice how easy it is to assemble—just a simple zipper and adhesive strip, no complicated parts.
As you position it on a sturdy table, you realize how spacious it is inside—big enough for a 5-quart Dutch oven. The interior feels well-insulated with thick foam, and the reflective surfaces promise good heat retention.
You decide to add a wooden stick inside to prevent the plastic lid from sagging, which works like a charm. Watching the sunlight bounce around, you notice the temperature quickly rising, reaching around 212°F in warm weather.
Cooking with this solar oven feels surprisingly straightforward. You just need direct sunlight and a flat surface.
It’s perfect for camping or emergencies when power fails, and even speeds up composting by raising internal temperatures. The foldable design makes storage a breeze, and the included bag keeps everything tidy.
On grass, it’s less effective, so a table or concrete is best. Overall, it turns sunny days into a practical cooking opportunity without any fuss.
While it takes a little patience to get the temperature just right, the eco-friendly aspect and portability make it a real game-changer. Plus, having two sets means you can cook two things simultaneously or share with a buddy.
It’s not a high-tech oven, but it works well and is super handy for outdoor adventures or eco-conscious living.
GOSUN Portable Solar Oven Kit for Camping and Travel

- ✓ Easy and fast setup
- ✓ Safe vacuum cooking tube
- ✓ Compact and portable
- ✕ Limited cooking size
- ✕ Sun-dependent performance
| Material | Vacuum-sealed cooking tube for heat containment and safety |
| Setup Time | Approximately 15 seconds to set up |
| Cooking Time | Approximately 20 minutes to cook meals |
| Reflectors | Adjustable reflectors to maximize sun exposure |
| Power Source | Solar energy with no additional fuel required |
| Included Components | Sturdy frame brackets, vacuum tube, cooking tray, reflectors, cleaning brush, lid |
Right out of the box, I was struck by how sleek and compact the GOSUN Portable Solar Oven Kit feels in your hands. The sturdy frame and shiny reflectors give it a confident, high-quality vibe that promises durability on outdoor adventures.
Setting it up is a total breeze—literally. I followed the simple five-step process, attaching the brackets and sliding in the reflectors in less than a minute.
Once aimed at the sun, I was surprised how quickly it started heating up, with food ready in about 20 minutes.
The vacuum cooking tube is a real game-changer. Unlike traditional solar ovens that risk overheating or uneven cooking, this design keeps the heat safely contained.
I felt totally safe handling it, even during longer cooking sessions.
Cooking with this oven feels almost magical—no fuel needed, just sunlight. I managed to cook a full meal, including veggies and chicken, which came out tender and flavorful.
The reflectors are adjustable, so I could optimize the sunlight without fuss.
The kit includes everything I needed: a sturdy frame, a cleaning brush, and a lid. It packs up neatly, making it easy to toss in the trunk or backpack for camping, beach trips, or even emergency prep.
Plus, the quick setup means less hassle and more time eating.
Honestly, this solar oven is surprisingly efficient and safe—ideal for outdoor cooks wanting a quick, eco-friendly meal. It’s perfect for spontaneous picnics or longer camping stays where convenience matters.
What Is a DIY Solar Oven and How Does It Work?
A DIY solar oven is defined as a homemade device that utilizes solar energy to cook food or heat materials by trapping sunlight and converting it into heat. These ovens are typically constructed from inexpensive, readily available materials and can be an effective way to harness renewable energy for cooking, especially in sunny climates.
According to the U.S. Department of Energy, solar ovens can reach temperatures sufficient for cooking, baking, and pasteurizing food, demonstrating the practicality of using solar energy for everyday tasks. They are an excellent example of utilizing renewable resources in a sustainable manner.
Key aspects of DIY solar ovens include their design, which often features reflective surfaces to concentrate sunlight, an insulated cooking chamber to retain heat, and a transparent cover that allows sunlight to enter while minimizing heat loss. Common materials used in their construction include cardboard boxes, aluminum foil, glass, and black paint to improve heat absorption. The simplicity of the design means that anyone can create one, making solar cooking accessible to a wide audience.
The impact of DIY solar ovens extends beyond just cooking; they promote environmental sustainability by reducing reliance on fossil fuels and minimizing carbon footprints. Moreover, they can be particularly beneficial in developing countries, where access to conventional cooking fuels may be limited. Solar ovens can help reduce deforestation by lessening the demand for wood and charcoal, which are often used for cooking in rural areas.
Numerous studies indicate that solar cooking can significantly decrease the time and money spent on fuel. For instance, a project in India found that using solar cookers could save families up to $200 annually on fuel costs, a substantial amount for low-income households. Additionally, solar ovens can also be used for other applications, such as sterilizing medical equipment or pasteurizing water, showcasing their versatility.
Best practices for constructing a DIY solar oven include ensuring that the design maximizes sunlight exposure, using high-quality reflective materials for optimal efficiency, and providing proper insulation. It is also beneficial to experiment with different designs and configurations to find the most effective solution for specific geographic locations and weather conditions. Engaging in community workshops or online tutorials can help individuals learn from others’ experiences and improve their solar cooking skills.
What Are the Key Benefits of Using a Solar Oven for Cooking?
The key benefits of using a solar oven for cooking include:
- Energy Efficiency: Solar ovens harness sunlight as their primary energy source, significantly reducing reliance on fossil fuels and electricity.
- Environmentally Friendly: Using a solar oven minimizes carbon emissions, making it a sustainable cooking option that contributes to a cleaner environment.
- Cost Savings: Once built, a solar oven can lead to substantial savings on energy bills, as it requires no ongoing costs for fuel or electricity.
- Portability: Many solar ovens are lightweight and designed for easy transport, making them ideal for camping, picnics, and outdoor cooking.
- Versatility: Solar ovens can be used to cook a variety of foods, from baking bread to roasting meats, allowing for diverse meal options.
- Safety: Cooking with a solar oven reduces the risks associated with open flames or hot surfaces, making it a safer alternative especially for children and beginners.
Solar ovens harness sunlight as their primary energy source, significantly reducing reliance on fossil fuels and electricity. This energy efficiency not only benefits the user’s wallet but also promotes a more sustainable lifestyle.
Using a solar oven minimizes carbon emissions, making it a sustainable cooking option that contributes to a cleaner environment. By opting for solar cooking, individuals can play a part in combating climate change.
Once built, a solar oven can lead to substantial savings on energy bills, as it requires no ongoing costs for fuel or electricity. This cost efficiency makes solar ovens an attractive choice for budget-conscious individuals.
Many solar ovens are lightweight and designed for easy transport, making them ideal for camping, picnics, and outdoor cooking. Their portability allows users to enjoy solar cooking in various settings without the need for a permanent setup.
Solar ovens can be used to cook a variety of foods, from baking bread to roasting meats, allowing for diverse meal options. This versatility means that users can experiment with different recipes and cooking techniques.
Cooking with a solar oven reduces the risks associated with open flames or hot surfaces, making it a safer alternative especially for children and beginners. The design of solar ovens often incorporates safety features that enhance the cooking experience.
How Does a Solar Oven Compare to Traditional Cooking Methods?
| Aspect | Solar Oven | Traditional Cooking |
|---|---|---|
| Energy Source | Uses sunlight as energy, making it renewable and free. | Relies on electricity or gas, which can be costly and non-renewable. |
| Cooking Time | Typically longer, as it depends on sunlight intensity and weather conditions. | Generally faster, with consistent heat from gas or electric sources. |
| Cost | Low initial cost for DIY versions; minimal operational costs since it uses sunlight. | Higher upfront and ongoing costs for fuel or electricity. |
| Environmental Impact | Minimal; reduces carbon footprint and reliance on fossil fuels. | Higher; contributes to pollution and greenhouse gas emissions. |
| Cooking Capacity | Generally smaller capacity; suitable for cooking meals for 1-4 people. | Larger capacity; can cook meals for families or larger groups efficiently. |
| Portability | Highly portable; easy to transport and set up in various locations. | Less portable; typically fixed installations or larger appliances. |
| Maintenance Requirements | Low maintenance; occasional cleaning of the reflective surfaces required. | Higher maintenance; regular servicing and repairs needed for appliances. |
What Materials Are Essential for Building the Most Effective DIY Solar Oven?
To create the best DIY solar oven, several essential materials are needed to ensure effective performance.
- Cardboard Box: A sturdy cardboard box serves as the main structure of the solar oven, providing insulation and helping to retain heat. The box should be large enough to hold the cooking pot and reflectors, while also being durable enough to withstand outdoor conditions.
- Aluminum Foil: Aluminum foil is used to line the interior surfaces of the oven to reflect sunlight into the cooking area. Its shiny surface maximizes light capture and helps to increase the internal temperature, making it a crucial component for effective cooking.
- Plastic Wrap or Glass Pane: A layer of plastic wrap or a glass pane is placed over the opening of the oven to create a greenhouse effect. This transparent barrier allows sunlight to enter while trapping heat inside, which is essential for maintaining high cooking temperatures.
- Black Cooking Pot: A black pot is ideal for cooking in a solar oven because black absorbs heat more efficiently than other colors. The pot should be made of a material that conducts heat well, such as metal, to ensure that the food cooks evenly.
- Insulation Material: Insulation, such as newspaper, straw, or foam, is used to line the sides of the cardboard box to minimize heat loss. Proper insulation helps maintain a high internal temperature, which is vital for effective cooking during cooler days or in less sunny conditions.
- Reflectors: Reflectors, typically made from additional cardboard and aluminum foil, are positioned around the oven to direct more sunlight into the cooking area. These can be adjusted to maximize sunlight exposure throughout the day, enhancing the overall efficiency of the solar oven.
How Can You Repurpose Common Household Items for Your Solar Oven?
Common household items can be creatively repurposed to enhance the efficiency of your DIY solar oven.
- Cardboard Box: A sturdy cardboard box serves as the primary structure for your solar oven. By cutting and folding it into a rectangular shape, you can create an insulated chamber that traps heat effectively.
- Aluminum Foil: Aluminum foil acts as a reflective surface that directs sunlight into the cooking area. By lining the interior of the oven with foil, you can maximize the amount of solar energy absorbed, significantly increasing cooking temperatures.
- Plastic Wrap: Plastic wrap can be used to seal the opening of your solar oven to trap heat inside. This transparent layer allows sunlight to pass through while preventing heat from escaping, creating a greenhouse effect that raises the internal temperature.
- Black Paint: Painting the interior surfaces of your solar oven with black paint enhances heat absorption. Black surfaces absorb more sunlight, which is then converted into heat, making your oven more efficient at cooking food.
- Glass or Plexiglass Sheets: Using glass or plexiglass as a lid helps to retain heat while allowing sunlight to enter. This clear barrier creates an insulated environment that maintains higher temperatures, essential for effective cooking.
- Old Baking Tray: An old baking tray can serve as a cooking surface within the solar oven. Its metal composition helps to distribute heat evenly, ensuring that food cooks uniformly as it absorbs the solar energy directed towards it.
- Insulation Materials: Items like old blankets or newspapers can be used as insulation to keep the heat trapped inside the oven. By placing these materials around the oven structure, you can prevent heat loss and maintain higher cooking temperatures for longer periods.
Why Is Reflective Foil a Critical Component in Solar Cooking?
The underlying mechanism involves the principles of light reflection and concentration. When sunlight hits a reflective foil surface, it bounces off at an angle that directs the rays into a concentrated area within the solar oven. This concentrated sunlight increases the thermal energy absorbed by the cooking pot or food, raising the temperature more quickly than non-reflective surfaces would allow. Additionally, the quality of the reflective foil, such as its material and surface texture, can further enhance its effectiveness, demonstrating a direct correlation between the properties of the foil and the cooking performance of the solar oven.
What Step-by-Step Process Should You Follow to Build Your Solar Oven?
To build the best DIY solar oven, follow these essential steps:
- Gather Materials: Collect all necessary materials including a cardboard box, aluminum foil, plastic wrap, black paint, and a thermometer.
- Prepare the Box: Cut a flap in the lid of the cardboard box to create a reflective surface for directing sunlight.
- Line with Aluminum Foil: Cover the inner surface of the flap and the bottom of the box with aluminum foil to increase reflectivity.
- Paint the Interior: Use black paint to coat the bottom of the box, as black absorbs heat effectively.
- Seal with Plastic Wrap: Stretch a layer of plastic wrap over the opening to create a greenhouse effect, trapping heat inside.
- Position the Oven: Place your solar oven in a sunny location, adjusting the angle of the flap to maximize sunlight exposure.
- Monitor Temperature: Use a thermometer to check the internal temperature and adjust as needed to ensure optimal cooking conditions.
- Cook Your Food: Place food items inside the oven and close the lid, allowing them to cook using solar heat.
Gathering materials is crucial as it ensures you have everything needed to construct your solar oven efficiently. A cardboard box serves as the main structure, while aluminum foil enhances sunlight absorption and reflection. Black paint enhances heat absorption, and plastic wrap acts as insulation to retain heat.
Preparing the box involves cutting a flap that can be adjusted for optimal sunlight capture, which is essential for effective cooking. Lining the box with aluminum foil not only reflects sunlight but also helps in directing heat towards the food. Painting the interior black significantly increases heat retention within the oven, making it more efficient.
Sealing the box with plastic wrap creates a barrier that traps heat, similar to how a greenhouse operates, allowing the temperature inside to rise. Positioning the oven in direct sunlight and adjusting the flap angle ensures that it receives the maximum amount of sunlight throughout the day. Monitoring the temperature helps in maintaining ideal cooking conditions, which can vary based on outdoor temperature and sunlight availability.
Finally, cooking food in your solar oven is an exciting process, allowing you to experiment with recipes that benefit from slow cooking, such as stews or baked goods. This innovative method not only promotes sustainability but also provides a hands-on experience in harnessing renewable energy.
What Different Designs Can You Choose for Optimal Performance?
When designing a DIY solar oven for optimal performance, several designs can be considered:
- Box Oven: This is one of the simplest solar oven designs, consisting of an insulated box with a transparent lid to trap sunlight. It is effective for slow cooking and can reach temperatures of around 200°F, making it suitable for baking and roasting.
- Parabolic Solar Cooker: This design uses a parabolic mirror to focus sunlight onto a single point, where a pot or pan is placed. This type can achieve much higher temperatures, often exceeding 600°F, allowing for quicker cooking and boiling water, making it ideal for high-heat cooking tasks.
- Panel Cooker: Comprising reflective panels that direct sunlight into a cooking pot, this design is lightweight and portable. It is best for outdoor settings and can cook food at moderate temperatures, making it great for simmering and slow cooking.
- Solar Oven Bag: A solar oven bag is made from reflective materials that trap heat around food placed inside. This design is extremely portable, lightweight, and effective for slow cooking, perfect for camping or hiking.
- Cylinder Solar Oven: Shaped like a cylinder, this design uses cylindrical reflectors to capture and direct sunlight. It offers a larger cooking surface and can maintain a stable temperature, making it versatile for various cooking methods.
What Are the Best Recipes to Try with Your DIY Solar Oven?
The best recipes to try with your DIY solar oven include:
- Solar Baked Potatoes: Baking potatoes in a solar oven is a simple and effective way to utilize solar energy. Wrapped in aluminum foil, the potatoes can cook evenly while the oven traps heat, resulting in soft, fluffy interiors.
- Solar S’mores: Making s’mores in a solar oven is a fun and easy project, especially for families. By placing graham crackers, chocolate, and marshmallows together in a solar-safe dish, the heat from the sun will melt the chocolate and marshmallows for a delicious treat.
- Solar Roasted Vegetables: Roasting vegetables like carrots, zucchini, and bell peppers in a solar oven enhances their natural flavors. Tossing the vegetables with olive oil, salt, and herbs and allowing them to bake slowly in the sun results in tender, flavorful sides.
- Solar Pizza: A DIY solar oven can also create a delightful pizza. Use a pre-made crust, and top it with sauce, cheese, and your favorite toppings; the sun’s heat will melt the cheese and warm the toppings for a delicious meal.
- Solar Hard-Boiled Eggs: You can hard-boil eggs in a solar oven by placing them in a pot of water and covering it tightly. The heat from the sun will cook the eggs thoroughly in a gentle way, resulting in perfectly cooked hard-boiled eggs.
How Do Cooking Times Vary with Different Dishes?
Cooking times can vary significantly based on the type of dish being prepared, the ingredients used, and the cooking method employed.
- Vegetables: Cooking times for vegetables depend on their type and size, with leafy greens generally cooking faster than root vegetables. For instance, steamed broccoli may take about 5-7 minutes, while carrots can take up to 10-15 minutes when boiled.
- Meat: Different cuts of meat require varying cooking times; for example, chicken breasts cook relatively quickly, taking about 20-30 minutes, whereas tougher cuts like brisket may need several hours to become tender. Factors such as thickness and whether the meat is bone-in or boneless also affect cooking durations.
- Grains: Cooking times for grains like rice, quinoa, or barley can differ widely; white rice typically cooks in about 15-20 minutes, while brown rice may take around 40-45 minutes. The method of cooking, such as boiling versus using a rice cooker, can also influence the time required.
- Baking: Baking times are crucial for dishes like bread or cakes, which often require precise timing for proper texture and rise. For example, a standard loaf of bread may need 25-30 minutes at 350°F, while a cake might take 30-40 minutes, depending on the recipe and oven type.
- Soups and Stews: These dishes usually benefit from longer cooking times to develop flavors, typically simmering for at least 30 minutes, but some recipes recommend hours for the best taste. The complexity of the ingredients and whether they are fresh or dried can also affect the total cooking time.
What Maintenance Tips Can Help Ensure Longevity of Your Solar Oven?
To ensure the longevity of your solar oven, consider the following maintenance tips:
- Regular Cleaning: Keeping the reflective surfaces clean is crucial for optimal performance. Dust, dirt, and grime can significantly reduce the amount of sunlight absorbed, leading to inefficient cooking.
- Inspect Seals and Hinges: Regularly check the seals and hinges for wear and tear. Proper sealing is essential to maintain heat inside the oven, and any gaps can lead to heat loss, affecting cooking efficiency.
- Store Properly: When not in use, store your solar oven in a dry, shaded place. This helps prevent damage from UV rays and moisture, which can deteriorate materials over time.
- Avoid Overloading: Ensure not to overload the oven with too much food. Overloading can obstruct airflow and prevent even cooking, and it may also put unnecessary strain on the structure of the oven.
- Monitor Temperature: Use a thermometer to keep an eye on the internal temperature, especially during cooking. This helps you understand how well your solar oven is performing and whether any adjustments are needed for better efficiency.