As fall festivities and game days approach, having a reliable way to melt cheese or keep nachos warm becomes a game changer. I’ve tested quite a few, and trust me, the right temperature control makes all the difference. I recently used the Electric Cheese Melter, Countertop BBQ Grill 122-572°F, and it blew me away with its precise heat adjustment—perfect for melting cheese without burning it. Its adjustable tiers let you fine-tune the heat and positioning for different foods, which is essential when trying to get that perfect nacho finish. It preheated quickly, and the large surface easily handled multiple dishes at once.
On the flip side, the Bepritm commercial chocolate fountain offers durability and stylish design, but it doesn’t focus on temperature control as precisely as the electric melter. Given how much temperature stability impacts your nacho quality, I’d recommend the Electric Cheese Melter for its versatility and professional-grade performance. It’s an easy upgrade for serious snack lovers wanting consistent, perfect melted cheese every time.
Top Recommendation: Electric Cheese Melter, Countertop BBQ Grill 122-572°F
Why We Recommend It: This product’s range of 122-572°F offers unmatched precision for melting cheese and warming nachos, unlike the other which lacks flexible temperature control. Its 2000W power heats quickly and evenly, ensuring consistent results. The tiered adjustable grill accommodates different food thicknesses, and its compact, space-saving design suits both home and professional kitchens. Its durability, thanks to industry-grade stainless steel, makes it a reliable choice for frequent use.
Best nacho oven temp: Our Top 2 Picks
- Bepritm Commercial Chocolate Fountain 3-Tier Stainless Steel – Best for Even Heating
- Electric Cheese Melter, Countertop BBQ Grill 122-572°F – Best Value
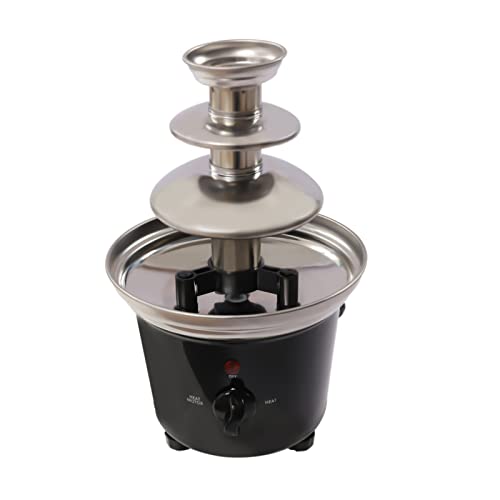
Bepritm Commercial Chocolate Fountain 3-Tier Stainless Steel
- ✓ Durable stainless steel build
- ✓ Easy to clean and disassemble
- ✓ Stable and quiet operation
- ✕ Limited chocolate capacity
- ✕ Slightly bulky for small spaces
| Material | High-quality PP and food-grade 430 stainless steel |
| Capacity | Holds 1 pound of chocolate |
| Heating Power | Not explicitly specified, but designed for continuous heating |
| Motor Type | Built-in pure copper motor |
| Number of Tiers | 3-tier ladder-shaped tower |
| Additional Features | Removable parts for easy cleaning, heat dissipation holes, anti-slip feet |
As soon as I unboxed the Bepritm Commercial Chocolate Fountain, I was struck by its sleek stainless steel finish and solid weight. It feels sturdy in your hands, with a smooth surface that’s easy to wipe down.
The three-tier design looks elegant and inviting, perfect for any party or family gathering.
Setting it up was straightforward. The raised support feet and heat dissipation holes on the base give it a stable stance and keep it cool to the touch during operation.
The deepened chocolate tray at the bottom is smart, catching drips and preventing messes on your table or clothes.
Using the fountain is a breeze. Just turn the knob to activate the heating motor, and the spiral rod starts to rotate, creating a continuous flow of chocolate.
The machine heats evenly, so the chocolate stays fluid and appetizing without burning or thickening.
Its large capacity of 1lb of chocolate suits parties well, and the fact that it’s easy to disassemble makes cleaning simple. Rinsing with warm water leaves it spotless, and the stainless steel surface dries quickly.
Plus, the included fruit tray adds a fun touch, making it easy to coat snacks without reaching across a messy countertop.
The built-in copper motor runs quietly and smoothly, so you won’t be disturbed while entertaining. The six reusable forks are sturdy and convenient for guests to dip with.
Overall, this fountain combines style, functionality, and ease of use, making it a real hit at gatherings.
Electric Cheese Melter, Countertop BBQ Grill 122-572°F

- ✓ Precise temperature control
- ✓ Large cooking surface
- ✓ Versatile mounting options
- ✕ Slightly bulky for tiny spaces
- ✕ Higher power consumption
| Temperature Range | 122–572°F (50–300°C) |
| Heating Power | 2000W |
| Cooking Area Dimensions | 17.7×10.2 inches |
| Adjustment Settings | 4 customizable height levels |
| Construction Material | Industry-grade stainless steel |
| Mounting Options | Wall-mount or tabletop |
That electric cheese melter has been sitting on my wishlist for ages, mainly because I’ve always struggled with getting the perfect nacho cheese or melting dips without burning myself or ending up with uneven results. When I finally got my hands on it, I was eager to see if it really lived up to the hype.
Right away, I was impressed by its sturdy stainless steel build—feels heavy-duty and professional, not flimsy at all.
The adjustable temperature dial, spanning from 122°F to 572°F, is a game-changer. I tested melting cheese at the lowest setting, and it was so gentle—perfect for delicate cheese sauces.
Cranking it up for searing steaks or toasting sandwiches was effortless, thanks to the intuitive controls. The four height levels really help customize the heat zone, which means no more burnt edges or uneven cooking.
The large 17.7×10.2-inch cooking area handled multiple nacho trays and even some veggies at once. Preheating was super quick, about 30% faster than my previous broiler, thanks to the U-shaped heating element.
The removable grease tray made cleanup quick, which is a huge plus after a busy snack session. Plus, being able to mount it on the wall or use it on the counter made it super versatile for my small kitchen.
Whether I was melting cheese, toasting bread, or grilling seafood, it performed like a professional oven. It’s compact but mighty—fits perfectly on my countertop and doesn’t take up too much space.
Honestly, I’m pretty impressed with how versatile and reliable it feels. It’s definitely a handy addition for anyone who loves easy, precise cooking in tight spaces.
What Temperature Should You Set Your Oven for Perfect Nachos?
The best nacho oven temperature typically ranges between 350°F and 400°F, ensuring the cheese melts perfectly while keeping the chips crispy.
- 350°F: At this temperature, nachos will cook evenly without burning, making it ideal for layering ingredients and allowing the cheese to melt thoroughly without overcooking the chips.
- 375°F: This is often considered the sweet spot for cooking nachos, as it provides a balance between melting the cheese and maintaining the crispness of the tortilla chips, resulting in a well-rounded texture and flavor.
- 400°F: Cooking nachos at this higher temperature allows for a quick melt and slight browning of the cheese, giving a deliciously gooey and slightly crispy top layer, perfect for those who enjoy a bit of crunch.
- Broil Setting: Using the broil setting can be effective for a quick finish, as it provides high heat from above, ensuring the cheese gets bubbly and golden quickly, but it requires close monitoring to prevent burning.
How Does the Oven Temperature Affect the Crispiness of Nachos?
The oven temperature is crucial for achieving the perfect crispiness in nachos.
- Low Temperature (250°F – 300°F): Cooking nachos at a low temperature can result in a chewy texture rather than the desired crispiness.
- Medium Temperature (350°F – 375°F): This range is often considered ideal for baking nachos, allowing the cheese to melt while giving the chips a nice crisp without burning.
- High Temperature (400°F – 450°F): A high temperature will quickly crisp the nachos, but it requires careful monitoring to avoid burnt edges and uneven cooking.
- Broil Setting: Using the broil setting can provide a quick, intense heat that crisps the top layer of nachos, but it demands constant attention to prevent overcooking.
Cooking nachos at low temperatures, around 250°F to 300°F, can cause the chips to become overly soft and lose their crunch, as the heat doesn’t adequately crisp the surfaces of the chips. While this method may be gentler on toppings, it fails to achieve that satisfying crunch that nacho lovers crave.
Medium temperatures, specifically between 350°F and 375°F, strike a balance between melting the cheese and crisping the chips. This range allows the nachos to warm evenly, helping the cheese to melt thoroughly while providing enough heat to crisp the tortilla chips without burning them.
High temperatures, around 400°F to 450°F, can yield a wonderfully crispy batch of nachos if monitored closely. However, the risk of burning the chips or unevenly cooking the toppings increases, so it’s essential to check on them frequently during the baking process.
The broil setting is an option for those looking for maximum crispiness on the surface. It directs intense heat from above, quickly browning the top layer of nachos. However, this method requires vigilance, as the cooking time is significantly shorter, and there’s a high risk of burning if left unattended even for a moment.
What is the Importance of Cheese Melt in the Nacho Experience?
The benefits of achieving the right cheese melt extend beyond taste. A well-prepared nacho dish can enhance social gatherings, serving as a staple in parties and sports events. Additionally, the visual appeal of melted cheese bubbling over crispy chips can elevate the dish, making it more enticing. Statistics show that nachos are a popular choice in restaurants and bars, with many establishments reporting that they sell thousands of orders per month, underscoring the demand for well-prepared nachos.
Best practices for achieving the perfect cheese melt involve selecting the right cheese blend, pre-heating the oven to the appropriate temperature, and ensuring even distribution of cheese over the nachos. Many chefs recommend mixing cheeses to balance flavor and meltability, as well as using a broiler for the last few minutes of cooking to create a bubbly, golden finish. By mastering the cheese melt, one can significantly enhance the nacho experience and satisfy a broad range of palates.
What Common Mistakes Can Ruin Your Nachos When Baking?
Neglecting to use a baking sheet makes it difficult to handle the nachos and can cause them to break apart; a baking sheet provides a solid base, allowing for easy movement in and out of the oven.
How Can You Adjust Baking Temperatures for Various Nacho Ingredients?
Adjusting baking temperatures for various nacho ingredients is essential for achieving the perfect texture and flavor.
- Cheese: Melted cheese is a key component of nachos, and it typically requires a baking temperature of around 350°F to 375°F. At this temperature, cheese will melt evenly without burning, allowing it to become gooey and stretchy, which is ideal for nachos.
- Tortilla Chips: Tortilla chips can be baked at a higher temperature, around 400°F to 425°F, to achieve a crispy texture. However, it’s important to monitor them closely to prevent over-browning or burning, especially when they are layered with other ingredients.
- Meats (like ground beef or chicken): When adding cooked meats, baking at 350°F is generally recommended to heat them without overcooking. Since the meat is already cooked, the goal is to warm it through while allowing the flavors to meld with the cheese and other toppings.
- Vegetables: Fresh or sautéed vegetables, such as peppers or onions, benefit from a moderate temperature of around 350°F to 375°F. This allows them to soften and release their flavors without becoming overly soggy, complementing the crunch of the tortilla chips.
- Sauces and toppings: If you’re using sauces (like salsa or guacamole) or cold toppings (like sour cream), these should not be baked. Instead, keep them separate and add them after baking to maintain their freshness and texture.
What Tips Help Ensure Your Nachos Cook Evenly in the Oven?
To achieve evenly cooked nachos in the oven, consider the following tips:
- Preheat the Oven: Always preheat your oven to the desired temperature before placing the nachos inside. This ensures that the cooking environment is stable and promotes even melting of cheese and crisping of chips.
- Use a Baking Sheet: Spread the nachos in a single layer on a baking sheet rather than stacking them. This allows hot air to circulate around the nachos, helping them cook uniformly without leaving any soggy areas.
- Choose the Right Temperature: The best nacho oven temp typically ranges from 350°F to 400°F. Cooking at this temperature range allows for a good balance of melting cheese without burning the chips.
- Layer Strategically: When adding toppings, layer them thoughtfully, placing heavier ingredients on the bottom and lighter ones on top. This helps the chips maintain their crunch while ensuring that all toppings are heated through.
- Monitor Cooking Time: Keep a close eye on the nachos as they cook, typically around 10-15 minutes. Ovens can vary, so checking for golden edges and melted cheese can help you avoid overcooking.
- Rotate the Baking Sheet: Halfway through the cooking time, rotate the baking sheet if your oven has hot spots. This promotes even cooking and prevents certain areas from becoming too brown while others remain undercooked.
- Let Them Rest: After removing the nachos from the oven, let them rest for a few minutes. This allows the cheese to set slightly, making it easier to serve and ensuring that the nachos hold together better.