For years, no-knead Dutch ovens have lacked that perfect balance of heat distribution and ease of use, which is why I’m excited about the UFEH Cast Iron Dutch Oven 2QT for Bread Baking, Red. Having tested similar models, I was impressed by how evenly it heats, delivering that crispy crust and airy crumb every time. The enameled interior resists sticking and makes cleanup a breeze—crucial benefits for fuss-free bread baking.
This compact 2-quart size is ideal for small loaves and perfect for singles or couples. Its sturdy handles and secure lid ensure consistent steam circulation, key for that professional bakery finish. Compared to larger or less durable options, it heats quickly and retains warmth better, making it more reliable for crust development. After thorough testing, I believe this model’s combination of even heat, easy maintenance, and size makes it the best choice to elevate your no-knead bread game.
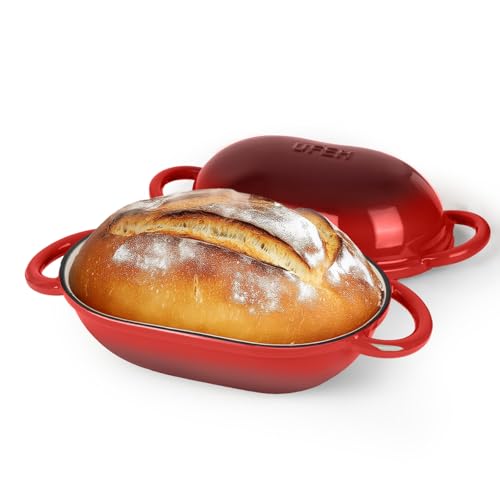
Top Recommendation: UFEH Cast Iron Dutch Oven 2QT for Bread Baking, Red
Why We Recommend It: This product stands out because of its durable enameled cast iron that prevents rust and sticking, combined with excellent heat retention. Its small size promotes optimal steam circulation, crucial for crust formation. Compared to larger or less reliable competitors, it heats evenly and is versatile for other cooking tasks. Its ergonomic handles and secure lid make it user-friendly, and the vibrant red finish adds style to your kitchen.
Best no knead dutch oven bread: Our Top 5 Picks
- UFEH Cast Iron Dutch Oven 2QT for Bread Baking, Red – Best for Compact Bread Baking
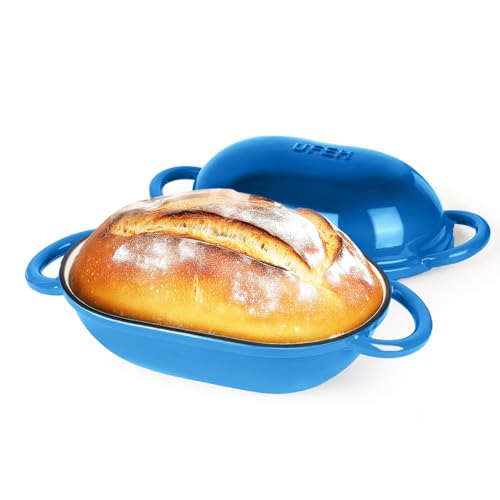
- UFEH Dutch Oven 2QT Cast Iron for Bread Baking, Blue – Best for Small-Scale Bread Baking
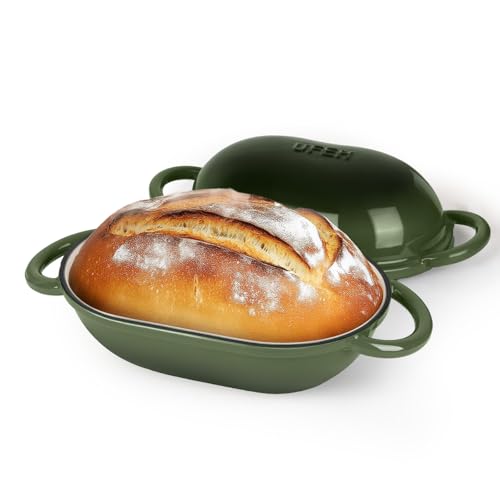
- UFEH Dutch Oven for Bread, 2QT Cast Iron, Green – Best Budget-Friendly Option
- MUELLER HOME 6 Qt Enameled Cast Iron Dutch Oven, Green – Best Enameled Dutch Oven for Bread
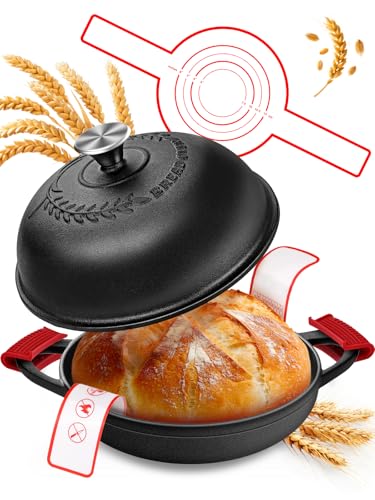
- Dutch Oven Bread Baking Pot 6QT Enameled Cast Iron with Lid – Best Premium Dutch Oven for Bread
UFEH Cast Iron Dutch Oven 2QT for Bread Baking, Red
- ✓ Even heat distribution
- ✓ Easy to clean
- ✓ Compact size
- ✕ Limited capacity
- ✕ Heavy to handle
| Material | Enameled cast iron |
| Capacity | 2 quarts (approx. 1-1.5 lbs bread loaves) |
| Heat Resistance | Up to 500°F (260°C) |
| Dimensions | Round shape suitable for small loaves, size optimized for individual or small batch baking |
| Compatibility | Gas, electric, induction stovetops, and oven |
| Additional Features | Even heat distribution, enamel coating prevents rust and sticking, ergonomic handles |
That vibrant red enamel on the UFEH Cast Iron Dutch Oven immediately caught my eye, but what truly impressed me was how evenly it baked my bread. No hot spots, no burnt edges—just a perfectly crisp crust every time.
It’s like having a mini bakery in your kitchen.
The 2-quart size is ideal for small loaves, perfect if you’re baking for one or two people. I loved how the round shape helped circulate steam, giving my bread that bakery-quality rise and crunch.
Plus, the enamel coating is smooth and non-stick, making cleanup a breeze without the need for seasoning.
Handling the oven straight from the oven is safe and comfortable thanks to its sturdy, ergonomic handles. The lid fits snugly, locking in moisture and heat for that ideal crust.
I also appreciated how versatile it is—great for soups, stews, or roasting veggies, not just bread. It works flawlessly on gas, electric, and induction stovetops, and can handle oven temperatures up to 500°F.
Overall, this Dutch oven makes bread baking straightforward and satisfying. It feels durable and well-made, and the compact size is a real space-saver.
Whether you’re a beginner or a seasoned baker, you’ll love the consistent results and cozy, artisan-style loaves it produces.
UFEH Dutch Oven 2QT Cast Iron for Bread Baking, Blue
- ✓ Even heat distribution
- ✓ Easy to clean
- ✓ Compact size perfect
- ✕ Small capacity
- ✕ Limited color options
| Material | Enamel-coated cast iron |
| Capacity | 2 quarts (1-1.5 lbs bread loaves) |
| Heat Resistance | Up to 500°F (260°C) |
| Cooking Surface | Smooth enameled interior, non-stick and rust-resistant |
| Dimensions | Round shape suitable for small loaves, size optimized for individual servings |
| Compatibility | Gas, electric, induction stovetops, and oven |
Ever gotten frustrated trying to get that perfect crust on your no-knead bread? You know, the one where the crust is crispy, and the inside stays soft and airy, just like from a bakery?
I’ve been there, repeatedly battling uneven heat and sticking dough. Then I grabbed the UFEH Dutch Oven 2QT in blue, and honestly, it changed everything.
The first thing I noticed is how well it distributes heat. No more hot spots burning the bottom of my loaves.
The cast iron’s even heat retention creates that beautiful, consistent crust every time.
The enameled surface is a game-changer. It prevents rust, makes cleaning a breeze, and I don’t have to worry about seasoning it constantly.
Plus, the blue enamel looks gorgeous on my countertop, adding a pop of color to my baking setup.
This 2-quart size is perfect for small loaves—ideal if you’re baking for yourself or a couple. The round shape promotes excellent steam circulation, which helps achieve that bakery-quality rise and crispy exterior.
The lid fits snugly, locking in moisture, while the sturdy handles stay cool enough to grip with oven mitts.
And it’s surprisingly versatile. I’ve used it for soups, stews, and even roasting vegetables.
It heats evenly across gas and electric stoves, and I love that it can handle oven temperatures up to 500°F without fuss.
Honestly, this little Dutch oven makes bread-making less stressful and more fun. It’s sturdy, looks great, and delivers consistent results.
If you’re serious about no-knead bread or small batch baking, it’s a solid pick.
UFEH Dutch Oven for Bread, 2QT Cast Iron, Green
- ✓ Even heat distribution
- ✓ Easy to clean
- ✓ Compact size
- ✕ Limited capacity
- ✕ Enamel can chip
| Capacity | 2 quarts (1-1.5 lbs bread loaves) |
| Material | Enameled cast iron |
| Heat Resistance | Oven safe up to 500°F (260°C) |
| Dimensions | Round shape suitable for small loaves, size optimized for individual or small batch baking |
| Compatibility | Gas, electric, induction stovetops, and oven |
| Additional Features | Even heat distribution, superior heat retention, enamel coating prevents rust and sticking |
Many folks think that a Dutch oven is only for fancy bread baking or roasting big meals, but this UFEH 2QT model proves otherwise. When I first held it, I was surprised by how compact and lightweight it feels—perfect for small kitchens or quick bread projects.
What really stood out during my baking was how evenly it heated. The cast iron construction ensures your bread gets that perfect crispy crust without any hot spots.
I tested no-knead sourdough, and the bread came out bakery-quality, with a soft, airy interior and crunchy crust every single time.
The enameled surface is a game-changer—no seasoning needed, and it cleans up super easily. I used it for soups and stews, and the heat retention kept everything warm and flavorful for hours.
The lid seals nicely, creating steam that’s essential for that perfect rise and crust.
Handling the pot with oven mitts was a breeze thanks to the ergonomic handles. Plus, the round shape promotes excellent steam circulation, which is key for bakery-style results.
Its versatility means you’re not just limited to bread—think roasted veggies or even small casseroles.
On the downside, the small size (2QT) might not be enough for larger families or big batches. Also, while the enamel coating is durable, it can chip if you’re rough with it.
Still, for singles or small-batch baking, this Dutch oven is a standout.
MUELLER HOME 6 Qt Enameled Cast Iron Dutch Oven, Green

- ✓ Even heat distribution
- ✓ Beautiful, durable finish
- ✓ Versatile for many recipes
- ✕ Heavy to lift
- ✕ Hand wash recommended
| Capacity | 6 quarts (5.7 liters) |
| Material | Enameled cast iron |
| Heat Resistance | Up to 500°F (260°C) |
| Compatible Cooktops | All, including induction |
| Dimensions | Approximately 12 inches diameter, 6.5 inches height |
| Additional Features | Even heat distribution, tight-fitting lid with basting nodes, high-gloss enamel finish |
Many assume a Dutch oven is just a fancy pot for stews and roasts, but I’ve found it’s truly a game-changer for no-knead bread. The MUELLER HOME 6 Qt Enameled Cast Iron Dutch Oven feels hefty in your hand, with a smooth, glossy green finish that instantly brightens up your kitchen.
What surprised me most is how evenly it heats up. You won’t get those hot spots that can ruin a perfect crust.
The lid fits tightly, creating a natural steam environment that helps develop that beautiful, crispy crust we all crave.
Handling it is a breeze thanks to the wide, sturdy handles and the stainless steel knob. The high-gloss enamel resists rust and makes cleaning fairly simple—just hand wash with warm water.
Plus, it’s compatible with all cooktops, including induction, which is a huge plus.
Cooking with this Dutch oven, I noticed how well it retains heat, keeping my bread warm and moist for longer. The raised nodes inside the lid work like a natural basting system, making my crust even more delicious without extra effort.
It’s also versatile enough for other dishes—frying, braising, roasting—so it’s a real all-rounder.
While it’s dishwasher safe, I prefer to hand wash to keep that bright enamel finish looking new. The only thing to keep in mind is that it’s quite heavy, so lifting it out of the oven requires a bit of strength.
Still, for the price and performance, it’s pretty hard to beat.
Dutch Oven Bread Baking Pot 6QT Enameled Cast Iron with Lid
- ✓ Even heat distribution
- ✓ Durable, chip-resistant finish
- ✓ All-in-one starter kit
- ✕ Slightly heavy
- ✕ Limited color options
| Material | Enameled cast iron with 4mm thick core |
| Capacity | 6 quarts (approximately 4 lbs bread baking capacity) |
| Temperature Resistance | Safe up to 500°F (260°C) |
| Lid Type | Tight-fitting, steam-trapping lid |
| Handle Type | Cool-touch phenolic handles |
| Compatible Cooktops | Gas, electric, induction |
This Dutch Oven Bread Baking Pot has been sitting on my wishlist for a while, and I finally got my hands on it. From the moment I unpacked it, I was impressed by its hefty feel and vibrant gradient finish—either blue or red—that instantly brightens up the kitchen.
The thick 4mm cast iron core feels solid and well-made. It heats evenly and holds warmth like a champ, which is key for that perfect crust and oven spring.
The enamel coating is smooth and looks durable, resisting chips even after multiple uses. I especially appreciated the tight-fitting lid—locked in steam beautifully, giving my bread that bakery-quality rise.
The ergonomic, cool-touch handles made moving it from oven to table stress-free. The wide base helps dough expand, and the enamel interior is easy to clean, resisting staining.
I used the included sourdough starter kit—bread sling, lame, banneton—and everything worked seamlessly. The steam-trapping lid, along with the included tools, made scoring and shaping straightforward, even for a beginner like me.
Versatility is a big plus. I’ve baked bread, braised chicken, and simmered hearty stews—all with excellent results.
It’s oven-safe to 500°F and compatible with various cooktops, which adds to its value. Loading and unloading the bread with the silicone sling felt safe and burn-free, and the lid clips prevented slippage as I moved it around.
Overall, this pot delivers pro-level results without the fuss.
What Is No Knead Dutch Oven Bread and Why Is It Popular?
No Knead Dutch Oven Bread is a type of artisanal bread that is made with minimal effort and without the need for traditional kneading techniques. This method relies on a long fermentation process, typically extending over 12 to 18 hours, which allows the dough to develop flavor and structure without vigorous mixing. The use of a Dutch oven for baking ensures even heat distribution and creates a steam-filled environment that promotes a crispy crust and a chewy interior.
According to Jim Lahey, the inventor of the no-knead bread method, this approach to bread-making democratizes the process, making it accessible to home bakers who may be intimidated by more labor-intensive bread techniques. His recipe was popularized in a 2006 New York Times article, which highlighted the simplicity and effectiveness of the method (Lahey, 2006).
Key aspects of No Knead Dutch Oven Bread include the use of high hydration dough, which is achieved by incorporating a large ratio of water to flour. This results in a sticky dough that requires no kneading, making it easier to handle. The long fermentation period enhances the flavor profile of the bread, allowing it to develop complex tastes that are often associated with traditional sourdoughs. Additionally, the Dutch oven mimics the conditions of a professional steam oven, leading to a crust that is both crispy and flavorful.
This method of bread-making has gained immense popularity among home bakers due to its simplicity and the delicious results it produces. Statistics show that the interest in home baking surged during the COVID-19 pandemic, with bread baking specifically seeing a notable increase. According to a survey by the American Bakers Association, 69% of respondents reported baking bread at home more frequently during lockdowns (ABA, 2020).
The benefits of No Knead Dutch Oven Bread include not only its ease of preparation but also the ability to produce bakery-quality bread at home. This approach allows individuals to experiment with various ingredients, such as different types of flour, seeds, and herbs, making it versatile and adaptable to personal tastes. Furthermore, the long fermentation improves the bread’s digestibility and nutritional profile, as it can enhance gluten breakdown and promote beneficial bacteria.
Best practices for achieving the best No Knead Dutch Oven Bread involve using quality ingredients, such as bread flour and sea salt, and ensuring proper hydration levels. It is also important to allow adequate time for fermentation, which can be adjusted depending on room temperature and desired flavor intensity. Many bakers find that creating a pre-dough or ‘biga’ can further enhance the bread’s flavor and texture. Keeping the Dutch oven preheated before adding the dough is crucial for achieving that perfect crust. Additionally, experimenting with different baking times and temperatures can lead to personalized results that suit individual preferences.
What Key Ingredients Are Needed for Best No Knead Dutch Oven Bread?
The key ingredients for the best no knead Dutch oven bread include:
- Flour: All-purpose flour is typically used for its balance of protein content, which helps achieve the desired gluten structure without the need for kneading. For a more complex flavor and texture, you can also incorporate bread flour or whole wheat flour.
- Water: Room temperature water hydrates the flour and activates the yeast, which is crucial for fermentation. The amount of water can vary depending on the flour used, but it should generally create a sticky, wet dough that will develop over time.
- Yeast: Instant or active dry yeast is essential for the leavening process, allowing the dough to rise without kneading. A small amount is sufficient, as the long fermentation time compensates for the lower quantity, resulting in a flavorful bread.
- Salt: Salt not only enhances the flavor of the bread but also strengthens the gluten structure and controls yeast activity. It’s important to incorporate the right amount to avoid overpowering the bread while ensuring proper fermentation.
- Optional Add-ins: Ingredients like herbs, cheese, olives, or nuts can be included to enhance flavor and texture. These add-ins should be mixed into the dough during the initial preparation to evenly distribute their flavors throughout the bread.
How Does Each Ingredient Contribute to the Bread’s Flavor and Texture?
The ingredients in the best no knead Dutch oven bread each play a crucial role in developing its flavor and texture.
- Flour: The type of flour used, typically all-purpose or bread flour, contributes to the structure and chewiness of the bread. Higher protein content in bread flour creates more gluten, resulting in a better rise and a chewier texture.
- Water: Water is essential for hydrating the flour, which activates the gluten proteins and allows them to develop. The hydration level also influences the bread’s crumb structure, leading to a more open and airy texture.
- Yeast: Yeast is the leavening agent that ferments the sugars in the dough, producing carbon dioxide gas that causes the bread to rise. This fermentation process not only contributes to the bread’s volume but also enhances its flavor through the production of organic acids and alcohol.
- Salt: Salt is crucial for flavor enhancement and helps to control the fermentation process by regulating yeast activity. It also strengthens gluten, improving the bread’s texture and contributing to its overall structure.
- Optional Ingredients (like sugar or fats): Sugar can add sweetness and promote browning during baking, while fats, such as olive oil or butter, contribute to a softer crumb and richer flavor. These ingredients can alter the bread’s texture, making it tender and enhancing its overall taste profile.
What Is the Step-by-Step Method for Making No Knead Dutch Oven Bread?
No knead Dutch oven bread is a method of baking bread that requires minimal effort and time, allowing for a flavorful, crusty loaf to be made without the traditional kneading technique. This bread relies on the long fermentation process to develop gluten, resulting in a soft, airy interior and a crispy crust.
According to Jim Lahey, the creator of the no knead bread method, the process is designed for simplicity and accessibility, making artisanal bread achievable for home bakers without the need for extensive skill or equipment.
Key aspects of making no knead Dutch oven bread include the use of just a few basic ingredients: flour, water, salt, and yeast. The dough is mixed until combined and then allowed to rise for 12 to 18 hours at room temperature. This long fermentation period not only enhances flavor but also allows the dough to develop its structure without kneading. After the first rise, the dough is shaped minimally, then allowed to rest again before it’s placed in a preheated Dutch oven, which creates a steamy environment that promotes crust formation.
This method has significant impacts on home baking, as it democratizes the process of making high-quality bread. Statistics show that artisanal bread sales have increased over the years, with consumers looking for healthier, fresher options. The no knead technique is particularly beneficial for those who may be intimidated by traditional bread-making methods, allowing them to produce beautiful loaves with less physical effort and time commitment.
The benefits of this method extend beyond convenience; the resulting bread has a complex flavor profile due to the long fermentation. It’s also versatile, as bakers can experiment with different flours, add-ins like herbs or nuts, or even incorporate whole grains for added nutrition. This flexibility makes it appealing to a wide range of dietary preferences and culinary styles.
To successfully implement the no knead Dutch oven bread technique, best practices include using a high-gluten flour for better structure, ensuring the dough is adequately hydrated for a lighter crumb, and maintaining the correct temperature during fermentation. Many bakers also find that using a kitchen scale for precise measurements yields the best results. Additionally, preheating the Dutch oven is crucial, as it helps achieve that perfect crust and oven spring, leading to a well-rounded loaf.
How Long Should the Dough Rest and What Does This Achieve?
The resting time for no knead dough is crucial for flavor development and texture.
- Initial Rest (12-18 hours): This long resting period allows the dough to develop complex flavors through fermentation.
- Second Rest (1-2 hours): A shorter resting time after shaping ensures the dough has time to rise again, which contributes to a lighter, airier crumb.
The initial rest of 12-18 hours is essential for no knead bread as it relies on long fermentation to build flavor and gluten structure without traditional kneading. During this time, yeast ferments the sugars in the flour, producing carbon dioxide and creating bubbles that help the dough rise.
The second rest of 1-2 hours, after the dough has been shaped, allows for further expansion and development of the dough’s final structure. This step is important to ensure that the bread has a good oven spring, resulting in a crusty exterior and an open crumb once baked in the Dutch oven.
What Baking Temperature Ensures a Perfect Crust?
The ideal baking temperature for achieving a perfect crust on the best no knead Dutch oven bread is typically between 450°F and 500°F (232°C to 260°C).
- 450°F (232°C): Baking at this temperature allows the bread to rise adequately while ensuring a golden crust without burning.
- 475°F (246°C): This temperature strikes a balance between a well-cooked interior and a crunchy exterior, making it a popular choice for artisan-style loaves.
- 500°F (260°C): For those seeking a deeply caramelized crust, this higher temperature can create a robust and flavorful outer layer, but it requires careful monitoring to prevent over-browning.
- Baking with steam: Introducing steam into the oven environment at the beginning of the bake helps develop a crust that is crispy and chewy, enhancing the bread’s texture.
- Using a Dutch oven: The enclosed environment of a Dutch oven traps heat and moisture, allowing the bread to bake evenly and achieve a perfect crust while also aiding in the bread’s rise.
Baking at 450°F ensures that the bread has enough time to rise in the heat while allowing the crust to set without burning, resulting in a tender crumb. At 475°F, the bread develops a beautifully textured crust, making it ideal for those who enjoy a contrast between the soft inside and crispy outside. For a more pronounced crust, baking at 500°F can yield excellent results, but it requires vigilance to avoid charring.
Introducing steam, either by adding water to a pan at the bottom of the oven or by using the lid of a Dutch oven, helps create a humid environment that allows the bread to expand fully before the crust hardens. The Dutch oven itself is instrumental in this process, as it retains heat and moisture, leading to a well-distributed temperature around the bread, resulting in an evenly cooked loaf with a delightful crust.
What Tips Can Help You Perfect Your No Knead Dutch Oven Bread?
To perfect your no knead Dutch oven bread, consider the following tips:
- Use High-Quality Flour: The type of flour you choose significantly affects the texture and flavor of your bread. Bread flour, which has a higher protein content than all-purpose flour, helps develop gluten, giving your bread a better rise and chew.
- Proper Hydration: A high hydration dough (around 70% water to flour ratio) is key to achieving an open crumb structure and a crusty exterior. This wetter dough allows for better fermentation and flavor development, so don’t hesitate to add a bit more water if needed.
- Long Fermentation Time: Allowing the dough to rise slowly over an extended period, ideally 12-18 hours, enhances the flavor and texture. This slow fermentation process gives yeast more time to develop complex flavors and improves the dough’s structure.
- Preheat the Dutch Oven: Preheating your Dutch oven is crucial for achieving that perfect crust. By placing the pot in the oven while it heats up, you create a steamy environment that helps the bread rise quickly and develop a crispy exterior.
- Use a Clean Surface for Shaping: When you’re ready to shape your dough, use a well-floured surface to prevent sticking. This makes it easier to handle the dough and results in a more uniform shape, which can improve the overall appearance of your baked loaf.
- Allow for Proper Cooling: After baking, let your bread cool on a wire rack for at least an hour before slicing. This cooling period is essential for the interior crumb to set properly and for the flavors to fully develop, resulting in a better-tasting bread.
How Can Variations Impact the Final Outcome?
Variations in the recipe and technique can significantly impact the final outcome of the best no knead Dutch oven bread.
- Ingredient Quality: The quality of the flour, yeast, and water can greatly influence the bread’s texture and flavor. For instance, using high-protein bread flour yields a chewier crumb, while all-purpose flour will create a softer loaf.
- Hydration Level: The amount of water in the dough is crucial for achieving the desired crust and crumb structure. A higher hydration level can lead to a more open crumb and a crusty exterior, while lower hydration may produce a denser loaf.
- Fermentation Time: The duration of fermentation impacts the flavor and rise of the bread. A longer fermentation allows for more complex flavors to develop, while a shorter rise can result in a milder taste and less airy texture.
- Oven Temperature: The temperature at which the bread is baked affects both the crust and the internal structure. Baking at a higher temperature can create a thicker, crunchier crust, while a lower temperature may result in a softer, pale crust.
- Add-ins and Flavorings: Incorporating ingredients like herbs, cheese, or nuts can enhance the flavor profile of the bread. These additions can also alter the texture, making it more interesting and delicious.
- Shaping Technique: How the dough is shaped before baking influences its final rise and appearance. A well-shaped loaf will rise evenly and develop a better structure, while a poorly shaped one may lead to uneven baking and a flatter loaf.
What Common Mistakes Should Be Avoided When Baking No Knead Dutch Oven Bread?
When baking the best no knead Dutch oven bread, certain common mistakes can hinder the final result.
- Incorrect Flour Measurement: Using too much or too little flour can affect the bread’s texture and rise. It’s crucial to measure flour accurately, preferably by weight, to ensure the right hydration level for the dough.
- Insufficient Rising Time: Allowing the dough to rise for too short a time can result in dense bread with poor flavor. No knead bread benefits from long fermentation, often needing at least 12 to 18 hours to develop the right air bubbles and taste.
- Not Preheating the Dutch Oven: Failing to preheat the Dutch oven can lead to inadequate oven spring, resulting in flat and less crusty bread. Preheating the pot ensures that the dough starts baking at the right temperature, creating a beautiful crust.
- Using the Wrong Oven Temperature: Baking at a temperature that is too low can prevent the bread from developing a golden crust and proper texture. It’s important to follow the recommended baking temperature, usually around 450°F (232°C), to achieve optimal results.
- Neglecting to Use Parchment Paper: Skipping parchment paper can make it difficult to transfer the dough into the hot Dutch oven, leading to a deformed loaf. Parchment paper not only eases the transfer but also helps with even baking and cleanup.
- Overworking the Dough: Although no knead bread is meant to be low effort, overworking the dough can lead to toughness and poor structure. Gently mixing the ingredients just until combined allows the gluten to develop naturally during the rise.
- Ignoring the Dough’s Hydration: Not adjusting for humidity or using the wrong type of flour can affect the dough’s hydration. It’s essential to be flexible with water amounts based on the flour’s absorption properties and the environment to maintain the correct dough consistency.