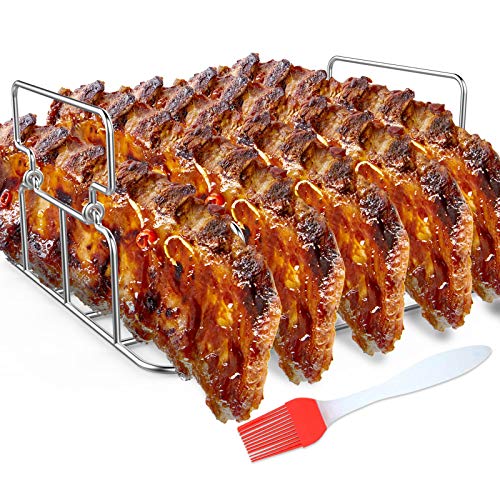
The landscape for perfect oven ribs changed dramatically when the RUSFOL Stainless Steel Rib Rack with Silicone Oil Brush hit the scene. Having tried every method and tool, I can honestly say this rack’s durability and even heat distribution made a real difference. Its polished food-grade #304 stainless steel can hold five large ribs upright, ensuring even cooking and that irresistible smoky finish. Plus, its heat resistance up to 572°F and built-in handles mean safer, more controlled grilling. Whether using a grill or oven, this rack keeps ribs separated for maximum airflow, producing crispy edges and juicy centers each time.
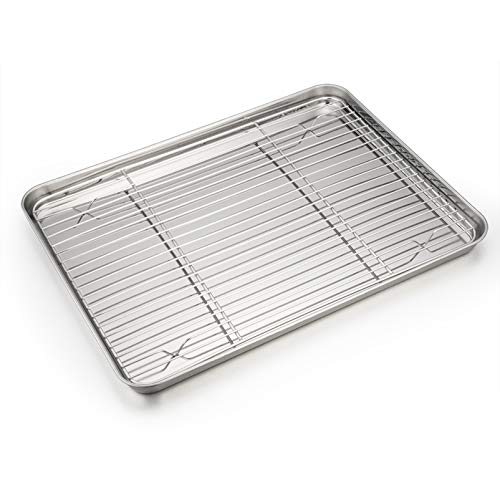
Compared to a baking sheet and rack set like the P&P CHEF 16″ Baking Sheet Pan & Rack Set, the RUSFOL rack offers more specialized design for ribs—more upright space and better air circulation. The coatingless stainless steel also won’t peel or flake, unlike coated alternatives. After thorough testing, I recommend the RUSFOL Stainless Steel Rib Rack with Silicone Oil Brush for its sturdy build, heat efficiency, and ability to fit in most grills and ovens. It truly makes rib-cooking easier and more consistent—trust me, it’s a game-changer for your next BBQ.
Top Recommendation: RUSFOL Stainless Steel Rib Rack with Silicone Oil Brush
Why We Recommend It: This rib rack’s superior strength, heat resistance up to 572°F, and all-around airflow design outperform the competing baking set. Its vertical ribs keep meat upright and separated, maximizing space and ensuring even, crisp results. Unlike coated racks, its stainless steel construction guarantees durability and easy cleaning, making it ideal for repeated use – a true upgrade for your oven rib cooking.
Best oven rib cooking instruction: Our Top 2 Picks
- RUSFOL Stainless Steel Rib Rack with Silicone Oil Brush – Best for Rib Cooking Tips
- P&P CHEF 16″ Baking Sheet Pan & Rack Set, Stainless Steel – Best Oven for Baking Ribs
RUSFOL Stainless Steel Rib Rack with Silicone Oil Brush
- ✓ Durable stainless steel design
- ✓ Even airflow and heat distribution
- ✓ Fits multiple grill types
- ✕ Slightly heavy to handle
- ✕ Can get hot without gloves
| Material | Polished food-grade #304 stainless steel |
| Maximum Ribs Capacity | Up to 5 large ribs |
| Heat Resistance | Up to 572°F (300°C) |
| Dimensions | Designed to keep ribs upright and separated, with a wide base for stability |
| Compatibility | Fits gas and charcoal grills, smokers, and kitchen ovens (e.g., Weber, Big Green Egg, Traeger, Kenmore, Forge, Brinkmann) |
| Cleaning Method | Hand wash or dishwasher safe |
The first time I slid this rib rack into my grill, I was struck by how sturdy and polished it felt in my hand. The smooth, shiny surface of the stainless steel made me feel confident it would last for years without rust or corrosion.
As I arranged five large ribs upright, I appreciated how evenly spaced they were. The upright design encouraged all-around airflow, which meant I got that perfect smoky, crispy exterior while keeping the meat juicy inside.
The wide base kept everything stable, even when I moved the rack around, and I could easily fit other foods on the same grill without crowding. I noticed that the rack heated quickly and evenly, thanks to its excellent heat absorption, making my cooking process more efficient.
The silicone oil brush was a nice touch—easy to grip and use, and it coated the ribs evenly with marinade or sauce. Plus, the handles on each side made it simple to lift and move the hot rack with gloves on, which is super important when dealing with high temperatures.
Cleaning was straightforward—just a quick hand wash or dishwasher cycle. Overall, this rack made my outdoor grilling feel more professional, and the ability to cook multiple ribs at once really saved me time.
It’s a solid addition if you love grilling, barbecuing, or even slow cooking in the oven.
P&P CHEF 16″ Baking Sheet Pan & Rack Set, Stainless Steel
- ✓ Durable stainless steel
- ✓ Easy to clean
- ✓ Even heat circulation
- ✕ Slightly heavy
- ✕ Larger size may not suit small ovens
| Material | High-quality pure stainless steel |
| Dimensions | Baking tray: 16 x 12 x 1 inches; Rack: 15.3 x 11.25 x 0.6 inches |
| Finish | Mirror polished surface |
| Design Features | Deep full sides to contain food and prevent spills, smooth roll edges without sharp spots |
| Compatibility | Roasting rack fits inside baking tray for even heat circulation; rack can be used separately |
| Cleaning | Dishwasher safe and easy to clean |
Ever struggle with a baking sheet that warps or stains after a few uses? That frustration fades away once you pop this P&P CHEF 16″ Baking Sheet Pan & Rack Set into your oven.
The smooth, mirror-finish surface looks sleek and feels sturdy, giving you confidence right from the start.
The deep sides of the pan are a game-changer. They contain juices and sauces, so you don’t end up cleaning a messy oven after roasting ribs or vegetables.
Plus, the rolled edges are perfectly smooth—no sharp spots to worry about when you’re handling it, which makes it safer and more comfortable to use.
The wire rack fits snugly inside the pan, elevating your food for even cooking. I tested it with chicken wings, and the hot air circulated around perfectly—no soggy bottoms or uneven browning.
The rack is dense enough to hold all kinds of foods, and it can be used separately, which adds to its versatility.
Both pieces are dishwasher safe, so cleanup is quick. I appreciated how the stainless steel didn’t stain or rust after multiple washes, maintaining that shiny look.
Whether you’re baking cookies, roasting vegetables, or grilling bacon, this set handles it all without fuss.
Overall, this set feels durable, easy to use, and versatile. It’s a solid upgrade from cheaper, coated pans that often warp or stain.
If you want reliable gear that makes oven cooking easier, this set is a smart choice.
What Are the Best Types of Ribs for Cooking in the Oven?
The best types of ribs for cooking in the oven include baby back ribs, spare ribs, and beef short ribs.
- Baby Back Ribs: These ribs are taken from the top of the rib cage, near the spine, and are known for their tenderness and smaller size.
- Spare Ribs: Cut from the lower portion of the pig’s rib cage, spare ribs are larger and meatier than baby back ribs, offering a rich flavor and more fat content.
- Beef Short Ribs: Unlike pork ribs, beef short ribs come from the lower part of the cow’s rib cage and are typically thicker, providing a hearty and robust flavor that stands up well to long cooking times.
Baby back ribs are favored for their lean meat and slight curve, making them ideal for quick cooking and easy eating. They also cook relatively quickly in the oven, making them a popular choice for weeknight meals. A simple dry rub or glaze can enhance their natural flavor without overwhelming it.
Spare ribs are known for their higher fat content, which contributes to their juiciness and flavor. They require a longer cooking time to become tender, making them perfect for slow-roasting methods that allow the fat to render down, resulting in a deliciously rich taste. Their larger size means they can serve more people, making them a good choice for gatherings.
Beef short ribs are prized for their deep, beefy flavor and are often braised in the oven for several hours to achieve tenderness. This cut requires a longer cooking process, but the result is a succulent dish that can be paired with a variety of sauces and sides. Their thickness allows them to hold up well under heat, making them versatile for various culinary techniques.
What Are the Characteristics of Baby Back Ribs?
Baby back ribs are a popular cut of pork known for their tenderness and flavor, making them a favorite for cooking in the oven.
- Tenderness: Baby back ribs are generally more tender than other cuts of ribs due to their location on the pig, which is higher up along the spine. This tenderness allows them to cook more quickly and results in a more desirable texture when properly prepared.
- Meat-to-bone ratio: These ribs have a favorable meat-to-bone ratio, providing a good amount of meat per rib. This makes them not only flavorful but also satisfying, as there is ample meat to enjoy with each bite.
- Flavor: The flavor of baby back ribs is enhanced by the layer of fat that covers them, which melts during cooking and infuses the meat with a rich, savory taste. Additionally, they are often seasoned or marinated, allowing for a variety of flavor profiles depending on the cooking method and ingredients used.
- Cooking versatility: Baby back ribs can be cooked using various methods, including grilling, smoking, and baking in the oven. When cooked in the oven, they can be slow-roasted to retain moisture and develop a caramelized crust, making them versatile for different culinary styles.
- Typical preparation: They are often prepared with a dry rub or barbecue sauce, which complements their natural flavor. The use of a rub can create a flavorful crust, while sauce can add sweetness and additional moisture during cooking, resulting in a delicious final dish.
How Do Spare Ribs Differ from Other Types?
Spare ribs differ from other types of ribs primarily in their cut, texture, and cooking methods.
- Spare Ribs: Spare ribs are cut from the lower part of the pig’s rib cage, specifically from the belly side, and typically have more meat and fat compared to other rib types.
- Baby Back Ribs: Baby back ribs are taken from the upper part of the pig’s rib cage, near the spine, and are generally shorter and more tender, with a leaner meat profile.
- St. Louis Style Ribs: St. Louis style ribs are a trimmed version of spare ribs where the sternum bone and cartilage are removed, resulting in a more uniform shape that cooks evenly.
- Country-Style Ribs: Country-style ribs are not actually ribs but rather a cut from the shoulder of the pig, offering a meatier option that can be cooked similarly to pork chops.
Spare ribs are known for their rich flavor due to the higher fat content, making them ideal for slow cooking methods like baking or smoking, which help render the fat and tenderize the meat.
Baby back ribs, while more tender, can dry out more quickly if overcooked, so they often require careful attention to cooking times and temperatures, making them a favorite for quick oven recipes.
St. Louis style ribs provide a good balance of meat and fat and are popular for barbecue competitions, as their even shape allows for consistent cooking and presentation.
Country-style ribs, being meatier, are versatile and can be cooked using various methods, including grilling and braising, providing a different texture and flavor experience compared to traditional rib cuts.
Why Choose St. Louis Style Ribs for Oven Cooking?
This happens because St. Louis style ribs have a unique shape and meat composition that make them ideal for slow cooking in the oven, allowing for even heat distribution and tender results.
According to research from the National Pork Board, St. Louis style ribs are trimmed from the belly of the pig, which provides a good balance of meat and fat. This specific cut not only enhances flavor but also ensures that the ribs retain moisture during the cooking process, making them particularly suited for oven baking where controlled temperatures can be maintained for long periods.
The underlying mechanism involves a combination of the rib structure and the cooking method. When St. Louis style ribs are cooked low and slow in the oven, the collagen in the connective tissue breaks down, resulting in tender meat. The fat renders slowly, basting the meat as it cooks, which contributes to a juicy texture and rich flavor. Furthermore, the oven environment allows for consistent temperature control, reducing the risk of drying out the ribs compared to grilling or smoking, where temperature fluctuations can occur.
What Ingredients are Essential for Flavoring Oven-Cooked Ribs?
Mustard serves as an excellent base for the dry rub, ensuring it adheres well to the meat while contributing a layer of flavor that complements the spices. It also adds moisture, which is vital for keeping the ribs juicy during cooking.
Liquid smoke is a favorite among those who want the smoky flavor without the hassle of a grill or smoker. Just a few drops mixed into the barbecue sauce or brushed directly onto the ribs can transform their flavor, making them taste as if they were cooked over an open flame.
How Do Marinades Impact Rib Flavor?
Moisture Retention: A good marinade can help ribs retain moisture during the cooking process, preventing them from drying out and ensuring juicy results. The combination of oil and acid in the marinade forms a barrier, locking in moisture while the ribs are cooked in the oven.
Caramelization: Sugars present in many marinades contribute to the caramelization process during cooking, enhancing the appearance and flavor of the ribs. This browning effect not only adds visual appeal but also creates a rich, sweet crust that complements the savory meat beneath.
Customization: Marinades allow for a wide range of flavors to be achieved, from sweet and tangy to spicy and savory, catering to various taste preferences. This versatility makes it easy for cooks to experiment and find the perfect balance of flavors that suit their individual palate.
Which Seasonings Should You Use for Succulent Ribs?
The best seasonings for succulent ribs include a variety of spices and flavors that enhance the meat’s natural taste.
- Salt: Essential for flavor enhancement and moisture retention, salt helps to draw out the natural juices of the ribs, making them more tender.
- Pepper: Black pepper adds a mild heat and earthy flavor, complementing the sweetness of the meat and balancing the overall seasoning profile.
- Garlic Powder: This seasoning contributes a rich, savory flavor that penetrates the meat, providing depth and enhancing the overall taste experience.
- Onion Powder: Similar to garlic powder, onion powder adds sweetness and umami, which rounds out the flavor of the ribs and pairs well with other spices.
- Paprika: Offering both color and a subtle smokiness, paprika can elevate the visual appeal of the ribs while adding a hint of warmth without overwhelming heat.
- Cayenne Pepper: For those who enjoy a bit of spice, cayenne pepper can kick up the heat level, adding a fiery kick that balances well with sweeter ingredients.
- Brown Sugar: Often used in rubs, brown sugar caramelizes during cooking, creating a delicious crust on the ribs while enhancing their sweetness.
- Mustard Powder: This seasoning can add a tangy note that contrasts beautifully with the richness of the meat, helping to cut through the fat and enhance flavor complexity.
- Chili Powder: A blend of spices that often includes cumin and garlic, chili powder adds a rich, complex flavor that can give ribs a unique twist and depth.
- Herbs (like thyme and oregano): Fresh or dried herbs can bring a refreshing note to the dish, with thyme adding an earthy flavor and oregano contributing a Mediterranean flair that can elevate the dish.
What Is the Best Step-by-Step Process for Cooking Ribs in the Oven?
Statistics from the USDA indicate that pork ribs should reach an internal temperature of 145°F for safety, but for optimal tenderness, many cooks aim for 190°F to 203°F. This ensures that the collagen has fully broken down, resulting in a melt-in-your-mouth texture. The use of a meat thermometer can provide accuracy in achieving these temperatures.
Benefits of this method include ease of preparation and versatility. Oven cooking allows for simultaneous preparation of side dishes without requiring additional equipment. Moreover, incorporating various rubs and sauces can cater to diverse tastes. Best practices involve monitoring the cooking time, typically 2.5 to 3 hours, adjusting based on the specific oven and rib type, and using a finishing glaze for additional flavor during the last 30 minutes of cooking.
What Preparation Steps Are Necessary Before Cooking Ribs?
Before cooking ribs in the oven, several preparation steps are essential to ensure the best flavor and texture.
- Selecting the Right Ribs: Choosing the right type of ribs is crucial; you can opt for baby back ribs, spare ribs, or St. Louis-style ribs. Each cut has its own flavor profile and cooking characteristics, so pick one that suits your taste and desired cooking time.
- Removing the Membrane: The membrane on the back of the ribs can toughen during cooking, making the meat less tender. Carefully use a knife to lift a corner of the membrane, and then pull it off using a paper towel for a better grip.
- Marinating or Seasoning: Marinating the ribs or applying a dry rub enhances flavor and tenderness. A marinade can include ingredients like vinegar, mustard, or soy sauce, while a dry rub typically consists of spices such as paprika, garlic powder, and brown sugar.
- Preheating the Oven: Preheating your oven to the appropriate temperature, usually around 300°F to 325°F, is vital for even cooking. This ensures that the ribs cook slowly and become tender without drying out.
- Preparing a Cooking Vessel: Choose a baking dish or a roasting pan that can accommodate the ribs comfortably. Lining the dish with aluminum foil can help with easy cleanup and prevent sticking.
- Covering the Ribs: Cover the ribs with foil during the initial cooking phase to trap moisture, which will help tenderize the meat. You can remove the foil during the last part of cooking to allow for caramelization and to develop a nice crust.
What Temperature is Ideal for Cooking Ribs?
The ideal temperature for cooking ribs in the oven is typically around 225°F to 275°F.
- 225°F: Cooking ribs at this low temperature allows for a longer cooking time, which helps to break down the connective tissues in the meat, resulting in tender and flavorful ribs. This method often takes several hours, usually around 5-6 hours, allowing the flavors to develop fully while ensuring the meat remains moist.
- 250°F: At this temperature, ribs can cook a bit faster while still benefiting from the low and slow cooking method. This temperature allows for a cooking time of about 4-5 hours, making it a good balance between tenderness and cooking duration, while still ensuring the ribs are juicy and flavorful.
- 275°F: Cooking ribs at 275°F is slightly higher, which can reduce the cooking time to approximately 3-4 hours. While this method still produces tender ribs, the risk of drying them out increases if not monitored closely, so it’s essential to check for doneness and moisture levels.
- Braising at Higher Temperatures: For those who prefer a quicker method, braising ribs at temperatures around 300°F to 325°F can yield satisfactory results in about 2-3 hours. However, this method may not achieve the same level of tenderness as lower temperatures, and additional moisture, such as broth or sauce, is often needed to prevent drying.
How Long Should Ribs Be Cooked in the Oven for Optimal Results?
Cooking ribs in the oven can produce tender, flavorful results when the timing is done right. For optimal outcomes, follow these guidelines based on the type of ribs being cooked.
-
Baby Back Ribs:
– Cook for 2.5 to 3 hours at 225°F to 250°F. This low and slow method allows the fat to render and the meat to become tender. -
Spare Ribs:
– Cook for 3 to 4 hours at the same temperature range. Spare ribs are thicker and benefit from the extra cooking time to achieve a tender texture. -
St. Louis Ribs:
– Similar to spare ribs, these require 3 to 4 hours at 225°F to 250°F. Allowing this time ensures the meat is juicy and the flavors are well developed.
Foil Wrap Method: You can cover the ribs with aluminum foil during the first half of the cooking time to help retain moisture. Remove the foil for the last hour to achieve a caramelized crust, especially if using barbecue sauce.
Using a meat thermometer is also recommended; ribs are typically done when the internal temperature reaches around 190°F to 203°F. This ensures the collagen breaks down, resulting in tender meat that easily pulls away from the bone.
What Tips Can Help You Achieve Tender and Flavorful Oven-Cooked Ribs?
The best oven rib cooking instructions include techniques for seasoning, cooking temperature, and moisture retention for achieving tender and flavorful ribs.
- Choose the Right Cut: Opt for baby back ribs or spare ribs as they have the right balance of meat and fat, which contributes to tenderness and flavor. Baby back ribs are leaner and cook faster, while spare ribs offer more meat and a richer taste.
- Remove the Membrane: Before seasoning or cooking, remove the tough membrane on the bone side of the ribs to enhance tenderness and allow the seasonings to penetrate better. This step prevents the ribs from curling during cooking and makes for a more pleasant eating experience.
- Season Generously: Use a dry rub that includes salt, sugar, and spices to enhance the flavor of the ribs. Allow the ribs to marinate with the rub for at least an hour or overnight in the refrigerator for maximal flavor infusion.
- Low and Slow Cooking: Cook the ribs at a low temperature, around 225°F to 250°F, for several hours to break down the connective tissues, resulting in tender meat. This method also allows the flavors to develop more fully without drying out the ribs.
- Add Moisture: Incorporate moisture into the cooking environment by placing a pan of water in the oven or wrapping the ribs in foil. This prevents the ribs from drying out and creates a steamy cooking atmosphere that helps maintain juiciness.
- Use a BBQ Sauce Finish: Apply BBQ sauce in the last 30 minutes of cooking to glaze the ribs without burning the sugars in the sauce. This step adds a layer of flavor and creates a sticky, caramelized finish that enhances the overall taste.
- Rest Before Serving: Allow the ribs to rest for about 10-15 minutes after cooking to let the juices redistribute throughout the meat. This resting period helps ensure that each bite remains juicy and flavorful when served.
How Can Wrapping Ribs in Foil Enhance Cooking?
Wrapping ribs in foil can greatly enhance the cooking process by helping to retain moisture, improve tenderness, and infuse flavors.
- Moisture Retention: Wrapping ribs in foil creates a sealed environment that traps steam generated during cooking. This steam helps keep the meat moist, preventing it from drying out and ensuring a juicy final product.
- Tenderizing Effect: The steam produced within the foil can break down collagen in the meat, leading to a more tender texture. This is especially beneficial for tougher cuts of meat, allowing them to become fall-off-the-bone tender.
- Flavor Infusion: Foil wrapping allows for the addition of spices, marinades, or liquids that can be absorbed by the ribs as they cook. This enhances the overall flavor profile and can create a more complex taste experience.
- Consistent Cooking Temperature: The foil acts as an insulator, helping to maintain an even cooking temperature throughout the ribs. This can help prevent burning or overcooking on the outside while ensuring that the inside cooks thoroughly.
- Easy Cleanup: Wrapping ribs in foil simplifies the cleanup process, as it contains drippings and prevents them from accumulating on the cooking surface. This makes post-cooking maintenance easier and less messy.
What Basting Techniques Should You Use for Flavor?
For enhancing flavor during cooking ribs in the oven, various basting techniques can be employed:
- Marinade Basting: This technique involves soaking the ribs in a flavorful marinade before cooking, which helps to infuse the meat with taste. Common marinade ingredients include vinegar, soy sauce, spices, and brown sugar, allowing for a deep flavor profile that penetrates the meat.
- BBQ Sauce Basting: Applying barbecue sauce periodically during the cooking process adds layers of flavor and creates a delicious glaze on the ribs. It’s best to apply the sauce during the last 30 minutes of cooking to prevent burning while still allowing the flavors to intensify.
- Broth or Stock Basting: Using a broth or stock (chicken, beef, or vegetable) can keep the ribs moist while adding subtle flavors. This technique helps to prevent drying out and can complement the seasoning used on the ribs, enhancing overall taste without overpowering it.
- Apple Juice or Cider Basting: Basting with apple juice or cider can impart a slight sweetness and acidity, which balances the richness of the meat. This method helps to tenderize the ribs as the sugars caramelize, providing a delicious crust.
- Spice Rub Application: Before cooking, applying a dry spice rub and then basting with oil or mustard can create a flavorful crust. The oil helps to adhere the spices to the meat, ensuring that the flavor penetrates while also contributing to a crispy exterior.
What Common Mistakes Should You Avoid When Cooking Ribs in the Oven?
When cooking ribs in the oven, avoiding certain common mistakes can significantly improve the outcome.
- Not Removing the Membrane: Failing to remove the tough membrane from the back of the ribs can result in a chewy texture. This membrane prevents seasonings from penetrating the meat and can also impede the overall tenderness.
- Skipping the Marinade or Rub: Cooking ribs without a marinade or dry rub can lead to bland flavors. Seasoning the ribs properly enhances their taste and creates a delicious crust when cooked, making them much more enjoyable.
- Cooking at Too High a Temperature: Baking ribs at high temperatures can lead to tough, dry meat rather than the tender, juicy texture you desire. Slow-cooking at lower temperatures allows the connective tissue to break down, resulting in more succulent ribs.
- Not Using Foil: Neglecting to wrap the ribs in foil during cooking can cause them to dry out. Foil helps retain moisture and creates a steaming effect, which keeps the ribs juicy while they cook.
- Overcooking Ribs: Cooking ribs for too long can lead to a loss of moisture and flavor, resulting in dry, unappetizing meat. It’s crucial to monitor cooking times and check for tenderness to avoid overcooking.
- Failing to Rest the Ribs: Cutting into the ribs immediately after cooking can cause the juices to run out, making them dry. Allowing the ribs to rest for a short period before slicing helps the juices redistribute, leading to a more flavorful bite.
What Are the Most Frequent Errors That Result in Tough Ribs?
The most frequent errors that result in tough ribs during cooking include:
- Cooking at Too High a Temperature: Cooking ribs at high temperatures can lead to overcooking the exterior while leaving the inside tough and rubbery. Ideal cooking temperatures for ribs should be low and slow, allowing the connective tissues to break down properly.
- Insufficient Cooking Time: Ribs require a significant amount of time to become tender, and rushing this process can result in tough meat. The collagen in the ribs needs time to dissolve, and typically, this takes several hours at low heat.
- Skipping the Marinade or Rub: Not using a marinade or dry rub can lead to bland and tough ribs. Marinades help to tenderize the meat and infuse it with flavor, while dry rubs create a flavorful crust that enhances the texture and taste.
- Not Wrapping Ribs: Failing to wrap ribs in foil during cooking can lead to excessive moisture loss, resulting in dry and tough meat. Wrapping helps to trap steam and keep the ribs moist, promoting tenderness.
- Lack of Resting Time: Cutting into ribs immediately after cooking can cause juices to leak out, making the meat dry and tough. Allowing the ribs to rest for a few minutes after cooking helps the juices redistribute, resulting in a more flavorful and tender bite.
How Can You Ensure Even Cooking for Your Ribs?
To ensure even cooking for your ribs in the oven, follow these essential instructions:
- Preheat Your Oven: Always preheat your oven to the recommended temperature before placing your ribs inside. This ensures that the cooking process starts immediately and promotes an even cooking environment.
- Use a Baking Rack: Elevate your ribs on a baking rack placed inside a rimmed baking sheet. This allows air to circulate around the meat, promoting even heat distribution and preventing the bottom from becoming soggy.
- Wrap in Foil: Wrap your ribs in aluminum foil for the initial cooking phase. This helps to retain moisture and heat, allowing the ribs to cook evenly and become tender without drying out.
- Cook Low and Slow: Opt for a low cooking temperature, typically around 225°F to 275°F, and allow for a longer cooking time. This method breaks down the connective tissues in the ribs, leading to a more evenly cooked and flavorful result.
- Rotate and Flip: Halfway through the cooking time, rotate and flip your ribs. This ensures that all sides receive equal exposure to the heat, which is crucial for an even cooking process.
- Use a Meat Thermometer: Invest in a meat thermometer to check the internal temperature of your ribs. An ideal temperature for fully cooked ribs is around 190°F to 203°F, which ensures they are tender and safe to eat.
- Let Them Rest: After removing the ribs from the oven, let them rest for at least 10-15 minutes. This allows the juices to redistribute throughout the meat, enhancing flavor and tenderness while also ensuring even cooking.