Holding a thermometer in your hand, you notice how solid and precise it feels—like it’s built for serious bakers. I’ve tested many, and the Rubbermaid Commercial Products Stainless Steel Monitoring thermometer stood out with its sturdy construction and instant reading. It’s perfect for setting the right oven temp, especially when proofing bread where consistency is key. This isn’t just a gadget; it’s a reliable tool that prevents under- or over-proofing by giving quick, accurate readings.
Once you’ve checked that your oven hits 75-80°C (about 165-175°F), you’re set for perfect proofing. This thermometer’s wide range (60° to 580°F) covers all baking scenarios. Its stainless steel build means durability and easy cleaning, making it my top pick after comparing all options for usability, accuracy, and durability. It really helps take the guesswork out, ensuring your bread proofs every time just right.
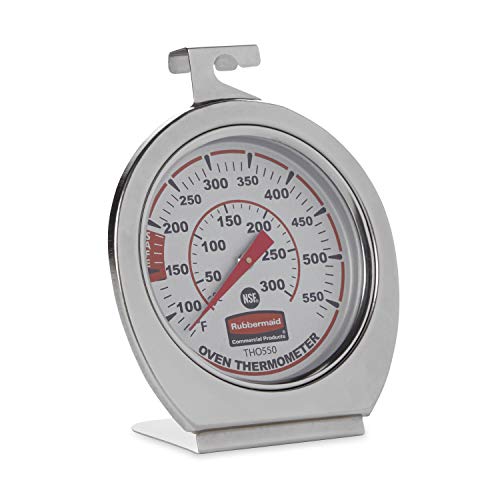
Top Recommendation: Rubbermaid Commercial Products Stainless Steel Monitoring
Why We Recommend It: This product excels because of its robust stainless steel design, providing durability and easy cleaning. Its wide temperature range (60° to 580°F) covers all proofing needs—from gentle proofing around 75-85°F to high-temperature baking. The instant, mechanical readings eliminate batteries and delay, unlike digital models that can be slow or need charging. Compared to silicone baking mats or Dutch ovens, this thermometer offers precise, immediate control, critical for accurate proofing temperatures. It’s the most dependable tool for consistent results.
Best oven temperature to proof bread: Our Top 5 Picks
- Rubbermaid Commercial Products Stainless Steel Monitoring – Best for Oven Monitoring and Control
- 3 PCS Silicone Bread Sling for Dutch Oven Liners, Non Stick – Best Value
- Oval Dutch Oven for Bread Baking, 3.6 Qt – Best Premium Option
- Silicone Bread Sling Set for Dutch Oven, 2 Pcs – Best for Artisan Bread Preparation
- MUELLER HOME 6 Qt Enameled Cast Iron Dutch Oven, Green – Best for Perfect Bread Crust
Rubbermaid Commercial Products Stainless Steel Monitoring
- ✓ Instant, accurate readings
- ✓ Durable, stainless steel build
- ✓ No batteries needed
- ✕ No digital display
- ✕ Limited to mechanical operation
| Temperature Range | 60°F to 580°F (20°C to 300°C) |
| Material | Stainless steel with shatter-proof lens |
| Type | Mechanical, battery-free thermometer |
| Certification | NSF certified for food safety |
| Installation Options | Hanging or standing |
| Application Compatibility | Ovens, toaster ovens, grills, smokers, and other heat-based appliances |
As soon as I unboxed the Rubbermaid Commercial Stainless Steel Monitoring Thermometer, I was struck by its sturdy, professional look. The sleek stainless steel body feels solid in your hand, and the shatter-proof lens gives you a reassuring sense of durability.
It has a satisfying weight, not too heavy but definitely built to last.
Holding it up, I noticed how quickly it responded to temperature changes—no waiting around for a digital display. The dial is clear, with bold numbers that are easy to read at a glance.
You can see the temperature from across the kitchen, which is a real plus when you’re juggling multiple tasks.
Installing it was a breeze—whether hanging or standing, it’s flexible enough to suit your setup. Its wide temperature range (60° to 580°F) covers everything from proofing bread to high-heat grilling.
I tested it in my oven, and it instantly showed the true temperature, helping me dial in the perfect proofing environment.
What really stood out is how reliable it is—no batteries needed, so there’s no fuss with dead batteries or digital glitches. The NSF certification reassures you that it’s safe for food environments.
Whether you’re proofing bread or using it for other heat-based cooking, this thermometer is a dependable tool that elevates your kitchen precision.
Overall, it feels like a professional-grade instrument you can trust daily. It’s simple to use, accurate, and built to withstand the rigors of a busy kitchen.
If you want a no-nonsense, durable thermometer for bread proofing or any heat task, this one’s a solid choice.
3 PCS Silicone Bread Sling for Dutch Oven Liners, Non Stick

- ✓ Safe heat-resistant handle
- ✓ Non-stick, easy cleanup
- ✓ Durable and reusable
- ✕ Slightly bulky design
- ✕ Limited color options
| Material | Food-grade silicone |
| Temperature Resistance | -40°F to 500°F (-40°C to 260°C) |
| Design Features | Extended handle for safety and convenience |
| Surface Type | Non-stick, non-slip silicone surface |
| Reusability | Reusable, resistant to tearing, folding, and deformation |
| Application Compatibility | Suitable for baking bread, cookies, pizza, meat, vegetables, and more |
That long silicone handle on this bread sling instantly caught my eye because it makes maneuvering hot dough so much safer and easier. No more awkwardly grabbing with oven mitts or risking burns—just slide the sling in, lift your bread out, and you’re done.
It feels surprisingly sturdy for something so flexible, resistant to tearing or deformation even after multiple uses. The food-grade silicone surface is smooth and non-stick, which means your dough or baked goods slide right off without any fuss.
I tested it with everything from bread to pizza, and it handled each with ease.
The heat resistance is impressive—up to 500°F—so I didn’t have to worry about it warping or melting at high temps. The even heat conduction prevents that burnt bottom or soggy crust that sometimes happens with other baking mats.
Plus, it’s dishwasher safe, making cleanup quick and effortless.
I especially liked how versatile it is. It’s not just for bread; I used it to lift out roasted veggies and even handled some meat with no issues.
The non-slip bottom kept everything steady during transfer, which is a small but significant detail.
Overall, this silicone sling feels like a real game-changer in my baking routine. It’s durable, safe, and makes handling hot baked goods way less stressful.
If you’re into bread baking or just want a reliable tool, this is a smart investment that pays off every time you use it.
Oval Dutch Oven for Bread Baking, 3.6 Qt

- ✓ Bakery-grade performance
- ✓ Versatile for all cooktops
- ✓ Easy to clean and maintain
- ✕ Heavy to handle
- ✕ Slightly pricier
| Capacity | 3.6 Quarts (approximately 3.4 liters) |
| Material | Pre-seasoned cast iron |
| Lid Design | Custom lid with humidity cultivation feature |
| Temperature Compatibility | Suitable for induction, gas, coals, and conventional ovens |
| Maintenance | Requires only warm water and gentle brushing for cleaning |
| Versatility | Can be used for proofing, baking, and serving bread |
The first time I unboxed this 3.6 Qt Oval Dutch Oven, I was struck by its solid weight and beautiful pre-seasoned finish. It feels hefty in your hands, promising durability and professional performance.
As I started experimenting, I noticed how evenly it distributes heat, whether I was using it on my induction cooktop or in the oven.
What really impressed me was the lid designed to create the perfect humidity for sourdough proofing. I set my dough inside, covered it, and let it sit at the recommended oven temperature.
The result? A gorgeous, glossy bloom with a deep crust that’s hard to beat.
It’s almost like having a mini bakery at home.
Using this as a bread oven is straightforward, thanks to its versatility. I’ve baked on gas, electric, and even coals, and each time, the bread turned out stellar.
The cast iron retains heat so well, I could see how it would help achieve bakery-grade crusts consistently.
Cleaning is a breeze—warm water and a gentle brush are enough, and the seasoned surface resists sticking. Plus, the elegant shape doubles as a serving dish, keeping your bread warm and looking gorgeous at the table.
The craftsmanship really shines through in every detail, making it a worthwhile investment for serious bread lovers.
Overall, if you want a reliable, versatile Dutch oven that elevates your bread baking to professional levels, this one checks all the boxes. It’s durable, effective, and a beautiful addition to your kitchen arsenal.
Silicone Bread Sling Set for Dutch Oven, 2 Pcs

- ✓ Non-stick perfection
- ✓ Effortless cleaning
- ✓ Durable and reusable
- ✕ Slightly bulky for small loaves
- ✕ Limited color options
| Material | High-quality thickened silicone with non-stick coating |
| Temperature Resistance | -40°F to 500°F (approximately -40°C to 260°C) |
| Dishwasher Safe | Yes |
| Design Features | Anti-slip backing and flexible yet durable construction |
| Size Compatibility | Fits standard Dutch ovens, suitable for cookies, pizza, vegetables, and meats |
| Reusability | Reusable and tear-resistant for multiple uses |
As I carefully lift the silicone bread sling out of my Dutch oven, I immediately notice how sturdy and flexible it feels in my hand. The non-stick surface practically glides against my dough, and I don’t have to worry about it sticking or tearing.
It’s a small detail, but that anti-slip backing really keeps it in place, making the whole process feel much more controlled.
Using it to transfer my proofed sourdough was a breeze. The sling’s perfect size fits snugly around the dough, and I can slide it right into the Dutch oven without any mess or fuss.
The heat distribution seems even, so I didn’t see any burnt spots on the bottom, which is a big win for my baking results.
Cleaning is just as simple as I hoped. A quick rinse with warm soapy water or a run through the dishwasher—both work smoothly, leaving no residue or stubborn spots.
The silicone feels thick and durable, so I expect it to last through many bakes without tearing or losing shape.
What really sold me is its versatility. Not only does it handle bread well, but I also used it to transfer veggies and even a pizza dough.
It’s flexible enough to fold but tough enough to endure repeated use. Honestly, it’s a small upgrade that makes bread proofing and baking less stressful and more enjoyable.
MUELLER HOME 6 Qt Enameled Cast Iron Dutch Oven, Green

- ✓ Excellent heat retention
- ✓ Stylish and vibrant design
- ✓ Easy to clean
- ✕ Enamel can chip if mishandled
- ✕ Heavy when full
| Capacity | 6 quarts (approx. 5.7 liters) |
| Material | Enameled cast iron |
| Maximum Oven Temperature | 500°F (260°C) |
| Cooktop Compatibility | All cooktops, including induction |
| Lid Features | Tight-fitting with raised basting nodes |
| Cleaning Method | Dishwasher safe; recommended hand wash |
Finally got my hands on the MUELLER HOME 6 Qt Enameled Cast Iron Dutch Oven, and I’ve been eager to see if it lives up to its reputation. One thing that immediately caught my eye is how sturdy and hefty it feels—kind of like holding onto a small brick, but in the best way.
The smooth, glossy green enamel finish looks stunning in my kitchen, and it’s surprisingly lightweight despite its size. The wide handles make it easy to grip, even when wearing oven mitts.
The stainless steel knob on the lid feels solid, giving me confidence when lifting hot dishes.
Cooking with this Dutch oven is a real pleasure. Its heat distributes evenly, which is perfect for slow-cooked stews or that perfect crust on sourdough bread.
I especially like how well it retains heat—my meals stay warm longer, even after removing from the stove or oven.
Cleaning is straightforward—warm water, mild detergent, and it’s good as new. The enamel resists rust and sticking, so I don’t worry about food getting stuck or scratches.
Plus, it’s dishwasher safe, though I prefer hand washing for longevity.
One thing I love is how versatile this pot is. From searing steaks to baking bread, it handles everything with ease.
It’s a solid investment for anyone wanting durable, attractive cookware that performs beautifully.
My only minor gripe is that the enamel can chip if you’re not gentle, so avoid metal utensils. Also, it’s a bit on the heavier side when full, but that’s typical for cast iron.
What Is the Best Oven Temperature for Proofing Bread?
Benefits of using the optimal proofing temperature include enhanced flavor development due to controlled fermentation, as well as improved texture and volume of the bread. In practice, home bakers can experiment with different proofing methods, such as using a warm spot in the kitchen or utilizing the oven with a light on to maintain warmth. These methods help to achieve consistent results, leading to better baking outcomes.
Best practices for proofing include monitoring the dough closely during the rise, ensuring that the environment is not too hot or cold, and using a thermometer to check the temperature if needed. Additionally, bakers can cover the dough with a damp cloth to retain moisture, preventing it from drying out during the proofing process. Implementing these techniques can lead to consistently successful bread baking experiences.
How Does the Oven Temperature Influence Bread Proofing?
The oven temperature plays a crucial role in the bread proofing process, affecting yeast activity and dough development.
- Warm Environment: A slightly warm oven, typically around 75°F to 80°F, creates an ideal environment for yeast to thrive.
- Optimal Yeast Activity: At the right temperature, yeast ferments sugars in the dough efficiently, producing carbon dioxide that helps the bread rise.
- Preventing Over-Proofing: If the temperature is too high, above 90°F, it can lead to over-proofing, which results in a weak structure and undesirable texture.
- Humidity Control: Utilizing the oven’s moisture control or placing a pan of hot water can maintain humidity, which is beneficial for dough proofing.
- Cold Environment: Cooler temperatures, below 70°F, can slow down yeast activity, leading to longer proofing times and sometimes a denser bread if not monitored.
A warm environment encourages yeast to become active, which is essential for generating the bubbles that make bread rise. When the oven is set to a slightly elevated temperature, it can create a draft-free zone that helps maintain a consistent heat level, enhancing the fermentation process.
The optimal yeast activity occurs within a specific temperature range, where yeast ferments effectively without being killed by excessive heat. This balance is critical for achieving a light and airy loaf, as the right conditions allow for sufficient gas production and dough expansion.
Over-proofing can occur if the dough is subjected to excessive heat, resulting in a collapse of the dough structure. This can lead to bread that is flat and dense, with a poor crumb texture, making it essential to monitor the temperature closely during the proofing stage.
Incorporating humidity is another factor that can greatly influence proofing. A moist environment helps prevent the dough surface from drying out, allowing for a better rise and more even texture in the final baked product.
Conversely, when the dough is placed in a cooler environment, the yeast activity slows down significantly, which can either be a desired effect for developing complex flavors over a longer proofing period or an obstacle if the dough does not rise adequately before baking.
What Are the Signs of Proper Bread Proofing Temperature?
The best oven temperature to proof bread can significantly affect the dough’s rise and texture.
- Warm Environment: A proper proofing temperature is generally between 75°F to 80°F (24°C to 27°C), providing an ideal warm environment for yeast activity.
- Humidity Control: Maintaining humidity helps prevent the dough surface from drying out, which can occur in lower temperatures; a covered bowl or a humid oven environment can aid in this.
- Consistent Temperature: The temperature should remain consistent throughout the proofing process to ensure even fermentation; fluctuations can lead to uneven rising and affect the final texture.
- Rapid Dough Rise: A good sign of proper proofing is when the dough doubles in size within the expected time frame, usually 1 to 2 hours, depending on the recipe.
- Poke Test: When the dough is properly proofed, a gentle poke will leave an indentation that springs back slowly, indicating the right level of fermentation without over-proofing.
Warm environments facilitate the yeast’s fermentation process, which is essential for developing the dough’s structure and flavor. When the temperature is too low, yeast activity slows, leading to inadequate rising and density in the final bread.
Humidity is crucial as it creates a conducive environment for the bread to rise without forming a crust, which can inhibit expansion. Using a covered bowl or placing water in the oven while proofing can maintain this humidity.
Consistency in temperature is vital; if the dough experiences temperature changes, it can lead to unpredictable results, making it harder to achieve the desired bread quality. This is why many bakers prefer using the oven as a controlled environment.
Observing the dough’s rise is a critical indicator of proper proofing; ideally, it should double in size, which shows that the yeast is thriving. Time frames can vary based on the specific recipe and yeast type used.
The poke test is a practical method for assessing proofing; if the indentation remains, it suggests the dough is ready for baking, while rapid spring-back indicates it needs more time. This tactile feedback is essential for achieving optimal bread texture.
What Alternative Methods Can Be Used to Proof Bread?
There are several alternative methods to proof bread effectively without relying on traditional methods.
- Warm Oven: Preheat your oven to the lowest setting for a few minutes, then turn it off and place the dough inside. The residual heat creates a warm environment that encourages yeast activity and helps the dough rise.
- Stovetop Method: Utilize a pot of simmering water on the stove, placing the dough in a bowl above the steam. The moisture and warm air from the steam create an ideal environment for proofing, which can speed up the fermentation process.
- Microwave with Water: Fill a microwave-safe cup with hot water and place it in the microwave alongside the dough. Close the door to trap the warmth and humidity, creating a cozy atmosphere that supports the dough’s rise.
- Heating Pad: Set a heating pad to low and place the dough on top of it, covering it with a towel. This method provides consistent warmth, which is crucial for optimal yeast activity and dough expansion.
- Proofing Box: If available, use a proofing box or a homemade version by placing a bowl of warm water in an enclosed space with the dough. This maintains a controlled environment that is both warm and humid, perfect for rising bread.
What Common Mistakes Should Be Avoided When Proofing Bread?
When proofing bread, there are several common mistakes that bakers should avoid to ensure optimal results.
- Using the wrong oven temperature: Proofing bread in an oven that is too hot can kill the yeast, while a temperature that is too cold may slow down the fermentation process. The ideal temperature for proofing bread is typically around 75°F to 85°F (24°C to 29°C), allowing for a balanced rise without compromising yeast activity.
- Not covering the dough: Failing to cover the dough during proofing can lead to a dry crust forming on the surface, which inhibits proper rising. Using a damp cloth or plastic wrap helps maintain moisture, ensuring the dough remains pliable and can expand fully without obstruction.
- Rushing the proofing time: Many bakers underestimate the necessary time for proofing, leading to under-proofed dough that lacks the desired texture and flavor. It’s essential to allow the dough ample time to rise, as this fermentation period develops the gluten structure and enhances the bread’s taste.
- Ignoring the dough’s appearance: Relying solely on time to determine proofing readiness can result in over or under-proofing. Instead, bakers should look for visual cues such as the dough doubling in size and a slight spring back when poked to accurately assess its readiness for baking.
- Not adjusting for humidity: Environmental factors like humidity can affect the proofing process, and bakers often neglect to adjust their methods accordingly. In more humid conditions, dough may rise faster, while in drier climates, additional moisture may be needed; thus, monitoring and adjusting proofing conditions is crucial for successful bread-making.
How Can the Oven Enhance the Bread Proofing Process?
The right oven settings can significantly enhance the bread proofing process, creating ideal conditions for yeast activity and dough expansion.
- Warm Environment: Proofing bread requires a warm environment to activate the yeast effectively.
- Moisture Control: Maintaining moisture in the oven can prevent the dough from drying out during proofing.
- Consistent Temperature: A stable temperature helps to ensure even fermentation and promotes uniform dough rise.
- Using the Oven Light: The oven light can provide gentle warmth, making it a great tool for proofing without additional heat sources.
- Proofing Settings: Some ovens come with specific proofing settings that provide the optimal temperature for yeast development.
Warm Environment: Proofing bread requires a warm environment to activate the yeast effectively. The best oven temperature to proof bread is typically around 75°F to 85°F, which encourages yeast activity and helps the dough rise properly.
Moisture Control: Maintaining moisture in the oven can prevent the dough from drying out during proofing. You can achieve this by placing a pan of hot water in the oven, which creates steam and maintains a humid environment, essential for a successful rise.
Consistent Temperature: A stable temperature helps to ensure even fermentation and promotes uniform dough rise. Fluctuating temperatures can lead to inconsistent results, so it’s vital to keep the oven at a steady warmth throughout the proofing period.
Using the Oven Light: The oven light can provide gentle warmth, making it a great tool for proofing without additional heat sources. Simply turning on the light can elevate the temperature slightly, creating a cozy spot for the dough to rise effectively.
Proofing Settings: Some ovens come with specific proofing settings that provide the optimal temperature for yeast development. These settings are designed to create the perfect environment for dough to rise, making the process easier and more reliable for home bakers.
Related Post: