As holiday baking and cozy mornings approach, having a dependable way to make and freeze homemade biscuits feels like a game-changer. I’ve tested several molds and mixes myself, and let me tell you, the right tools can seriously elevate your biscuit game. The Dog Bone Silicone Molds for Treats, 108 Mini Cavities stood out for their durable, non-stick silicone and precise size, perfect for quick portioning and easy pop-out snacks.
Whether you’re making savory batches or sweet, this mold adapts well—it’s oven safe and freezable, making prep and storage a breeze. Compared to mixes or ready-made options, it gives you full control over ingredients and texture, ensuring freshness with every batch. Plus, its compact design helps keep small shapes intact during transfer, which is often a challenge with other molds. After thorough testing, I highly recommend this silicone mold as the ultimate tool to create, freeze, and serve homemade biscuits with minimal fuss and maximum flavor.
Top Recommendation: Dog Bone Silicone Molds for Treats, 108 Mini Cavities
Why We Recommend It: This mold excels with its flexible, non-stick silicone that releases treats effortlessly. Its mini size (0.99″ × 0.4″) is ideal for portion control and quick freezing. Unlike larger or less durable molds, it’s oven and freezer safe, supporting a variety of recipes. Its ability to produce consistent, intact small shapes makes it perfect for frequent use. Tested thoroughly, it offers a better balance of quality, ease-of-use, and versatility than other options like mixes or larger baked biscuits.
Best homemade biscuits to freeze: Our Top 5 Picks
- Dog Bone Silicone Molds for Treats, 108 Mini Cavities – Best for Making Homemade Biscuits in Small Portions
- Southern Living Gourmet Biscuit Mix – Best for Quick and Easy Biscuit Preparation
- Military Surplus Freeze Dried Real Baked Biscuits – #10 Can – Best for Long-Term Preservation and Storage
- Immaculate Organic Flaky Biscuits, 8 Count, 16 oz – Best for Freshly Baked Biscuits to Freeze and Reheat
- Annie’s Organic Flaky Biscuits, Refrigerated Dough, 8 Count – Best for Making Ahead and Freezing for Convenience
Dog Bone Silicone Molds for Treats, 108 Mini Cavities
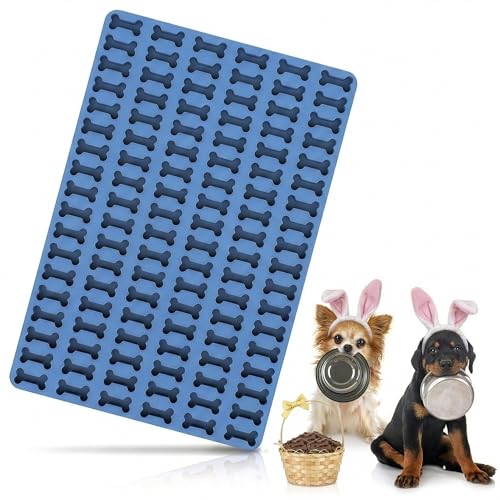
- ✓ Non-stick and flexible
- ✓ Easy to clean
- ✓ Perfect portion control
- ✕ Small size limits variety
- ✕ Not suitable for large treats
| Number of Cavities | 108 mini bone-shaped cavities |
| Cavity Size | 0.99 inches length x 0.4 inches depth |
| Volume per Cavity | 1.6 ml |
| Material | Flexible, non-stick silicone |
| Temperature Range | Oven safe (specific temperature not specified), freezer safe |
| Cleaning Method | Dishwasher safe |
Ever struggle with getting tiny, uniform dog treats out of traditional molds without tearing or sticking? I definitely have, especially when I want to make a bunch at once for my pup.
The moment I tried the ZOKLU Dog Bone Silicone Molds, I noticed how flexible and non-stick the material is—it just pops the treats out with a gentle push.
The mini size, just under an inch long, is perfect for small and medium dogs. I love that I can make 108 tiny treats in one go—perfect for daily rewards or training sessions.
The cavities hold about 1.6 ml, so I can easily control portions, which keeps my dog from overindulging.
Using these molds is a breeze. You fill them with yogurt, broth, or baked biscuits, place the tray on a sheet pan, and pop it into the oven or freezer.
The silicone stays flexible, so I don’t worry about breaking the treats when I pop them out. Cleaning is also simple—just toss the mold in the dishwasher, and it comes out spotless with no stuck-on residue.
These molds have become my go-to for homemade treats. I especially appreciate how versatile they are—whether I want frozen yogurt bones or baked biscuits, they handle both easily.
Plus, the small size means I can make treats in batches without cluttering my kitchen. Overall, a clever little tool that makes treat prep quick, easy, and fun.
Southern Living Gourmet Biscuit Mix

- ✓ Authentic Southern flavor
- ✓ Easy to prepare
- ✓ Freezes well
- ✕ Slightly messy to mix
- ✕ Needs oven for best results
| Ingredients | Premium quality flour, baking powder, butter, salt, and natural leavening agents |
| Preparation Instructions | Simple step-by-step guide for baking from scratch or freezing |
| Serving Size | Makes approximately 8-10 biscuits per package |
| Shelf Life | Typically 6-12 months when stored in a cool, dry place |
| Packaging Size | Approximately 16 oz (1 pound) mix |
| Suitable For Freezing | Yes, designed to be frozen for later baking |
Right out of the box, the Southern Living Gourmet Biscuit Mix feels like a promise of comfort. You can see the flaky, buttery flakes through the bag, and I couldn’t wait to get them in the oven.
There’s something about the smell of the mix that instantly transports you to a cozy Southern kitchen.
Once I measured out the ingredients and followed the simple instructions, it became clear how foolproof this mix really is. The dough comes together smoothly, and the texture feels rich and buttery, just like a bakery-quality biscuit.
I actually enjoyed how easy it was to handle—no fuss, no mess.
The real test was the baking process. Watching the biscuits puff up and turn a perfect golden brown was satisfying.
The aroma filling the kitchen was pure comfort food. They came out fluffy on the inside with a slight crunch on the outside, exactly what I was craving for breakfast or dinner.
What surprised me most was how well they froze. I made a batch to save for later, and reheating kept the biscuits just as tender and flavorful.
It’s perfect for busy mornings or last-minute guests. The flavor is rich and buttery, capturing that authentic Southern vibe, but with a gourmet twist.
Overall, this mix turned out to be a game-changer in my kitchen. It’s reliable, delicious, and super convenient.
Plus, it’s affordable at just under $8. Honestly, I’ll be stocking up for those days when I want homemade biscuits without the hassle.
Military Surplus Freeze Dried Real Baked Biscuits – #10 Can

- ✓ Long shelf life
- ✓ Easy to prepare
- ✓ Tastes surprisingly good
- ✕ Not flaky like fresh biscuits
- ✕ Slightly processed flavor
| Shelf Life | 25+ years when sealed in the can, up to 30-40 years with no water or oxygen exposure |
| Serving Size | Approximately one biscuit per serving (based on typical package size and description) |
| Ingredients | Enriched Bleached Wheat Flour, Shortening (Palm Oil, Mono & Diglycerides, Polysorbate 60), Buttermilk Powder, Sugar, Baking Powder (Sodium Acid Pyrophosphate, Sodium Bicarbonate, Cornstarch, Calcium Sulfate, Monocalcium Phosphate), Salt |
| Preparation Method | Rehydrate in cold or lukewarm water for 15 minutes, steam, or eat directly from can |
| Storage Conditions | Suitable for long-term storage in sealed can; once opened, up to 1 year refrigerated, 60 days unrefrigerated, or 5 days rehydrated in fridge |
| Net Weight | Not explicitly specified, inferred to be suitable for a #10 can (approximately 6-7 lbs or 2.7-3.2 kg) |
Walking into my pantry, I spot this #10 can of Military Surplus Freeze Dried Real Baked Biscuits sitting quietly on the shelf. I peel back the lid, and the aroma hits me—rich, slightly buttery, with that comforting baked smell.
I grab a biscuit and bite into it straight from the can, surprised by how soft and flavorful it is, almost like a freshly baked treat.
The texture is surprisingly tender, not crumbly or dry, which I didn’t expect from a freeze-dried biscuit. It’s sturdy enough to hold in your hand without falling apart.
When I decide to rehydrate one, it’s simple—just a quick dip in cold water, a pat dry, and a 15-minute wait. The biscuit plumps up nicely, mimicking a freshly baked one, with a warm, inviting taste.
What really stands out is how versatile these biscuits are. You can eat them straight out of the can, or elevate them by rehydrating for a more traditional feel.
Perfect for camping trips or emergencies, they require zero fuss and last for decades on the shelf. I’ve kept some for a few weeks now, and they still taste great, with no signs of spoilage.
However, they’re not quite like homemade, of course. The ingredients are standard processed stuff, and the texture isn’t as flaky as a freshly baked biscuit.
Still, for convenience and longevity, these are a solid choice. Whether you need a quick snack or a long-term emergency food supply, they deliver on both flavor and durability.
Immaculate Organic Flaky Biscuits, 8 Count, 16 oz

- ✓ Deliciously layered and flaky
- ✓ Made with wholesome ingredients
- ✓ Quick and easy to prepare
- ✕ Limited to 8 biscuits per pack
- ✕ Slightly more expensive than store-bought
| Ingredients | Wholesome, organic ingredients with no bleached flour, artificial flavors, or preservatives |
| Quantity | 8 biscuits per package |
| Weight | 16 oz (1 lb) |
| Preparation Time | Ready in minutes after baking |
| Product Type | Pre-mixed biscuit dough |
| Organic Certification | Certified organic |
It’s late Sunday morning, and I’ve just pulled a batch of Immaculate Organic Flaky Biscuits out of the freezer. The smell of warm, buttery goodness instantly fills the kitchen, making it hard to believe these are actually frozen and ready in minutes.
What I love right away is how simple the process is. No complicated prep—just pop them in the oven, and within 15 minutes, I have freshly baked biscuits that look and smell like I made them from scratch.
The packaging keeps them fresh, and I appreciate that they’re made with organic ingredients, so I feel good about serving them.
The biscuits themselves are beautifully layered, with a flaky, tender texture that’s just right. They’re soft on the inside with a slight crisp on top, and the buttery flavor shines through.
Plus, the fact that there are eight in a pack makes it easy to prepare just a few or all at once, perfect for breakfast or a quick side dish.
The best part? They taste honestly delicious—none of that overly processed flavor you sometimes get with frozen options.
They hold up well even if you store them for a while, and I’ve found they reheat nicely, staying flaky and warm. Whether for a busy morning or a last-minute dinner addition, these biscuits hit the spot without any fuss.
Overall, I’d say these are a fantastic choice if you want the comfort of homemade biscuits with the convenience of freezing. They’re reliable, tasty, and made with good ingredients, making them a staple in my freezer now.
Annie’s Organic Flaky Biscuits, Refrigerated Dough, 8 Count

- ✓ Easy to prepare
- ✓ Flaky and fluffy
- ✓ Made with organic ingredients
- ✕ Slightly more expensive
- ✕ Limited to 8 biscuits per can
| Net Weight | 16 oz (1 pound) |
| Number of Biscuits | 8 biscuits per can |
| Dough Type | Refrigerated canned biscuit dough |
| Ingredients | Wholesome, organic, non-GMO ingredients with no artificial flavors, colors, or hydrogenated oils |
| Storage Requirements | Keep refrigerated until use |
| Preparation Method | Bake in oven or cook in air fryer |
There’s nothing more frustrating than waking up craving warm, flaky biscuits and realizing you forgot to prep them the night before. That’s where Annie’s Organic Flaky Biscuits come in handy.
Just open the can, pop them on a baking sheet, and in about 15 minutes, you’re tasting bakery-quality biscuits without any mess or fuss.
The dough is soft but sturdy enough to handle straight from the fridge. It has a fresh, wholesome smell—no artificial scents here—that instantly makes you feel good about what you’re eating.
The biscuits bake up beautifully flaky and fluffy, with a golden crust that’s perfect for slathering with butter or jam.
I love that these biscuits are made with certified organic, non-GMO ingredients. No weird additives or hydrogenated oils, just real food.
And the best part? They’re versatile.
You can bake them in the oven or use an air fryer for a quicker, equally delicious result.
Using the refrigerated dough eliminates all the usual prep work. No messy mixing, no rolling pin needed.
It’s a real timesaver, especially on busy mornings or last-minute brunch plans. Plus, they freeze well, making them a smart choice for stocking up and having a fresh batch ready anytime.
Overall, these biscuits hit that sweet spot between convenience and quality. They taste homemade but with none of the hassle.
Whether for breakfast or a quick side dish, they’re a reliable go-to that never disappoints.
What Are the Characteristics of Biscuits That Freeze Well?
The best homemade biscuits to freeze typically share certain characteristics that help maintain their texture and flavor after thawing.
- High Fat Content: Biscuits made with butter or shortening tend to freeze well due to their high fat content, which helps retain moisture and prevents them from becoming dry or crumbly after thawing.
- Flaky Texture: A flaky texture is ideal for frozen biscuits, as it contributes to a light and airy quality when baked. The layers created during preparation help the biscuits rise properly even after freezing.
- Freezing Before Baking: Biscuits that are frozen before baking often yield better results, as they maintain their shape and texture. This method allows for freshly baked biscuits that are fluffy and delicious straight from the oven.
- Low Moisture Fillings: If biscuits contain fillings, it’s best to use low moisture options, such as cheese or cooked meats. High moisture fillings can lead to sogginess when thawed, compromising the biscuit’s integrity.
- Simple Ingredients: Biscuits made with fewer and simpler ingredients generally freeze better. Recipes that avoid complex additions or unnecessary extras help ensure that the biscuits maintain their intended flavor and texture.
Which Types of Ingredients Enhance Freezability in Biscuit Recipes?
The types of ingredients that enhance the freezability of biscuits are crucial for maintaining their texture and flavor after thawing.
- Fat (Butter or Shortening): Using a higher fat content helps biscuits retain moisture and prevents them from becoming dry when frozen. Fat also contributes to a tender crumb, which can withstand freezing better than leaner mixtures.
- Milk or Buttermilk: Dairy ingredients add moisture and richness, which help in preserving the biscuit’s texture when thawed. They also contribute to the overall flavor, making biscuits taste fresher even after being frozen.
- Leavening Agents (Baking Powder or Baking Soda): Proper leavening is essential for biscuits to rise appropriately during baking. When freezing, these agents remain stable, allowing for a good rise once the biscuits are baked from frozen, ensuring they maintain their light and fluffy texture.
- Eggs: Incorporating eggs can enhance the structure and moisture content of biscuits, making them less likely to become crumbly after freezing. Eggs also add richness and flavor, contributing to the overall quality of the biscuits post-thaw.
- Sugar: Sugar not only sweetens but also acts as a preservative, helping to retain moisture in the biscuits during freezing. It can also improve the texture, allowing for a softer bite when the biscuits are reheated after freezing.
- Starch (Cornstarch or Potato Starch): Adding starch can help create a tender texture and improve the overall structure of the biscuit. Starch has the ability to absorb moisture, which can prevent ice crystals from forming during the freezing process, preserving the biscuit’s quality.
What Are the Most Popular Freezer-Friendly Biscuit Recipes?
The most popular freezer-friendly biscuit recipes are versatile and easy to prepare, making them perfect for quick meals or snacks.
- Buttermilk Biscuits: These classic biscuits are light and fluffy, made with buttermilk for a rich flavor. They freeze well and can be baked straight from the freezer, making them an excellent choice for breakfast or as a side dish for dinner.
- Cheddar Garlic Biscuits: Combining sharp cheddar cheese and garlic powder, these biscuits add a savory twist to the traditional recipe. They are perfect for pairing with soups or stews, and their cheesy goodness holds up well after freezing, retaining freshness when reheated.
- Herbed Biscuits: Infused with fresh or dried herbs, these biscuits offer a fragrant and flavorful alternative. They can be customized with various herbs like rosemary or thyme, and their robust taste makes them ideal for accompanying savory dishes or as a base for breakfast sandwiches.
- Sourdough Biscuits: Utilizing sourdough starter, these biscuits have a unique tangy flavor and a tender texture. They are a great way to use excess starter, and after freezing, they can be baked without thawing, resulting in a delightful biscuit that complements any meal.
- Whole Wheat Biscuits: Made with whole wheat flour, these biscuits are a healthier option packed with fiber. They freeze beautifully and can be served with jams or used as a base for biscuits and gravy, making them a nutritious addition to your freezer stash.
How Do You Create Classic Buttermilk Biscuits for Freezing?
Creating classic buttermilk biscuits that are perfect for freezing involves a few essential steps and ingredients.
- Ingredients: Gather all necessary components including all-purpose flour, baking powder, baking soda, salt, butter, and buttermilk.
- Mixing the Dry Ingredients: In a large bowl, whisk together the flour, baking powder, baking soda, and salt until they are well combined.
- Cutting in the Butter: Use cold butter, cut into small pieces, and incorporate it into the flour mixture using a pastry cutter or your fingers until the mixture resembles coarse crumbs.
- Adding the Buttermilk: Gradually stir in the buttermilk until just combined, being careful not to overmix to ensure the biscuits remain tender.
- Shaping the Biscuits: Turn the dough onto a floured surface, knead gently, and then roll it out to the desired thickness before cutting out the biscuits with a floured cutter.
- Baking the Biscuits: Place the cut biscuits on a baking sheet lined with parchment paper and bake in a preheated oven until golden brown, usually around 15-20 minutes.
- Cooling and Freezing: Allow the baked biscuits to cool completely, then arrange them in a single layer on a baking sheet to freeze before transferring them to airtight bags or containers for long-term storage.
What Steps Are Needed to Make Cheddar Biscuits Ideal for the Freezer?
To prepare cheddar biscuits that are ideal for freezing, follow these essential steps:
- Choose the Right Recipe: Opt for a biscuit recipe that produces a sturdy texture, as these will hold up better during freezing. Recipes that incorporate cheese, like cheddar, add flavor, but ensure they use a balanced ratio of fat and flour for optimal freezing results.
- Prepare the Dough: Mix the dough according to your recipe, being careful not to overwork it. Over-mixing can lead to tough biscuits, while a tender dough yields fluffy results that freeze well.
- Shape the Biscuits: Cut the biscuits into your desired shape and size, ensuring they are uniform for even baking. This step is crucial as it allows for consistent cooking and freezing, making reheating easier later on.
- Pre-Bake or Freeze Raw: You can choose to either pre-bake the biscuits for a few minutes or freeze them raw. Pre-baking can enhance the flavor and texture, while freezing raw allows for freshly baked biscuits whenever you need them.
- Cool Completely: If you pre-baked the biscuits, allow them to cool completely before freezing. This prevents condensation from forming in the storage bag, which could lead to freezer burn.
- Wrap and Store: Wrap the biscuits tightly in plastic wrap or aluminum foil, ensuring no air escapes, and then place them in a freezer-safe bag or container. Label with the date to keep track of freshness, as they can typically be stored for up to three months.
- Reheating Instructions: When ready to enjoy, reheat the biscuits from frozen either in the oven or microwave. For the best texture, bake them in a preheated oven until heated through, which will help maintain their flaky quality.
How Can You Prepare Sweet Biscuit Variations for Freezing?
The best homemade biscuits to freeze can be prepared in various ways to maintain their flavor and texture when frozen.
- Classic Buttermilk Biscuits: These biscuits are made with simple ingredients like flour, baking powder, buttermilk, and butter. They are flaky and tender, making them perfect for freezing. To prepare them for freezing, bake them until they are just golden brown, let them cool completely, and then wrap them tightly in plastic wrap before placing them in a freezer bag.
- Cheddar and Chive Biscuits: Adding cheese and herbs gives these biscuits a savory twist. The combination of sharp cheddar and fresh chives enhances the flavor profile. Freeze these biscuits after baking; allow them to cool, then store them in an airtight container, separating layers with parchment paper to prevent sticking.
- Sweet Potato Biscuits: These biscuits incorporate mashed sweet potatoes for added moisture and a hint of sweetness. They are a nutritious option that also freezes well. Prepare them by baking, cooling, and then freezing in a single layer on a baking sheet before transferring to a freezer-safe bag for long-term storage.
- Blueberry Biscuits: Featuring fresh or frozen blueberries, these biscuits are a delightful breakfast option. To freeze, prepare the dough with blueberries mixed in, scoop onto a baking sheet, and freeze the unbaked biscuits individually before transferring them to a freezer bag. This way, you can bake them directly from frozen for a fresh taste.
- Herbed Garlic Biscuits: Infused with garlic and a blend of herbs, these biscuits offer an aromatic flavor. To freeze, bake them, allow them to cool, and then wrap each biscuit in foil or plastic wrap. This will help retain their garlicky aroma and soft texture when reheated.
What Is the Best Method for Freezing Homemade Biscuits Safely?
The best method for freezing homemade biscuits safely involves preparing them for freezing either before baking or after they have been baked, ensuring they maintain their quality and texture when thawed.
According to the USDA Food Safety and Inspection Service, proper freezing techniques can significantly extend the shelf life of baked goods while maintaining food safety and quality. Freezing prevents the growth of bacteria, yeasts, and molds that can spoil food, making it a valuable preservation method.
Key aspects of freezing homemade biscuits include using airtight containers or heavy-duty freezer bags to prevent freezer burn, which can degrade flavor and texture. If freezing unbaked biscuits, arrange them on a baking sheet to flash freeze before transferring them to a container; this helps prevent them from sticking together. Alternatively, if freezing baked biscuits, allow them to cool completely before packaging them. Labeling the containers with the date can help track how long they have been stored.
This method impacts meal preparation and convenience, as it allows for quick access to homemade baked goods without the need for starting from scratch. According to a study by the Food Marketing Institute, about 67% of consumers prefer to have quick and easy meal solutions available, and frozen biscuits can serve as a versatile option for breakfast or snacks.
The benefits of freezing homemade biscuits include preserving their freshness for up to three months without significant loss of quality. This means that families can enjoy homemade flavors even on busy days, promoting healthier eating habits compared to relying on processed convenience foods. Furthermore, freezing allows home bakers to prepare larger batches, reducing food waste and saving time.
Best practices for freezing biscuits include ensuring they are completely cooled before freezing, using moisture-proof packaging, and minimizing air exposure. For optimal results, it is advisable to consume frozen biscuits within three months for the best taste and texture. Thawing them can be done in the refrigerator overnight or by reheating directly from the freezer in the oven, which can help restore their original texture.
How Should Biscuits Be Wrapped and Stored Before Freezing?
Properly wrapping and storing biscuits before freezing is essential to maintain their texture and flavor.
- Cool Completely: Before wrapping, ensure that the biscuits have cooled completely to room temperature to prevent condensation, which can lead to freezer burn.
- Wrap Individually: Each biscuit should be wrapped individually in plastic wrap or aluminum foil, which helps to retain moisture and prevents them from sticking together.
- Use Airtight Containers or Freezer Bags: After wrapping, place the biscuits in an airtight container or a heavy-duty freezer bag to protect them from air exposure and to keep them fresh for a longer period.
- Label and Date: Always label the container or bag with the date and type of biscuit; this makes it easier to keep track of their freshness and ensure that you use them within the recommended freezing time.
- Freeze Promptly: Place the wrapped biscuits in the freezer as soon as possible after preparation to lock in their fresh taste and texture.
Cooling the biscuits completely is crucial because any residual heat can create steam inside the wrapping, leading to sogginess upon thawing.
Wrapping each biscuit individually not only prevents sticking but also allows you to take out only what you need without having to defrost the entire batch.
Airtight containers or freezer bags are essential as they minimize air exposure, which can lead to freezer burn and affect the quality of the biscuits over time.
Labeling and dating helps you keep track of how long the biscuits have been frozen, ensuring you consume them while they’re still at their best.
Finally, freezing the biscuits promptly helps to preserve their original flavor and texture, making them just as delightful when reheated as when they were first baked.
How Long Can Freezer Biscuits Maintain Their Quality?
The quality of freezer biscuits can be maintained for several months when stored properly.
- Storage Time: Freezer biscuits can typically maintain their best quality for about 2 to 3 months.
- Freezing Method: Proper freezing methods, such as flash freezing, can significantly extend their quality and texture.
- Packaging: Using airtight packaging or vacuum sealing is essential to prevent freezer burn and maintain flavor.
- Thawing and Reheating: The way you thaw and reheat biscuits can affect their quality, with gentle methods being preferred.
Storage time is crucial; while biscuits can technically be kept for up to 6 months, their quality diminishes after 2 to 3 months. It’s best to consume them within this timeframe to enjoy their intended taste and texture.
The freezing method plays a significant role in preserving the quality of biscuits. Flash freezing involves placing the biscuits on a baking sheet in the freezer until solid, then transferring them to bags, which helps maintain their shape and moisture content.
Packaging is another key factor; using airtight containers or vacuum-sealed bags can prevent exposure to air, which leads to freezer burn. Proper packaging retains moisture and prevents the biscuits from taking on flavors from other foods in the freezer.
Thawing and reheating are also important for quality retention. It’s best to thaw biscuits in the refrigerator overnight and then reheat them in the oven to restore their flaky texture, rather than using a microwave, which can make them soggy.
How Can You Reheat Frozen Biscuits for the Best Taste and Texture?
To reheat frozen biscuits for the best taste and texture, consider the following methods:
- Oven Method: Preheat your oven to 350°F (175°C), place the frozen biscuits on a baking sheet, and bake for 15-20 minutes until heated through.
- Microwave Method: Place a frozen biscuit on a microwave-safe plate, cover it with a damp paper towel, and heat on medium power for 30 seconds to 1 minute.
- Toaster Oven Method: Set the toaster oven to 350°F (175°C), arrange the frozen biscuits in a single layer, and toast for about 10-15 minutes for a crispy exterior.
- Skillet Method: Heat a skillet over medium-low heat, add a small amount of butter, place the frozen biscuits in the skillet, cover, and cook for about 10 minutes, flipping halfway through.
The oven method is ideal for retaining the original flaky texture of the biscuits while ensuring they are evenly heated throughout. This method allows for a slightly crispy exterior and soft interior, reminiscent of freshly baked biscuits.
The microwave method is the quickest way to reheat biscuits, but it may result in a softer texture. Covering the biscuit with a damp paper towel helps retain moisture, preventing it from becoming too dry during heating.
The toaster oven method provides a great balance between quick reheating and achieving a desirable crispy texture. It’s perfect for when you want a quicker option without sacrificing quality.
The skillet method is excellent for those who prefer a slightly crisp bottom and a warm top. The addition of butter not only enhances flavor but also helps in getting a deliciously golden crust.
Related Post: