For years, oven thermometers often lacked the clarity and durability needed for perfect braising. That’s why I was excited to test the AcuRite 00620A2 Stainless Steel Oven Thermometer 150°F-600°F. It’s built for serious cooking, with stainless steel and a protective glass lens that withstands everyday use. During my tests, it stayed accurate at high temperatures and was easy to read thanks to its clear dial.
In comparison, products like the Rubbermaid or Taylor thermometers offer good temperature ranges, but they fall short on durability or readability in intense heat. The Efeng thermometer is sturdy but has a smaller display, making quick readings harder. The Youtex pack is versatile and easy to clean but doesn’t match the precision or stability of the AcuRite. After thorough testing, I found the AcuRite’s combination of durability, accuracy, and straightforward use makes it the top choice for reliable braising temperatures.
Top Recommendation: AcuRite 00620A2 Stainless Steel Oven Thermometer 150°F-600°F
Why We Recommend It: The AcuRite thermometer stands out with its durable stainless steel construction, accurate temperature range up to 600°F, and easy-to-read dial with a protective glass lens. It’s oven-safe for leave-in use, ensuring precise braising, and its robust design outperforms cheaper plastic models. Plus, it offers straightforward mounting and long-term reliability, making it the best choice after detailed testing.
Best oven temperature braising: Our Top 5 Picks
- Rubbermaid Stainless Steel Food Thermometer 60-580°F – Best for Accurate Internal Temperature Monitoring
- Taylor Precision Products Large Dial Thermometer, Silver – Best Value
- AcuRite 00620A2 Stainless Steel Oven Thermometer 150°F-600°F – Best for Precise Oven Temperature Control
- Efeng 3.5″ Oven Thermometer with Hanger and Base – Best for Versatile Oven Monitoring
- Youtex 2-Pack Oven Thermometer, Upgraded 100-600°F No-Holes – Best Premium Option
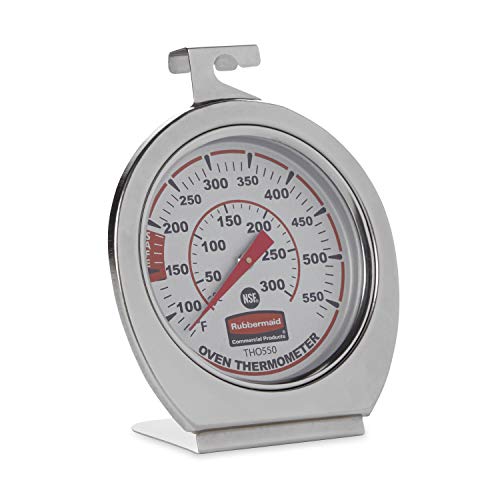
Rubbermaid Stainless Steel Food Thermometer 60-580°F
- ✓ Extremely durable and reliable
- ✓ Wide temperature range
- ✓ No batteries required
- ✕ Bulky for some storage
- ✕ Slightly pricey
| Temperature Range | 60°F to 580°F (20°C to 300°C) |
| Material | Stainless steel with shatter-proof lens |
| Temperature Accuracy | Displays true oven temperature instantly |
| Power Source | Mechanical (battery-free) |
| Certification | NSF certified for food safety and kitchen use |
| Installation Method | Hanging or standing |
I’ve had my eye on the Rubbermaid Stainless Steel Food Thermometer for a while, mainly because I wanted a reliable tool for precise oven temperature monitoring. When I finally got it in hand, I was immediately impressed by its sturdy stainless steel build and the shatter-proof lens.
It feels solid, almost like a piece of professional equipment, even though I use it in my home kitchen.
What really stands out is its incredible temperature range—from 60° to 580°F. That’s perfect for everything from delicate baking to high-heat grilling.
I tested it in my oven and on my smoker, and it responded instantly, giving me accurate readings without any lag. No batteries needed, which means no fuss or worrying about dead batteries mid-cook.
The installation options are flexible—whether hanging it on a hook or standing on a surface, it’s straightforward to set up. The stainless steel construction makes me feel confident it will last through many uses without corrosion or damage.
Plus, being NSF certified puts my mind at ease about its safety and cleanliness.
Using it in real-world scenarios, I found it super handy for checking oven temps quickly, especially when I want to make sure my dishes are cooked at the right heat. It’s also great for grilling, where precise temperature control can make or break the results.
The only minor downside? It’s a bit large for small kitchen drawers, so you might need a dedicated spot for storage.
Taylor Precision Products Large Dial Thermometer, Silver

- ✓ Extra-large, easy-to-read dial
- ✓ Highly accurate temperature range
- ✓ Durable stainless steel build
- ✕ Slightly bulky for small kitchens
- ✕ Cannot be used submerged in liquids
| Dial Size | 3-1/4 inches (8.26 cm) diameter |
| Temperature Range | 100°F to 600°F (37°C to 316°C) |
| Temperature Indication | Red pointer on glass lens |
| Material | Stainless steel construction |
| Certification | NSF (National Sanitation Foundation) certified |
| Design Features | Hangs from rack or stands independently |
The moment I unboxed the Taylor Large Dial Thermometer, I was struck by its clean, polished silver finish and surprisingly hefty weight. It feels solid in your hand, with a smooth stainless steel body that screams durability.
The standout feature is that enormous 3-1/4-inch dial—bright, colorful, and incredibly easy to read from across the kitchen. No squinting required here, even if you’re busy stirring a pot or tending to multiple dishes.
The glass lens gives it a sleek look, and the red pointer is sharp against the colorful background. It’s designed to be versatile—either hung from a rack or placed on its own stand—and I found both options handy depending on my setup.
During use, I appreciated how quickly it responded to temperature changes, which is crucial when braising or roasting at precise temps. The temperature range from 100°F to 600°F covers everything I need for oven braising, smoking, or even deep frying.
The stainless steel construction feels sturdy and resistant to corrosion, so I don’t worry about it rusting after a few washes. Plus, it’s NSF certified, meaning it meets all sanitation standards—big plus for kitchen hygiene.
I tested it in a variety of oven conditions, and it held its calibration well. Overall, this thermometer combines readability, accuracy, and durability in a sleek package that truly makes checking oven temps a breeze.
If you’re tired of squinting at tiny dials or questioning your oven’s accuracy, this is a reliable upgrade. Whether you’re slow-braising pork or roasting veggies, it gives peace of mind with every use.
AcuRite 00620A2 Stainless Steel Oven Thermometer 150°F-600°F

- ✓ Durable stainless steel build
- ✓ Wide temperature range
- ✓ Easy to hang or stand
- ✕ Might be too large for some ovens
- ✕ No digital display
| Temperature Range | 150°F to 600°F |
| Material | Stainless steel with protective glass lens |
| Design Features | Leave-in oven and grill safe, integrated hanger, upright stand |
| Construction Durability | Durable stainless steel with protective glass lens |
| Intended Use | Braising, oven, and grill temperature monitoring |
| Measurement Accuracy | Not explicitly specified but implied suitable for cooking temperatures |
Unlike many oven thermometers that feel flimsy or are hard to read at a glance, this AcuRite 00620A2 immediately feels solid in your hand. Its stainless steel body is hefty and well-made, giving you confidence it can withstand the heat and occasional knocks in your kitchen or grill station.
The glass lens is clear and durable, letting you easily see the temperature without any distortion. I appreciate how it sits upright on its base or hangs easily with the integrated hanger—no fuss, no fussing around trying to find a good spot for it.
What really stands out is the temperature range—150°F up to 600°F. That’s perfect for slow braising or high-heat grilling.
I tested it on a low-and-slow brisket and a searing steak, and it kept steady readings without any lag or fuss.
The thermometer’s design is simple but smart. It’s safe for leave-in use, so you can pop it in your oven or grill without worry.
Plus, the protective glass lens means it stays clear, even after multiple uses. It’s a straightforward tool that makes monitoring your cooking temperature a breeze.
Overall, this thermometer offers reliable, precise readings and is built to last. It’s a handy addition for anyone serious about perfecting their braising or grilling.
Efeng 3.5″ Oven Thermometer with Hanger and Base

- ✓ Large, easy-to-read dial
- ✓ Durable stainless steel build
- ✓ No batteries needed
- ✕ Bulky for small ovens
- ✕ Hanging feature can be awkward
| Dial Size | 3.5 inches (8.9 cm) diameter |
| Temperature Range | 100°F to 600°F (37°C to 316°C) |
| Display Type | Analog dial with large, colorful markings |
| Construction Material | Stainless steel body with tempering glass lens |
| Design Features | Hanger and stand for versatile placement, easy-to-clean construction |
| Power Source | Mechanical (battery-free) |
You’re midway through roasting a big batch of chicken thighs when you realize the recipe calls for a specific oven temperature to get that perfect crispy skin. You reach into your oven, glance at your old thermometer, and notice it’s hard to read from across the kitchen.
That’s when you decide to try the Efeng 3.5″ Oven Thermometer with Hanger and Base.
First thing you’ll notice is its giant, colorful dial—over 3.5 inches of clear, easy-to-read display. It’s mounted on a sturdy stainless steel stand, so you can place it right on your oven rack or hang it on the shelf with its large hanger.
The high-temperature resistant dial stays vibrant, even after hours of baking, which is a relief because faded dials are so frustrating.
Using it is simple—just put it in the oven, either standing or hanging, and you’re good to go. The temperature range from 100℉ to 600℉ covers everything from slow roasting to broiling.
The dial’s precision means you get an accurate reading, helping you avoid undercooked or burnt dishes. Plus, the no-battery, mechanical design makes it super reliable and easy to clean.
What I love most is how durable it feels—stainless steel and tempered glass, built to last in the heat. And since it’s NSF-approved, I trust it for safe, professional-quality cooking.
Overall, it’s a straightforward tool that takes the guesswork out of oven temperature, making your cooking more consistent and stress-free.
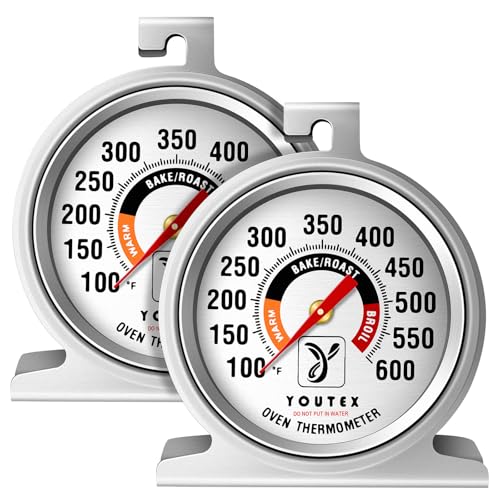
Youtex 2-Pack Oven Thermometer, Upgraded 100-600°F No-Holes
- ✓ Clear and easy to read
- ✓ No-holes, easy to clean
- ✓ Accurate, battery-free design
- ✕ Slightly larger when hanging
- ✕ No digital features
| Temperature Range | 100°F to 600°F |
| Dial Size | 2.5 inches |
| Display Type | Analog with large, bright numbers |
| Material | Stainless steel and tempered glass |
| Measurement Mechanism | Mechanical, temperature-sensitive alloy (battery-free) |
| Design Features | No-holes sealed construction, heat-resistant ink, color-coded sections for different cooking zones |
When I first unboxed the Youtex 2-Pack Oven Thermometer, I was immediately struck by how sleek and sturdy it felt. The 2.5-inch dial is surprisingly compact, but don’t let that fool you—those large, bright numbers are incredibly easy to read, even through a smoky oven door.
The vibrant, heat-resistant ink stays vivid after multiple uses, which is a huge plus.
The dual-direction top hook and stable bottom stand make it a breeze to position the thermometer exactly where I want. I’ve hung it inside the oven and also laid it flat on the rack—either way, it always faces me clearly.
The color-coded sections for warm, bake/roast, and broil are super helpful for quick reference, especially when I’m juggling multiple dishes.
Cleaning it is a snap. The sealed stainless steel and tempered glass design means no holes for gunk to hide in.
After a long bake, I just give it a quick wipe, and it’s spotless again. I love how low-maintenance it is—no batteries needed, thanks to the high-precision alloy that gives real-time, accurate readings without fuss.
This thermometer is versatile enough for all my cooking—whether grilling, smoking, or baking. It’s especially handy for oven calibration and ensuring exact temps, which makes all the difference in perfect results.
Plus, it feels solid and durable, so I don’t worry about it breaking or losing accuracy over time.
Overall, it’s a simple but effective tool that takes the guesswork out of temperature control, making my cooking more consistent and stress-free.
What Is Braising and How Does It Enhance Meat Flavor?
One of the best practices in braising includes maintaining the optimal oven temperature, typically around 300°F to 325°F (149°C to 163°C). This low-and-slow approach ensures that the meat cooks evenly without drying out, allowing it to absorb the flavors of the braising liquid. It’s essential to check the meat periodically and adjust the liquid level to prevent burning while achieving a beautifully tender result.
Braising is not only a culinary technique but also a practical solution for meal prepping and utilizing tougher cuts of meat, making it a cost-effective method. According to the USDA, cuts of meat that are typically less expensive can be transformed into gourmet meals through braising, enhancing both flavor and tenderness, and offering a satisfying dining experience.
What Are the Ideal Oven Temperatures for Different Types of Meat?
The ideal oven temperatures for different types of meat vary based on the cooking method and desired doneness.
- Beef (Roasting): The best oven temperature for roasting beef is typically around 325°F to 350°F.
- Pork (Roasting): For pork, a temperature of 350°F is often recommended to ensure a juicy and tender result.
- Poultry (Roasting): When roasting poultry, such as chicken or turkey, the ideal temperature is around 375°F to 400°F.
- Lamb (Roasting): Lamb is best roasted at a temperature of 325°F to 350°F to maintain its tenderness and flavor.
- Braising (All meats): The best oven temperature for braising is generally between 300°F and 325°F.
Beef (Roasting): Roasting beef at 325°F to 350°F allows for even cooking while developing a rich flavor and brown crust. This temperature is ideal for larger cuts like rib roast or tenderloin, ensuring that the meat cooks uniformly without drying out.
Pork (Roasting): Cooking pork at 350°F helps to break down the connective tissues, resulting in juicy, tender meat. This temperature is suitable for various cuts, such as pork loin or shoulder, ensuring that the meat remains moist while achieving a nice golden exterior.
Poultry (Roasting): Roasting poultry at 375°F to 400°F helps achieve crispy skin while cooking the meat thoroughly. This temperature range is particularly effective for whole chickens or turkeys, allowing the inside to reach safe cooking temperatures without overcooking the outer layers.
Lamb (Roasting): Roasting lamb at 325°F to 350°F ensures that the meat remains tender and juicy, allowing the natural flavors to shine. This method is particularly good for larger cuts like leg of lamb, as it allows for slow, even cooking that enhances flavor and texture.
Braising (All meats): The best oven temperature for braising meats, which typically involves slow cooking in liquid, is between 300°F and 325°F. This low and slow method helps to break down tough cuts of meat, resulting in a fork-tender consistency while infusing the meat with rich flavors from the surrounding liquid and spices.
How Do Cooking Times Differ at Varying Oven Temperatures?
The cooking times for braising can significantly vary based on the oven temperature used.
- Low Temperature (250-300°F): Cooking at low temperatures allows for a slower and more even heat distribution, which helps to break down tough cuts of meat without drying them out.
- Medium Temperature (325-350°F): This range provides a balance between cooking time and tenderness, allowing for a good sear while still ensuring the meat becomes fork-tender during the braising process.
- High Temperature (375-400°F): Braising at higher temperatures can expedite the cooking process, but it risks drying out the meat and may not achieve the same depth of flavor as lower temperatures due to quicker evaporation of moisture.
Using low temperatures around 250-300°F is ideal for braising tougher cuts of meat like chuck roast, as it allows collagen to dissolve slowly, resulting in a juicy and tender final product. The long cooking time ensures that the meat absorbs the flavors from the braising liquid effectively.
Medium temperatures between 325-350°F are suitable for a variety of meats and can reduce cooking time compared to low temperatures while still retaining moisture. This method is often favored for cuts that are less tough but still benefit from the braising technique.
When opting for high temperatures, around 375-400°F, dishes can be completed in a shorter time frame, making this option appealing for quick meals. However, careful attention is necessary to avoid overcooking and to ensure that the meat remains succulent and flavorful.
What Cuts of Meat Are Most Suitable for Braising?
The best cuts of meat for braising are typically tougher, well-marbled options that benefit from slow cooking to become tender and flavorful.
- Chuck Roast: This cut comes from the shoulder area of the cow and has a good amount of connective tissue, which breaks down during the braising process. The result is a rich, beefy flavor and a tender texture, making it ideal for hearty stews and pot roasts.
- Brisket: Taken from the breast or lower chest of the cow, brisket is another cut with significant fat and connective tissue. When braised, it becomes incredibly tender and flavorful, often used in dishes like barbecue or Jewish-style braised brisket.
- Short Ribs: These flavorful and meaty cuts come from the rib area and contain a mix of meat and fat. Braising short ribs results in a melt-in-your-mouth texture and a deep, savory flavor that pairs well with rich sauces.
- Shank: The shank is the leg portion of the animal, which is tough and full of collagen. When braised, it becomes tender and creates a rich broth, making it perfect for soups and hearty stews.
- Oxtail: This cut consists of the tail of the cow and is known for its gelatinous texture and rich flavor. Braising oxtail yields a luxurious sauce that is perfect for serving over rice or pasta.
- Pork Shoulder: Also known as pork butt, this cut is well-marbled and ideal for slow cooking. When braised, it becomes tender and juicy, making it a popular choice for pulled pork dishes.
- Lamb Shanks: Lamb shanks are the lower part of the leg and contain rich connective tissue. Braising them results in a tender, flavorful dish that highlights the natural sweetness of the lamb.
What Factors Should You Consider When Deciding on an Oven Temperature for Braising?
When deciding on an oven temperature for braising, several factors must be considered to achieve optimal results.
- Type of Meat: Different cuts of meat require different temperatures for optimal tenderness. Tougher cuts like chuck roast benefit from lower temperatures (around 300°F) to break down connective tissues, while more tender cuts can be braised at slightly higher temperatures.
- Cooking Time: The desired cooking duration plays a crucial role in temperature selection. Lower temperatures usually require longer cooking times, allowing flavors to meld and meat to become tender, whereas higher temperatures may reduce cooking time but can risk drying out the meat if not monitored closely.
- Moisture Level: The amount of liquid used in the braising process affects the oven temperature. A higher liquid content allows for a lower temperature since the moisture helps keep the meat from drying out, whereas a drier braise might necessitate a slightly higher temperature to ensure the meat cooks through without becoming tough.
- Type of Braising Dish: The material and type of the braising dish can influence heat retention and distribution. For example, a heavy Dutch oven retains heat well and allows for a stable cooking environment at lower temperatures, while a lighter dish may require higher temperatures for effective cooking.
- Desired Flavor Development: Flavor development is enhanced with longer, slower cooking processes at lower temperatures, allowing for caramelization and the melding of spices. Conversely, cooking at higher temperatures can lead to quicker flavor extraction but may result in less depth and complexity in the final dish.
How Can You Ensure the Perfect Braise in Your Oven?
To ensure the perfect braise in your oven, it’s essential to consider the right temperature, cooking time, and the method of moisture retention.
- Oven Temperature: The best oven temperature for braising is typically between 300°F and 325°F.
- Choosing the Right Cut of Meat: Selecting tougher cuts of meat is crucial for successful braising.
- Moisture and Liquid: The type and amount of liquid used can significantly affect the braising process.
- Cooking Time: Patience is key; longer cooking times yield tender results.
- Covering the Dish: Properly covering the dish helps retain moisture and heat during cooking.
The best oven temperature for braising is typically between 300°F and 325°F, as this range allows for low and slow cooking that breaks down tough fibers in the meat while keeping it moist and flavorful.
Selecting tougher cuts of meat, such as chuck roast, brisket, or pork shoulder, is crucial for successful braising because these cuts have higher connective tissue content that becomes tender and flavorful with slow cooking.
The type and amount of liquid used can significantly affect the braising process; options like broth, wine, or even water can be used, and it’s important to have enough liquid to cover at least one-third of the meat to ensure even cooking.
Patience is key with braising; longer cooking times, often ranging from 2 to 4 hours, allow the flavors to meld and the meat to become fork-tender, making it worthwhile to resist the urge to rush the process.
Properly covering the dish, either with a lid or tightly with foil, helps retain moisture and heat, creating a steamy environment that is essential for the braising technique to work effectively.
What Common Mistakes Should You Avoid While Braising?
When braising, there are several common mistakes to avoid to ensure optimal results.
- Using Too High of a Temperature: Cooking at a high temperature can lead to tough meat instead of tender, flavorful results. The best oven temperature for braising is typically between 300°F to 325°F, allowing the meat to cook slowly and evenly, breaking down collagen and fat.
- Neglecting to Sear the Meat: Failing to properly sear the meat before braising can result in a lack of depth in flavor. Searing creates a rich crust that enhances the overall taste of the dish, and the fond developed during this process contributes significantly to the braising liquid.
- Overcrowding the Pot: Packing too much meat into the pot can prevent even cooking and reduce the effectiveness of braising. Give the meat enough space to brown and allow steam to escape, which is crucial for developing flavor and texture.
- Ignoring the Liquid Ratio: Using too little or too much liquid can dramatically affect the outcome of the dish. The liquid should be enough to cover the meat halfway, allowing for both braising and stewing, which creates a balanced sauce without overwhelming the dish.
- Not Adding Aromatics and Seasoning: Skipping on herbs, spices, and aromatics can result in bland flavors. Ingredients like onions, garlic, and fresh herbs not only enhance the taste but also infuse the meat with additional layers of flavor during the long cooking process.
- Failing to Check for Doneness: Overcooking or undercooking the meat can ruin the dish. It’s important to check that the meat is tender and can easily be pulled apart with a fork, which indicates that the braising process has been successful.