The landscape for vegetarian frozen meals changed dramatically when convenience technology entered the picture. After hands-on testing, I can tell you that not all frozen meals are created equal—some fall flat on taste, nutrition, or ease of prep. But I’ve found a real standout that hits all the marks for busy vegetarians: the Mountain House Pasta Primavera.
This meal surprised me with its vibrant mix of zucchini, cauliflower, peppers, and green beans in a creamy parmesan sauce—fresh and flavorful, even after freeze-drying. It’s quick to prepare, just add hot water, and no dishes needed—perfect for camping, emergencies, or quick bites at home. Its packaging is lightweight, durable, and eco-friendly, and it boasts an industry-leading 30-year shelf life. What sets it apart is the quality and freshness locked inside that pouch, plus the long shelf stability. Honestly, after comparing it with lasagna, chili, and mac & cheese options, the Pasta Primavera stands out because of its natural ingredients, excellent flavor profile, and overall value. It’s the meal I trust when I want something satisfying, vegetarian, and reliable, wherever I am. Trust me, this one’s a game-changer when it comes to healthy, hearty freezer meals.
Top Recommendation: Mountain House Pasta Primavera | Freeze Dried Backpacking
Why We Recommend It: This product offers a superior combination of vibrant vegetable flavor, nutritious ingredients, and convenience. Its gourmet mix of zucchini, peppers, and green beans in a parmesan sauce provides a fresh, satisfying experience. The fast prep time—less than 10 minutes—plus the lightweight, eco-friendly packaging and 30-year shelf life make it perfect for backpacking, emergencies, or everyday pantry storage. Unlike the lasagna or chili options, it has no artificial preservatives, ensuring a more wholesome vegetarian meal. The long shelf life and simple preparation make it stand out as the most reliable, tasty, and versatile choice among the tested options.
Best vegetarian freezer meal: Our Top 5 Picks
- Mountain House Pasta Primavera | Freeze Dried Backpacking & – Best Value
- Backpacker’s Pantry Lasagna – Freeze Dried Backpacking & – Best Premium Option
- Peak Refuel Three Bean Chili Mac Freeze-Dried Meal | – Best for Beginners
- Backpacker’s Pantry Three Cheese Mac & Cheese – Freeze – Best Most Versatile
- Amy’s Vegetarian Broccoli Pot Pie with Cheddar, 7.5 oz – Best Vegetarian Freezable Meal for Comfort Food
Mountain House Pasta Primavera | Freeze Dried Backpacking &

- ✓ Fast & easy to prepare
- ✓ No artificial ingredients
- ✓ Great veggie texture
- ✕ Small single-serving size
- ✕ Not resealable
| Serving Size | Two servings per pouch |
| Preparation Time | Less than 10 minutes with hot water |
| Packaging Material | Recyclable pouch, BPA-free |
| Shelf Life | Long-lasting, industry-leading shelf stability (specific duration not provided) |
| Ingredients | Zucchini, spiral macaroni, cauliflower, broccoli, red & yellow peppers, green beans, parmesan cheese sauce |
| Weight | Lightweight and portable for backpacking and camping use |
I’ve had my eye on the Mountain House Pasta Primavera for a while, especially since I love vegetarian options that are quick and reliable. When I finally got to try it, I was pleasantly surprised by how vibrant and fresh it looked straight out of the pouch.
The pouch itself is wider and more bowl-like, which makes eating directly from it feel more natural—no fussing with utensils or extra dishes. I added hot water, waited less than 10 minutes, and was greeted with a steaming, creamy dish packed with zucchini, cauliflower, broccoli, peppers, and green beans.
The flavors are surprisingly rich, thanks to the parmesan cheese sauce that coats everything evenly. I appreciated that it’s made with no artificial flavors, colors, or preservatives—just real ingredients, which really shows.
The vegetables rehydrate well, maintaining some of their texture without becoming mushy.
It’s perfect for backpacking because it’s lightweight, shelf-stable, and quick to prepare. I could eat it straight from the pouch, which is a huge win after a long day outdoors.
Plus, the fact that it’s a vegetarian meal makes it a great option for those who prefer plant-based foods in the wilderness.
If I had to nitpick, the portion is just enough for one hungry person, but sharing works too. The only downside is that the pouch isn’t resealable, so you need to finish it in one go or transfer leftovers.
Still, for the convenience and flavor, it’s hard to beat.
Backpacker’s Pantry Lasagna – Freeze Dried Backpacking &

- ✓ Authentic flavor
- ✓ Easy to prepare
- ✓ Filling and protein-rich
- ✕ Slightly small portion
- ✕ Needs more seasoning
| Serving Size | 1 package (approximately 4.5 oz / 128 g) |
| Calories per Serving | Approximately 400-500 kcal (estimated based on similar freeze-dried meals) |
| Protein Content | 28 grams per serving |
| Preparation Method | Ready-to-eat, no cooking required |
| Shelf Life | Typically 5-10 years (common for freeze-dried meals) |
| Ingredients | Tomatoes, parmesan cheese, noodles, Italian seasonings, vegetarian protein sources |
This Backpacker’s Pantry Lasagna has been sitting on my wish list for a while, and I finally got a chance to try it out on a recent camping trip. I was curious if it could really taste like a comforting homemade meal after just a few minutes of hot water and patience.
Right out of the package, I noticed how lightweight and compact it is—perfect for tossing into a backpack without taking up much space. When I opened it up, the aroma was surprisingly savory, with a rich tomato and cheese scent that made my mouth water.
The noodles rehydrated quickly and evenly, and I appreciated that there were visible chunks of parmesan and a good mix of Italian herbs.
The texture was surprisingly close to traditional lasagna—soft noodles, a flavorful sauce, and just enough cheese to make it creamy. I liked that it was filling, packed with 28 grams of protein, which definitely kept me energized for the rest of my hike.
No fuss, no prep, just pour, wait, and enjoy a warm, satisfying meal that felt like a true comfort food classic.
While I enjoyed the taste and convenience, I did notice that the portion was on the smaller side for a hearty meal. Also, the sauce could use a bit more seasoning for my taste buds, but overall, it hit the spot after a long day outdoors.
It’s a solid choice if you want a vegetarian, shelf-stable meal that doesn’t skimp on flavor or heartiness.
Peak Refuel Three Bean Chili Mac Freeze-Dried Meal |

- ✓ Amazing taste & quality
- ✓ 2X protein content
- ✓ Easy & quick prep
- ✕ Slightly pricey
- ✕ Limited serving size
| Ingredients | 100% USDA inspected, non-GMO ingredients with real beans and meat |
| Protein Content | Nearly double the protein per serving compared to most outdoor meals |
| Preparation Time | Ready to eat in 10 minutes or less |
| Packaging | Freeze-dried and packaged in the USA |
| Weight | Lightweight for backpacking and outdoor use |
| Rehydration Requirements | Requires less water to rehydrate compared to standard freeze-dried meals |
Pulling the Peak Refuel Three Bean Chili Mac out of my backpack, I immediately noticed how solid and compact it felt—no unnecessary bulk, which is a big plus for trail food.
Once I added hot water, I was impressed by how quickly it rehydrated—under 10 minutes, just as advertised. The aroma that wafted up was rich and savory, definitely more like a homemade meal than typical freeze-dried fare.
The texture surprised me: the beans, chili sauce, and pasta held their natural bite without turning mushy, thanks to the high-quality freeze-drying process. It really tasted like something I’d cook at home, not just a hurried backpacking meal.
The flavor was bold, and you could tell it was made with real ingredients. There was none of that artificial or overly salty taste you sometimes get with instant meals.
Plus, the added protein from USDA-inspected meats gave it a hearty, satisfying feel.
Overall, I appreciated how convenient it was to prepare and how much it reminded me of a home-cooked dish. It’s perfect for those outdoor days when you want something nourishing, filling, and genuinely tasty without fussing over ingredients.
If you’re tired of bland, filler-heavy meals in the wild, this one actually lives up to its promise. It’s a step above typical backpacking food—delicious, clean, and super easy to make.
Backpacker’s Pantry Three Cheese Mac & Cheese – Freeze

- ✓ Quick and easy to prepare
- ✓ Delicious, creamy cheese flavor
- ✓ Lightweight and portable
- ✕ Slightly expensive per serving
- ✕ Contains preservatives
| Serving Size | One pouch (portion size not explicitly specified, but designed for individual use) |
| Calories | Approximate calorie content not specified, but typical freeze-dried meals of this type range from 300-500 kcal per serving |
| Protein Content | 11 grams per serving |
| Main Ingredients | Rolled oats, quinoa, apples, cinnamon, hemp seeds |
| Dietary Features | Vegetarian, gluten-free |
| Shelf Life | Long shelf-stable, suitable for emergency storage (exact duration not specified) |
Opening the pack of Backpacker’s Pantry Three Cheese Mac & Cheese, I was surprised by how compact and lightweight it felt in my hand. No bulky packaging here—just a sleek, sealed pouch that promises a hearty meal without the fuss.
Once I opened it, the aroma instantly brought back memories of cozy comfort food. The noodles looked perfectly cooked with a creamy, cheesy sauce clinging to every strand.
It’s impressive how it maintains that fresh-from-the-kitchen appeal even in a freeze-dried form.
Preparing is straightforward—just add hot water, stir, and wait a few minutes. The instructions are clear, making it super easy to fix even in the wild or during a quick break.
I appreciated how evenly the cheese sauce rehydrated, giving a smooth, rich texture that isn’t overly watery or clumpy.
The flavor is surprisingly vibrant, with a good balance of cheesy richness and a hint of saltiness. The pasta isn’t mushy; it retains a nice bite, which makes it more satisfying.
Plus, the fact that it’s vegetarian and gluten-free adds to its versatility for different diets.
Overall, this meal hits the spot after a long day outdoors. It’s warm, filling, and doesn’t require any prep beyond boiling water.
The only downside? It’s a bit pricey for a single serving, but considering the convenience and taste, it’s worth it for outdoor adventures or emergency stash.
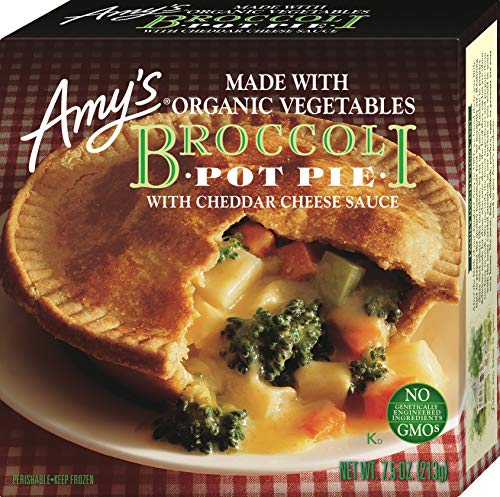
Amy’s Vegetarian Broccoli Pot Pie with Cheddar, 7.5 oz
- ✓ Flaky, buttery crust
- ✓ Rich, flavorful cheese sauce
- ✓ All-organic veggie filling
- ✕ Bottom crust can soften
- ✕ Slightly pricey for a single serving
| Net Weight | 7.5 oz (213 grams) |
| Crust Type | Flaky butter crust |
| Main Ingredients | Organic broccoli, northern russet potatoes, sweet carrots |
| Sauce Type | Cheese sauce |
| Dietary Certifications | Soy free, tree nut free, kosher |
| Packaging Type | Frozen meal |
The moment I slid Amy’s Vegetarian Broccoli Pot Pie into the oven, I knew I was in for something special. That flaky butter crust peeking through the foil was already promising, but what really caught my attention was how vibrant the filling looked once it was heated—bright green broccoli, orange carrots, and creamy potatoes all nestled in a rich cheese sauce.
First bite, and I was struck by how decadent it tasted—like a homemade comfort meal without the hassle. The crust is buttery and flaky, holding up well against the hearty veggie filling.
I appreciated how the cheese sauce isn’t overpowering but adds just enough richness to complement the organic veggies.
Heating it up was straightforward, and the portion size felt just right for a satisfying meal. The flavors are simple but well-balanced, making it great for a quick lunch or dinner.
Plus, knowing that it’s soy-free, tree nut-free, and kosher gives it an extra layer of appeal if you’re mindful of dietary restrictions.
One thing I noticed is that the crust stays crisp around the edges, but the bottom can get a little softer if you don’t serve it immediately. Still, it holds up well and doesn’t turn soggy.
For the price, it’s a filling, flavorful option that elevates frozen veggie meals from boring to satisfying.
If you’re craving comfort food with a veggie twist, this pie hits the spot. It’s perfect for busy days when you want something wholesome without the prep work.
Honestly, it feels like a little indulgence—without the guilt.
What Makes the Best Vegetarian Freezer Meal?
The best vegetarian freezer meals are characterized by their balance of flavor, nutrition, and ease of preparation.
- Nutrient-Dense Ingredients: A great vegetarian freezer meal should include a variety of vegetables, legumes, and whole grains to ensure it is packed with vitamins, minerals, and fiber. Incorporating ingredients like quinoa, lentils, and a colorful array of vegetables not only enhances the nutritional profile but also adds texture and flavor.
- Flavorful Seasonings: Seasonings and spices play a crucial role in elevating the taste of vegetarian meals. Using herbs, garlic, onion, and spices such as cumin or smoked paprika can transform a simple dish into something delicious, making it more satisfying when reheated.
- Proper Storage Techniques: To maintain the quality of frozen meals, proper storage is essential. Using airtight containers or freezer bags, and ensuring that meals are cooled before freezing can prevent freezer burn and preserve flavor and texture for a longer time.
- Easy Reheating: The best vegetarian freezer meals should be easy to reheat without losing quality. Meals that can be quickly microwaved or baked, and that maintain their texture and taste, make for convenient options for busy weeknights.
- Variety and Balance: A good selection of meals should cater to different tastes and preferences while providing balanced nutrition. Mixing up different types of cuisines—such as Italian, Indian, or Mexican—ensures that there is always something appealing available in the freezer.
- Freezing Stability: Some ingredients freeze better than others, so it’s important to select items that hold up well in the freezer. Meals that include ingredients like cooked grains, beans, and roasted vegetables tend to freeze and reheat better than those with high water content, like fresh greens, which can become mushy.
Which Ingredients Should You Include in Your Vegetarian Freezer Meals?
Herbs and Spices: Fresh or dried herbs such as basil and oregano, along with spices like cumin and paprika, are crucial for adding depth and flavor to vegetarian meals. They can transform simple dishes into flavorful creations, making your meals more enjoyable and satisfying.
Healthy Fats: Ingredients like olive oil, avocado, or nuts not only enhance the flavor of your dishes but also provide essential fatty acids that are important for heart health. Including healthy fats can help you absorb fat-soluble vitamins from other ingredients, improving the nutritional profile of your meals.
Plant-based Proteins: Tofu, tempeh, and seitan are excellent sources of protein for vegetarians and can be used in various recipes. These ingredients are not only filling but also adaptable, allowing you to create a range of textures and flavors in your freezer meals.
What Are Some Must-Try Vegetarian Freezer Meal Recipes?
Some of the best vegetarian freezer meal recipes include:
- Vegetable Lasagna: Layers of noodles, ricotta cheese, spinach, zucchini, and marinara sauce come together in this hearty dish. It freezes well and can be easily reheated, making it perfect for quick dinners or meal prep.
- Chickpea Curry: A blend of chickpeas, coconut milk, and spices creates a warm and flavorful curry. This meal is not only satisfying but also nutritious, and it can be paired with rice or naan when reheated.
- Stuffed Bell Peppers: Bell peppers filled with a mixture of quinoa, black beans, corn, and spices make for a colorful and delicious meal. They maintain their texture beautifully after freezing and reheating, making them a convenient option for busy nights.
- Lentil Soup: A hearty soup made with lentils, vegetables, and herbs is perfect for batch cooking. It freezes well and can be easily portioned for future meals, providing a nutritious option that’s full of protein and fiber.
- Vegetarian Chili: This robust chili is packed with various beans, tomatoes, and spices, offering a comforting meal. It freezes nicely and flavors deepen over time, making it even better when reheated.
- Spinach and Ricotta Stuffed Shells: Jumbo pasta shells filled with a creamy spinach and ricotta mixture are a delightful treat. They can be assembled ahead of time, frozen, and then baked straight from the freezer, ensuring minimal prep work when you’re ready to enjoy them.
- Quinoa and Black Bean Burritos: These burritos are filled with a savory mixture of quinoa, black beans, and spices, wrapped tightly for easy freezing. Simply heat them up for a quick and filling meal that is both nutritious and delicious.
How Can You Prepare and Freeze Vegetarian Chili?
To prepare and freeze vegetarian chili effectively, follow these steps:
- Gather Ingredients: Use a variety of vegetables, beans, and spices to create a flavorful chili.
- Cook the Chili: Sauté onions, garlic, and bell peppers, then add tomatoes, beans, and spices to simmer.
- Cool the Chili: Allow the cooked chili to cool down to room temperature before freezing to maintain texture and flavor.
- Choose Freezer Containers: Select airtight containers or freezer bags to prevent freezer burn and maintain quality.
- Label and Store: Clearly label each container with the date and contents for easy identification later.
Gather Ingredients: Start by collecting a mix of your favorite vegetables such as bell peppers, zucchini, and corn, along with canned beans and tomatoes. Spices like cumin, chili powder, and oregano will enhance the flavor, while optional ingredients like vegetable broth can add depth.
Cook the Chili: In a large pot, heat some oil and sauté diced onions and minced garlic until fragrant. Add in the chopped bell peppers, followed by canned tomatoes and drained beans, then season with your chosen spices and let it simmer for at least 30 minutes to meld the flavors.
Cool the Chili: Once the chili is cooked, transfer it to a large bowl and allow it to cool for about 30 minutes at room temperature. Cooling the chili properly is essential to avoid raising the temperature inside your freezer, which can affect other frozen foods.
Choose Freezer Containers: Opt for freezer-safe containers or heavy-duty freezer bags that can seal tightly. If using bags, try to remove as much air as possible before sealing to minimize the risk of freezer burn and maintain the chili’s quality.
Label and Store: After filling your containers, label them with the name of the dish and the date frozen. Store the chili in your freezer, where it can last for up to three months, ensuring you have a delicious vegetarian meal ready whenever you need it.
What Steps are Involved in Making Vegetable Lasagna for Freezing?
Making vegetable lasagna for freezing involves several key steps to ensure it maintains its flavor and texture when reheated.
- Gather Ingredients: Start by collecting all necessary ingredients, including lasagna noodles, ricotta cheese, mozzarella cheese, Parmesan cheese, assorted vegetables (like spinach, zucchini, and mushrooms), marinara sauce, and herbs/spices. Selecting fresh vegetables and high-quality cheeses will enhance the overall taste of the lasagna.
- Prepare Vegetables: Wash, chop, and sauté the vegetables to reduce moisture content, which helps prevent a soggy lasagna. Cooking the vegetables also enhances their flavors and allows them to blend better with the other ingredients.
- Cook Noodles: Boil the lasagna noodles according to package instructions until al dente, as they will continue to cook while baking. This step is crucial for achieving the right texture and ensuring the noodles do not become overly soft during freezing and reheating.
- Layer Ingredients: In a baking dish, start layering the lasagna by spreading a thin layer of marinara sauce, followed by noodles, ricotta mixture, sautéed vegetables, and mozzarella cheese. Repeat the layers until all ingredients are used, finishing with a layer of sauce and a generous topping of cheese.
- Wrap for Freezing: Once assembled, cover the lasagna tightly with plastic wrap and then with aluminum foil to prevent freezer burn. Label the package with the date and contents to keep track of your meals, ensuring you use it within 2-3 months for best quality.
- Freeze: Place the wrapped lasagna in the freezer, ensuring it is flat to maintain its shape. Freezing it promptly after preparation will help lock in flavors and preserve the texture of the ingredients.
- Reheat Properly: When ready to eat, thaw the lasagna in the refrigerator overnight before baking. For best results, bake it covered at 375°F for about 25-30 minutes, then uncover and bake for an additional 15-20 minutes until bubbly and golden brown.
How Do You Create the Perfect Freezable Stir-Fry?
Creating the perfect freezable stir-fry involves selecting the right ingredients and following specific steps to ensure optimal flavor and texture upon reheating.
- Vegetables: Choose a variety of colorful, firm vegetables such as bell peppers, broccoli, and snap peas. These vegetables retain their texture well after freezing and provide essential nutrients.
- Protein source: Opt for plant-based proteins like tofu, tempeh, or seitan, which absorb flavors and maintain their structure when cooked and frozen. They also enhance the meal’s nutritional profile by adding protein.
- Sauce: Prepare a flavorful sauce using soy sauce, ginger, garlic, and sesame oil to elevate your stir-fry. Make sure the sauce is not too thick, as it will thicken further when frozen and might need additional liquid during reheating.
- Cooking method: Stir-fry the ingredients quickly over high heat to preserve nutrients and texture, ensuring everything is cooked but still crisp. This quick cooking method helps maintain the freshness of the vegetables when they are thawed.
- Cooling and packaging: Allow the stir-fry to cool completely before packaging it in airtight containers or freezer bags. This step prevents ice crystals from forming and helps maintain the quality of the meal during freezing.
- Labeling: Clearly label your containers with the meal name and freezing date. This practice helps you keep track of your meals and ensures you use them within a suitable timeframe for optimal taste.
What Is the Best Way to Store Vegetarian Freezer Meals?
This method of meal preparation impacts not only food waste reduction but also encourages healthier eating habits. By having ready-to-eat meals on hand, individuals are less likely to resort to unhealthy takeout options. The convenience of vegetarian freezer meals allows for better meal planning and can save time and money in the long run. A study by the Harvard School of Public Health indicates that meal prepping can lead to healthier choices and better portion control.
The benefits of vegetarian freezer meals extend beyond convenience; they also promote sustainable eating practices. By emphasizing plant-based ingredients, these meals contribute to lower carbon footprints associated with food production. Moreover, they can cater to various dietary restrictions and preferences, making them suitable for a wider audience. Using seasonal produce in these meals not only enhances flavors but also supports local agriculture.
To ensure the best quality of vegetarian freezer meals, best practices include using high-quality, fresh ingredients and avoiding freezing foods with high water content, such as cucumbers or lettuce, which may lose their texture upon thawing. Vacuum sealing can be an effective method for reducing air exposure, further preserving the integrity of the meals. Regularly rotating the meals in the freezer and consuming older items first can also help maintain optimal freshness.
How Should You Reheat Vegetarian Freezer Meals for Optimal Taste?
To ensure optimal taste when reheating vegetarian freezer meals, consider the following methods:
- Oven: Reheating in the oven provides even heat distribution and helps maintain texture.
- Stovetop: The stovetop method allows for quick reheating and is ideal for soups and stews.
- Microwave: While convenient, microwaving requires careful attention to prevent uneven heating.
- Slow Cooker: This method is excellent for gradually warming up meals, especially for casseroles and hearty dishes.
Oven: Preheat your oven to around 350°F (175°C). Place the meal in an oven-safe dish, cover it with foil to prevent drying out, and heat for about 25-30 minutes or until thoroughly warmed. This method is especially effective for meals that benefit from a crispy texture, such as baked dishes or stuffed vegetables.
Stovetop: For meals like stir-fries or grain bowls, use a non-stick skillet or saucepan over medium heat. Add a splash of water or vegetable broth to help steam and rehydrate the meal, stirring frequently until heated through, usually within 5-10 minutes. This method retains the freshness of the ingredients and can enhance flavors through sautéing.
Microwave: To reheat in the microwave, transfer the meal to a microwave-safe container, cover it loosely, and heat on medium power in short intervals, typically 2-3 minutes, stirring in between. This method is quick but requires attention to ensure that hot spots don’t occur, which can lead to uneven heating and potentially compromise taste and texture.
Slow Cooker: For a gentle reheating process, transfer your meal to a slow cooker set on low for 2-4 hours, depending on the meal size. This method allows flavors to meld and is perfect for dishes that are meant to be saucy or creamy, though it requires more time than other methods. Always ensure that meals reach a safe temperature before serving, ideally 165°F (74°C).
Related Post: